by George Sruthin | Apr 4, 2022 | HCI, Servers, Troubleshooting, VMware Esxi
I recently faced this issue when downgrading HPE Simplivity Node, we were using Center v7 U2, and we have to shut down everything for this host downgrade.
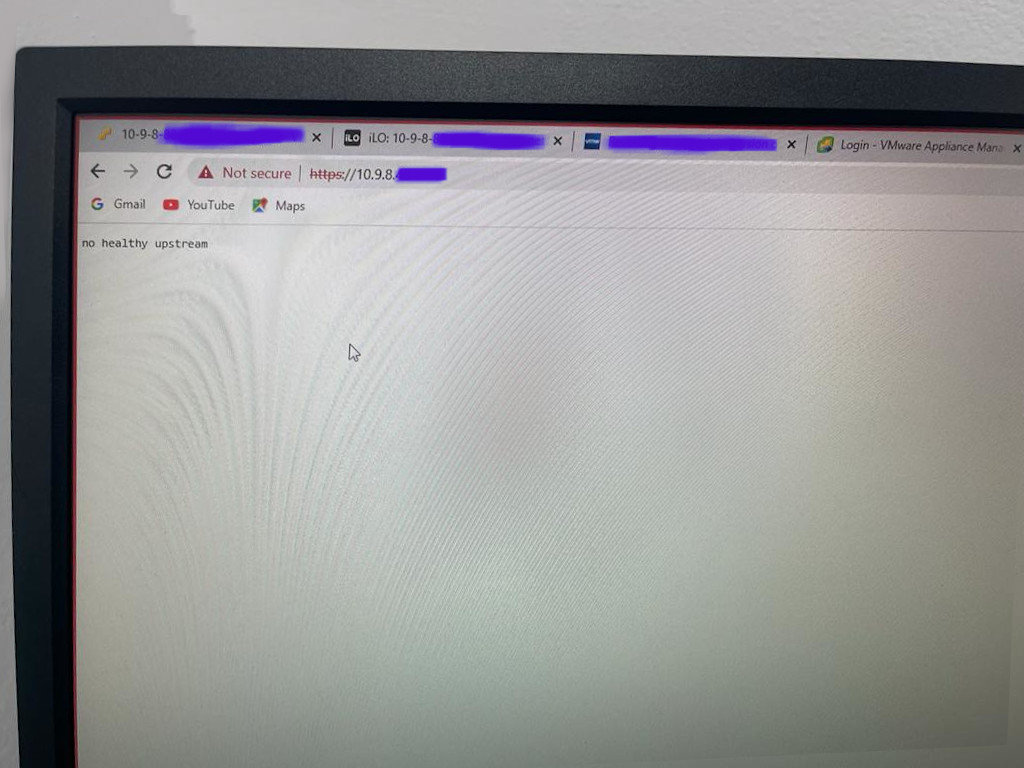
after the downgrade and adding additional SimpliVity node deployment was done, we tried to turn on vCenter but we cannot see GUI it says "no healthy upstream" and it looks like vpxd service not starting.
we tried to ssh to vCenter and try to restart "vmware-vpxd" several times, later we logged a case with VMware, immediately they called us and taken server remotely. and add esxi server IP to hosfile, I dont know why he did that. may be he wants vCenter to communicate with Esxi host properly kindly check this link for reference
later he relogged in to vCenter through ssh and tried to stop and restart all service and on another ssh he watch which service is up and running with in minutes issue got fixed. i will be pasting logs below for your reference.
SSH Connection 1
root@localhost [ /etc ]# vi hosts
root@localhost [ /etc ]# cat hosts
# Begin /etc/hosts (network card version)
10.9.8.120
127.0.0.1 localhost.localdomain
127.0.0.1 localhost
# End /etc/hosts (network card version)
root@localhost [ /etc ]# service-control --stop --all && service-control --start --all
Operation not cancellable. Please wait for it to finish...
Performing stop operation on service observability...
Successfully stopped service observability
Performing stop operation on service vmware-pod...
Successfully stopped service vmware-pod
Performing stop operation on service vmware-vdtc...
Successfully stopped service vmware-vdtc
Performing stop operation on profile: ALL...
Successfully stopped service vmware-vmon
Successfully stopped profile: ALL.
Performing stop operation on service vmcad...
Successfully stopped service vmcad
Performing stop operation on service vmdird...
Successfully stopped service vmdird
Performing stop operation on service vmafdd...
Successfully stopped service vmafdd
Performing stop operation on service lwsmd...
Successfully stopped service lwsmd
Operation not cancellable. Please wait for it to finish...
Performing start operation on service lwsmd...
Successfully started service lwsmd
Performing start operation on service vmafdd...
Successfully started service vmafdd
Performing start operation on service vmdird...
Successfully started service vmdird
Performing start operation on service vmcad...
Successfully started service vmcad
Performing start operation on profile: ALL...
Successfully started service vmware-vmon
Successfully started profile: ALL.
Performing start operation on service observability...
Successfully started service observability
Performing start operation on service vmware-vdtc...
Successfully started service vmware-vdtc
Performing start operation on service vmware-pod...
Successfully started service vmware-pod
root@localhost [ /etc ]#
SSH Connection 2
root@localhost [ ~ ]# watch service-control --status
Every 2.0s: service-control --status localhost: Thu Mar 31 16:17:48 2022
Running:
applmgmt lookupsvc lwsmd observability observability-vapi pschealth vlcm vmafdd vmcad vmdird vmonapi vmware-analytics vmware-certificateauthority vmware-certificatemanagement vmware-cis-license vm
ware-content-library vmware-eam vmware-envoy vmware-hvc vmware-infraprofile vmware-perfcharts vmware-pod vmware-postgres-archiver vmware-rhttpproxy vmware-sca vmware-sps vmware-statsmonitor vmware-
stsd vmware-topologysvc vmware-trustmanagement vmware-updatemgr vmware-vapi-endpoint vmware-vdtc vmware-vmon vmware-vpostgres vmware-vpxd vmware-vpxd-svcs vmware-vsan-health vmware-vsm vsphere-ui v
stats vtsdb wcp
Stopped:
vmcam vmware-imagebuilder vmware-netdumper vmware-rbd-watchdog vmware-vcha
Kudos to VMware team who fixed this issue, this way all of the services required for vCenter to start is up and running,
it is weird that some of the community members and blog post recommended to reset Bios time of Esxi node is correct and synchronized with vCenter, for us we already corrected Bios and (HPE) Intelligent provisioning time to same one because in future we may face issue with logs time stamp.
I Hope using above method might have fix your issue, or if you have any opinion about any good method let me know.
by Teffin Varghese | Oct 31, 2021 | Hosting, Howtos, Linux, Networking, OS, Review, Security, Servers, Troubleshooting, Unix, VPN, VPS, Vulnerability, Workstation
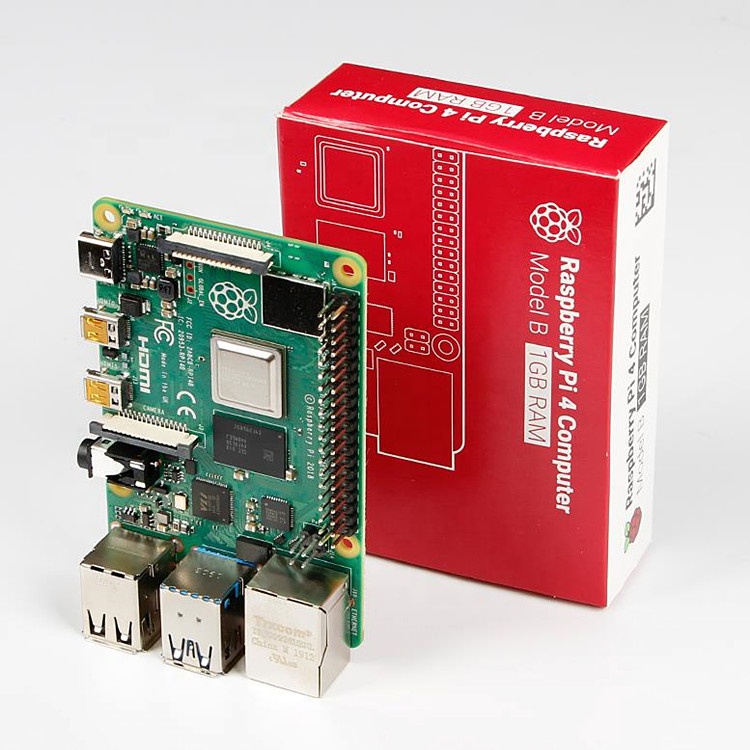
For the 64-Bit OS support we need to use Raspberry Pi 4
I’m using Raspberry Pi 4 Model-B With * Gigs of RAM, A 4GB RAM model would work just fine.
But First what is Raspberry Pi and what is it used for ?
he Raspberry Pi is a low cost, credit-card sized computer that plugs into a computer monitor or TV, and uses a standard keyboard and mouse.
It is a capable little device that enables people of all ages to explore computing, and to learn how to program in languages like Scratch and Python.
It’s capable of doing everything you’d expect a desktop computer to do, from browsing the internet and playing high-definition video, to making spreadsheets, word-processing, and playing games.
What’s more, the Raspberry Pi has the ability to interact with the outside world, and has been used in a wide array of digital maker projects, from music machines and parent detectors to weather stations and tweeting birdhouses with infra-red cameras.
We want to see the Raspberry Pi being used by kids all over the world to learn to program and understand how computers work.
Assemble and enclose the Raspberry Pi, We recommend a case with passive cooling or with a small fan and heat-sinks.
Yes of course you can the Pi without any case or cooling setup, But we recommend to use a cooling case for protection and better performance.
Download Kali-Linux Image from the official website.
You can get the download link from the below URL.
You need to select ARM image category, then choose the Raspberry Pi 64-bit Image.
Now you need to write this image to a Micro SD card, Which you are going to use it on your Raspberry Pi.
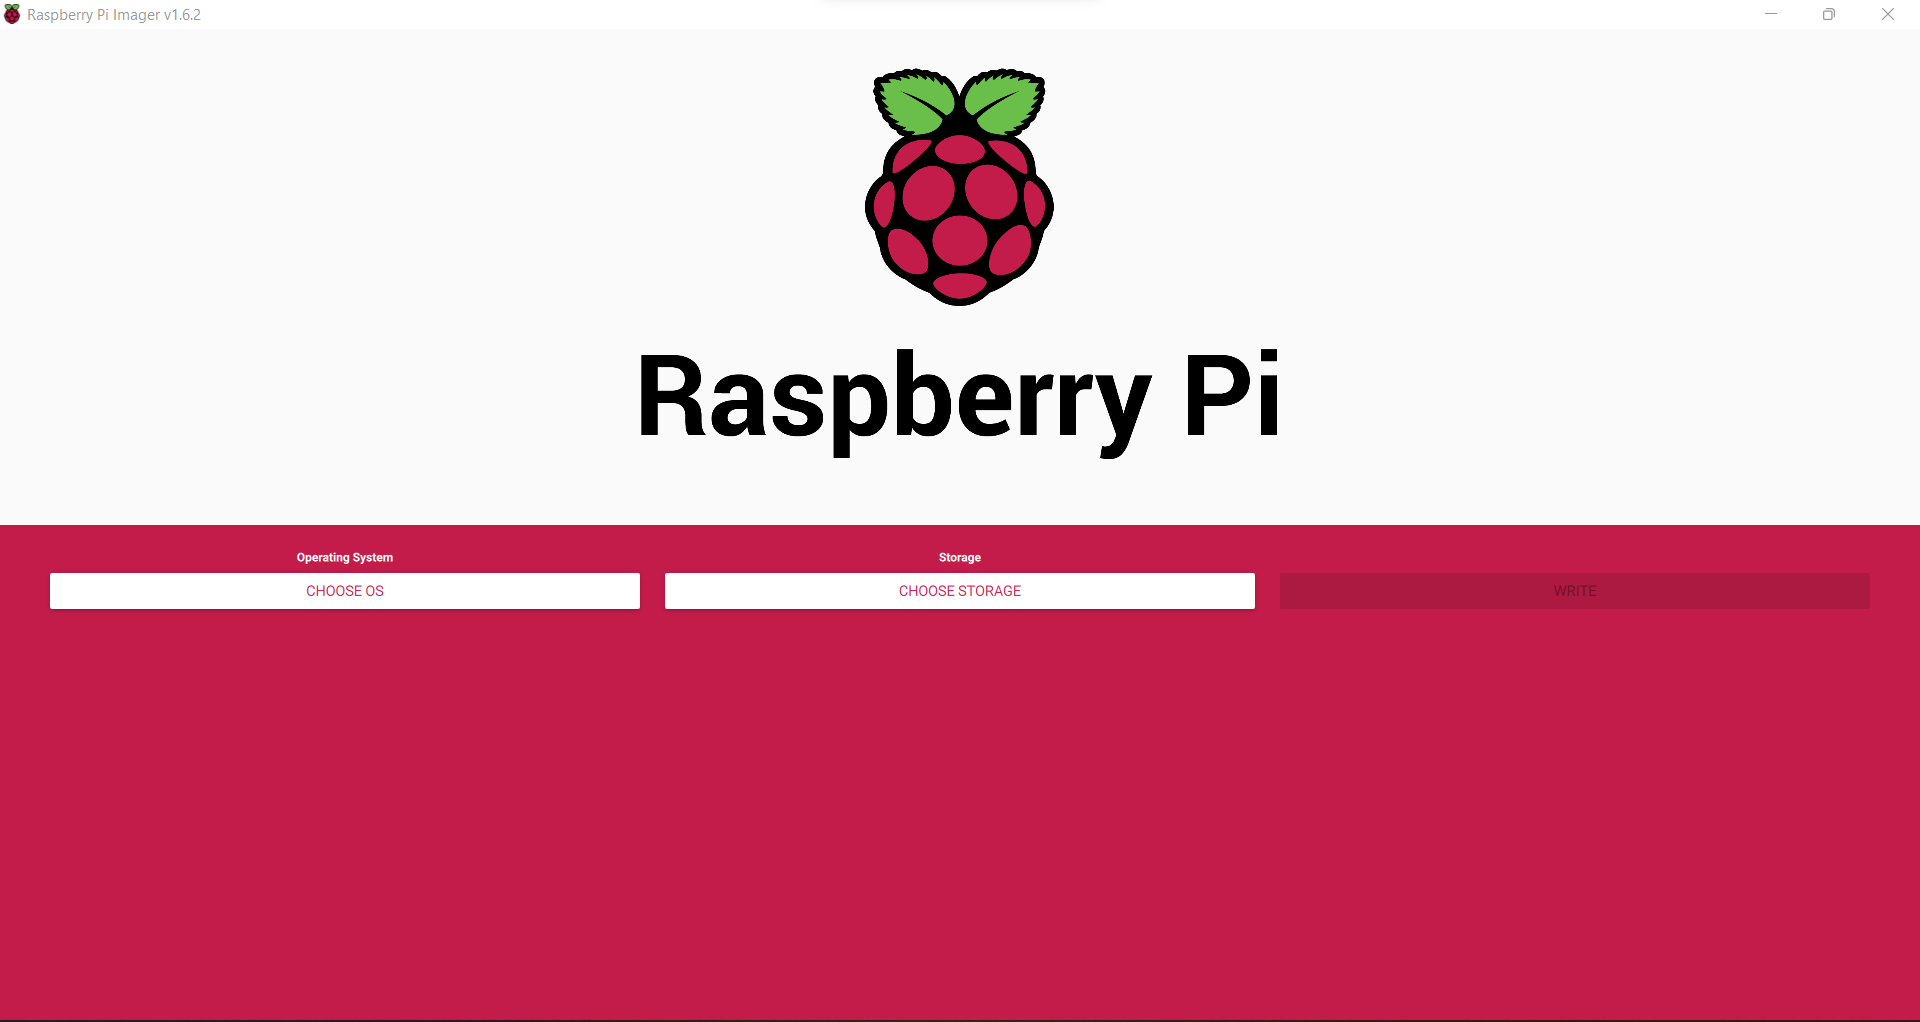
You can use either Balena Etcher or the official Raspberry Pi imager for this task.
Here we are using the official Raspberry Pi imager. You can download the imager from the following URL.
https://www.raspberrypi.com/software/
Here is the download link for Windows machines
https://downloads.raspberrypi.org/imager/imager_1.6.2.exe
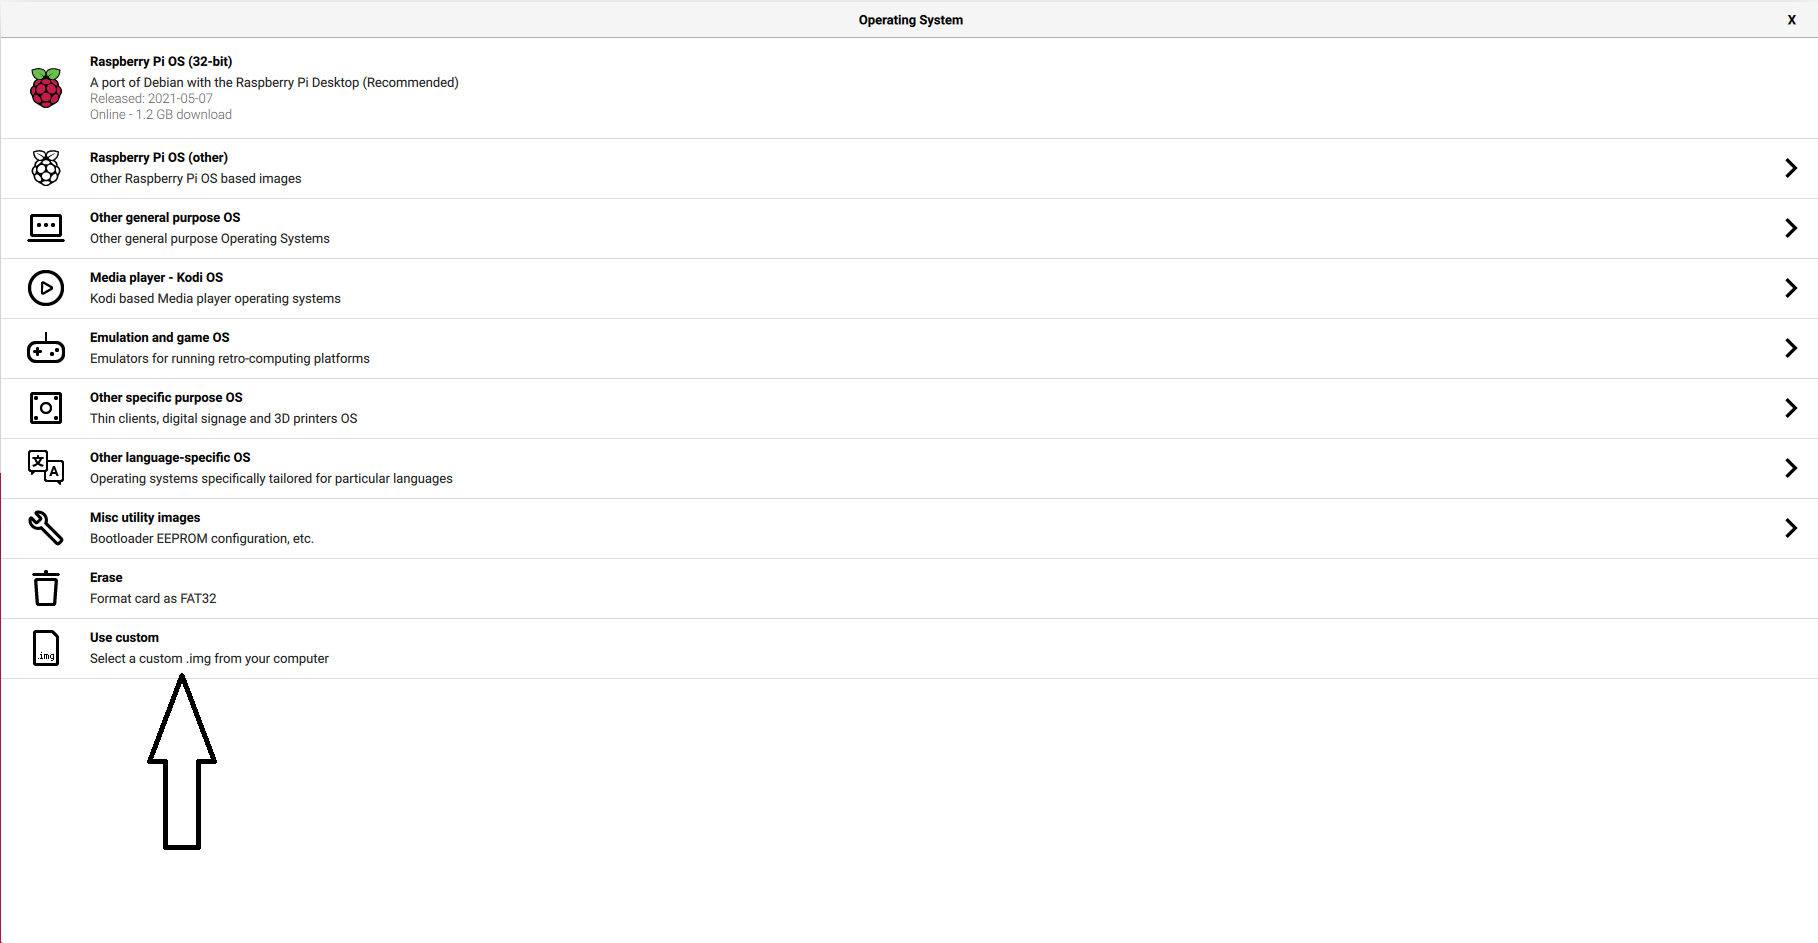
Write Kali-Linux image to the Micro SD-Card. Please follow the following images.
1, Launch the Pi Imager and select Choose OS.
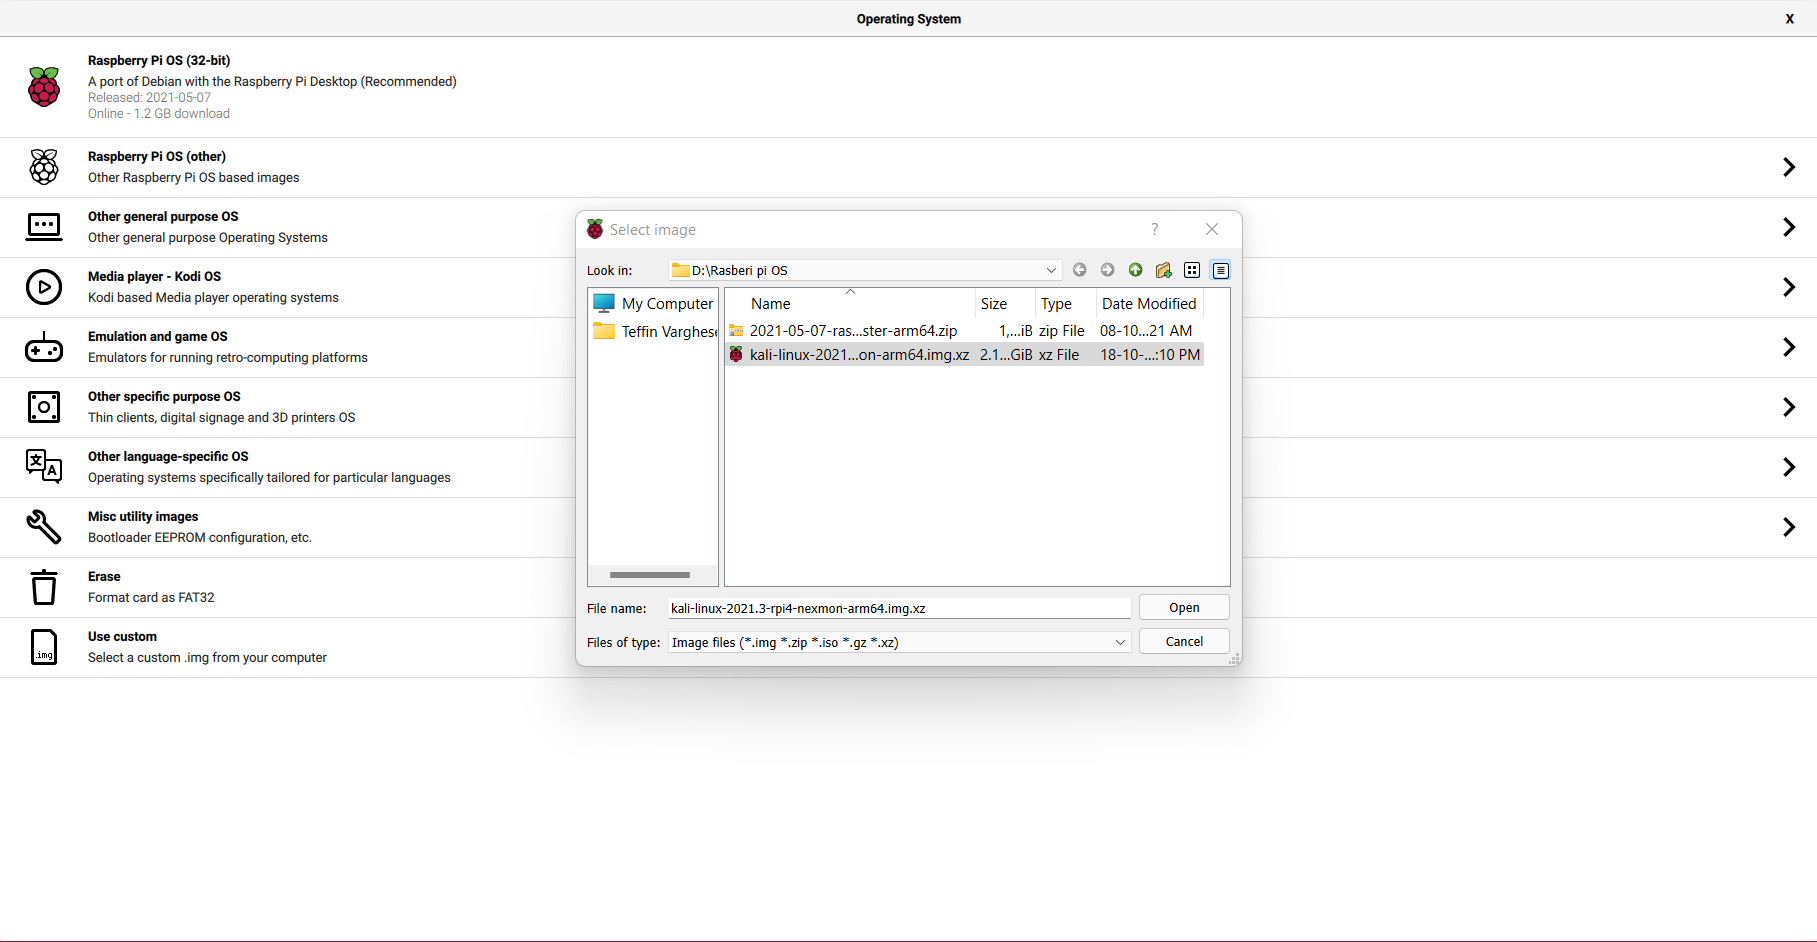
2, Select the option “Use Custome” for our Kali-Linux Image
3, Browse and choose the Kali-Linux Image we have downloaded from our PC.
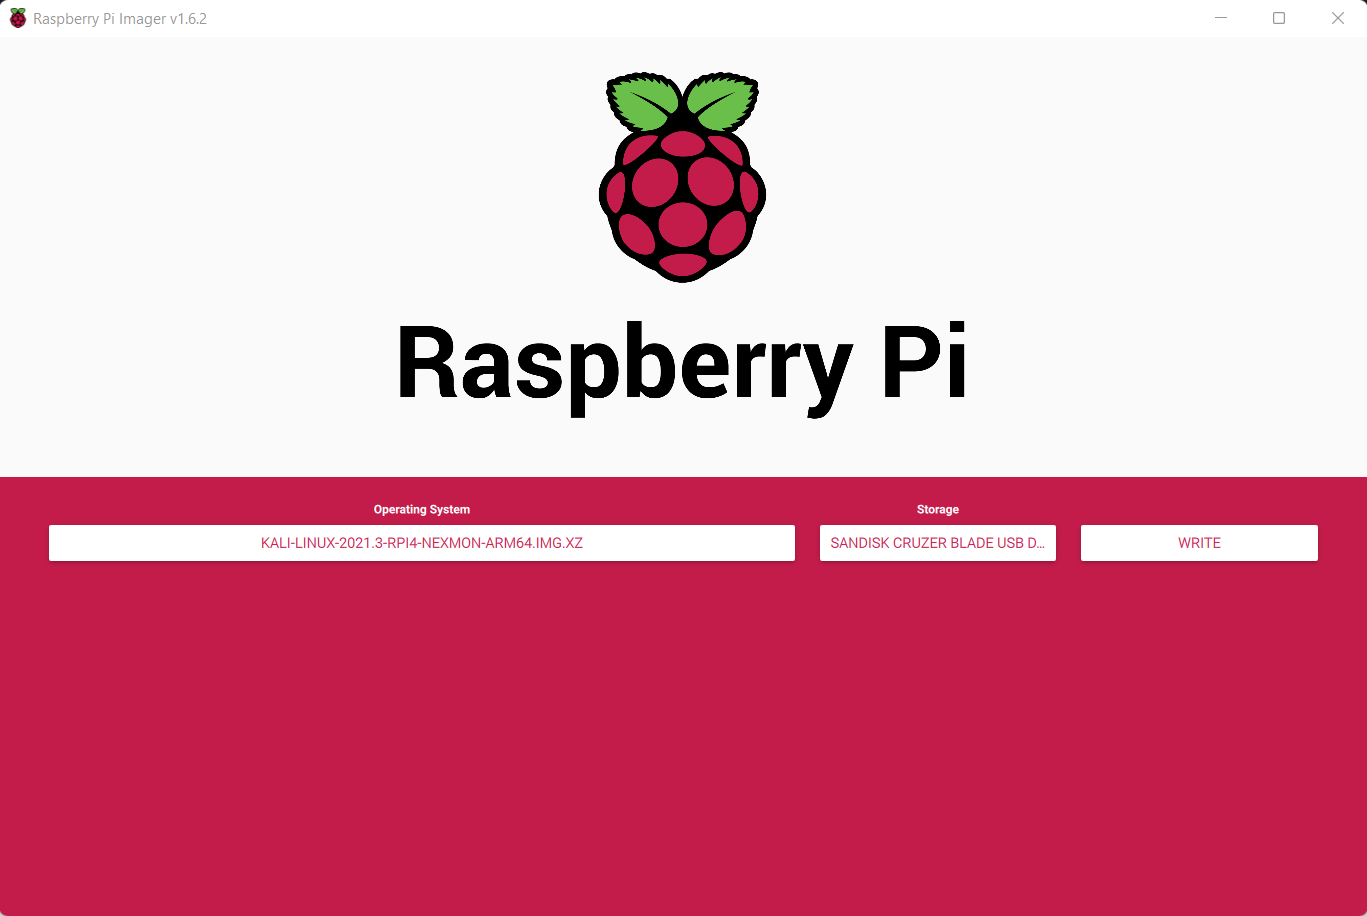
4, Now select storage and choose our micro SD-Card and click write to write the Image.
Note: Please make sure you have selected the correct storage, In our case the SD-Card. If you choose the wrong location the imager will wipe the selected storage location.
- step 5
Insert the Micro SD-card to your Raspberry Pi. Plug in your Raspberry Pi Power-Brick to the device and
connect your Pi to a monitor, also plugin your Mouse and Keyboard as well, Then power-on the power brick.
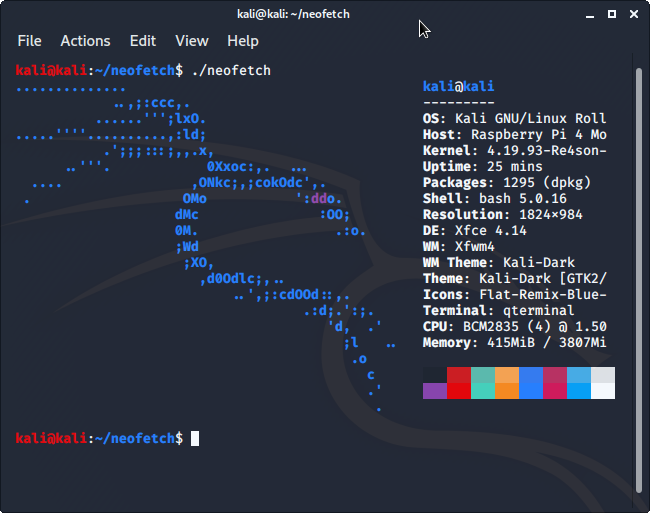
It will take some time for the initial bootup, Wait for it. If everything is perfect your Raspberry Pi will boot into Kali-Linux.
by Teffin Varghese | Sep 29, 2020 | Hosting, Howtos, Linux, OS, Servers, Troubleshooting, VPS
FreeBSD is an operating system used to power modern servers, desktops, and embedded platforms. A large community has continually developed it for more than thirty years. Its advanced networking, security, and storage features have made FreeBSD the platform of choice for many of the busiest web sites and most pervasive embedded networking and storage devices.
FreeBSD is a free and open-source Unix-like operating system descended from the Berkeley Software Distribution, which was based on Research Unix. The first version of FreeBSD was released in 1993.
Now lets check how can we reset forgotten root password in FreeBSD.
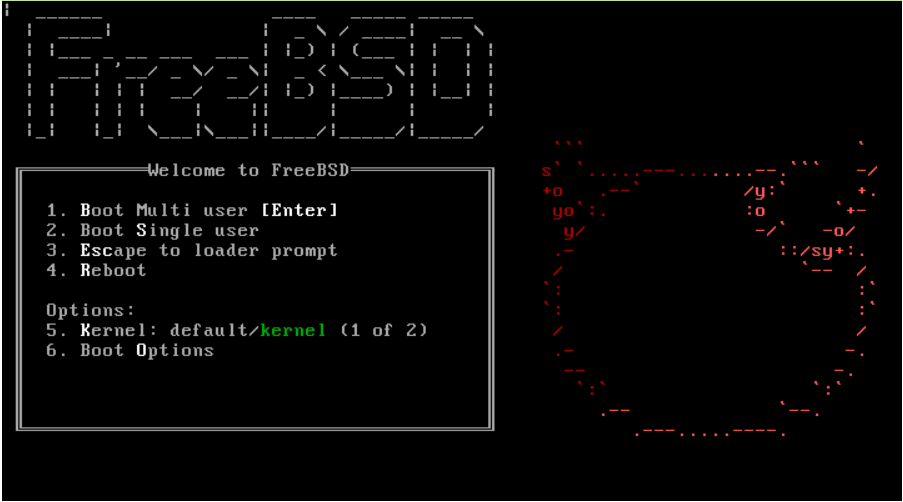
Step #1 : Reboot / Restart the server and boot into Single user mode.
You can press "S" at the boot prompt for entering the Single user mode.
Step #2: Mount the filesystem on the server.
root filesystem will be mounted read-only by default, you will need to remount it using the mount -ruw / command to give yourself read/write access. Run mount -a to remount all filesystems specified in the /etc/fstab file.
Step #3: Reset the root password.
You can reset the root password using the command passwd and set a new password on the server.
Step #4: Reboot the server.
That's it, when the server boots back to the OS you can login with the new password.
Cheers!!!
Please check our recent post about how to reset ubuntu server forgotten password.
by Teffin Varghese | Jul 16, 2020 | Howtos, Networking, News, OS, Security, Servers, Storages, Troubleshooting

Step 1: Identify the Adapter model
===========================
You can use the lspci command to view the details of the Adapter.
[root@localhost ~]# lspci | grep Mellanox
a1:00.0 Infiniband controller: Mellanox Technologies MT28908 Family [ConnectX-6]
Here our Adapter is Mellanox Technologies MT28908 Family [ConnectX-6]
Step 2: Download the OFED driver for the Adapter.
===================================================================================
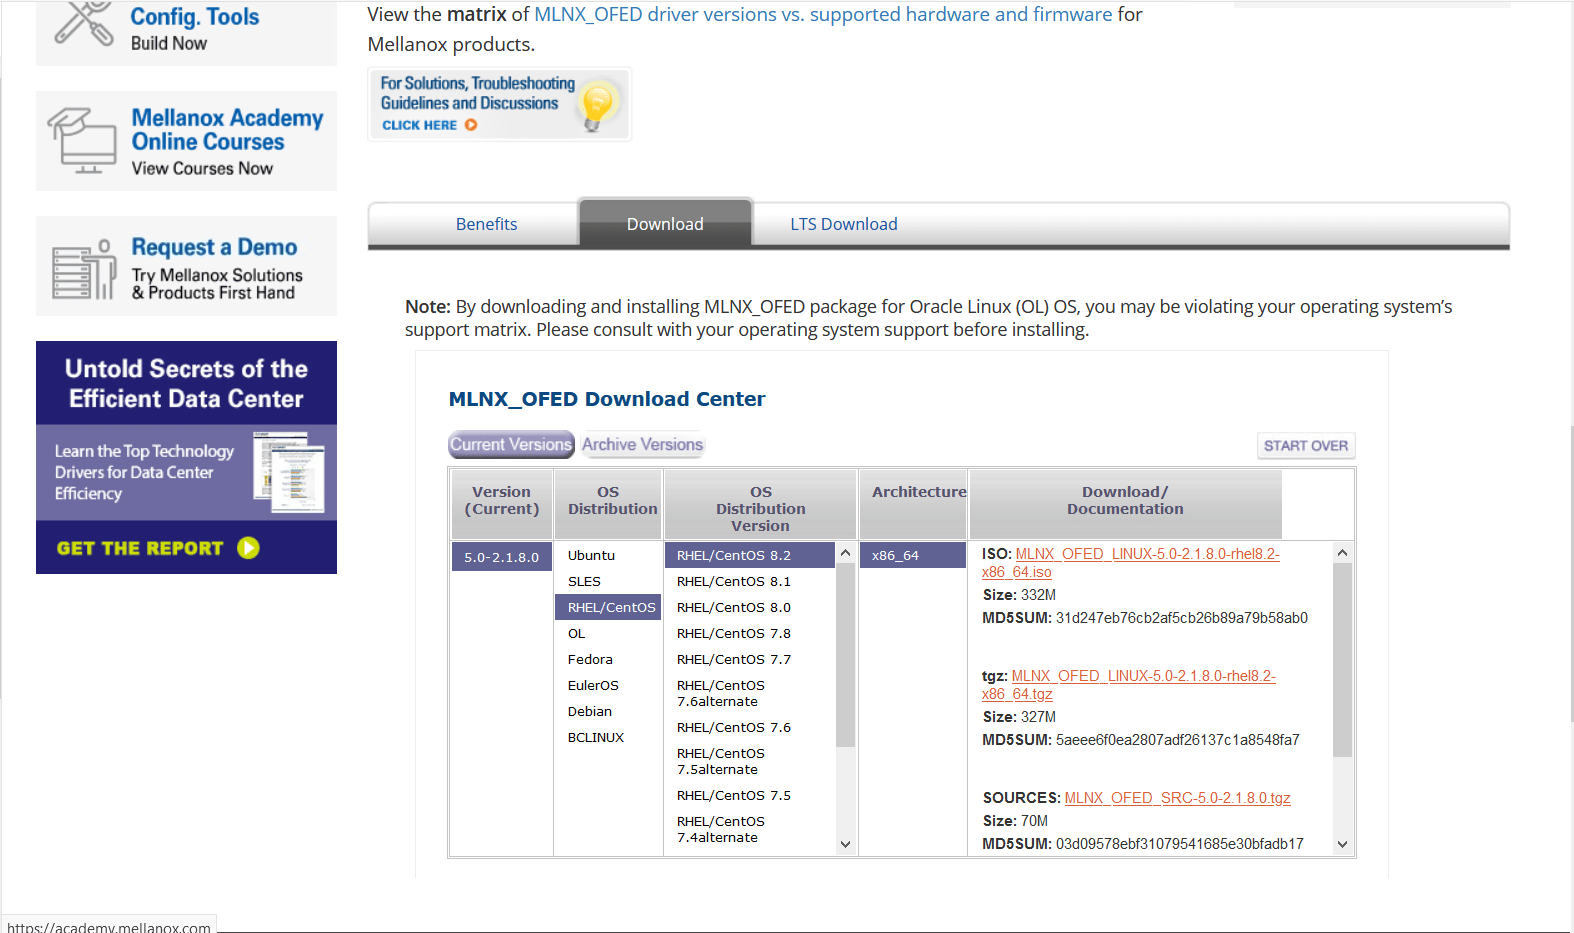
You can download the OFED driver from the below link and choose the OS and select the tar file for download.
https://www.mellanox.com/products/infiniband-drivers/linux/mlnx_ofed
https://www.mellanox.com/products/infiniband-drivers/linux/mlnx_ofed
You can use wget command to download the driver.
Example: wget http://content.mellanox.com/ofed/MLNX_OFED-5.0-2.1.8.0/MLNX_OFED_LINUX-5.0-2.1.8.0-rhel8.2-x86_64.tgz
http://content.mellanox.com/ofed/MLNX_OFED-5.0-2.1.8.0/MLNX_OFED_LINUX-5.0-2.1.8.0-rhel8.2-x86_64.tgz
Step 3: Extract the zip file.
============================================
Untar the zip file you have just downloaded
Example: tar -xvf MLNX_OFED_LINUX-5.0-2.1.8.0-rhel8.2-x86_64.tgz
Step 4: Navigate to the extracted directory.
======================================================================
Once you have extracted the tar file you can view a directory with the same name, navigate to the directory
by cd command
Example: cd MLNX_OFED_LINUX-5.0-2.1.8.0-rhel8.2-x86_64
Once you are in the directory please list the contents on the directory using a ls command.
and from the output you can view a script file name “mlnxofedinstall”
Step 5: Run the script file.
==========================================
You can run the script file using “./mlnxofedinstall”
Once you run the script the driver will be installed and once it is completed reload the driver or reboot the machine.
Note: The server must have Perl, python and GCC compilers for completing the driver installation.
If the installation run failed due to any unmet dependencies, please install the packages and libraries mentioned on the failed message.
Firmware upgrade.
————————–
Once the OFED driver is successfully installed then you can go with the firmware upgrade.
We are using the tool MSTFLINT for performing the firmware upgrade.
Step 1: First we need to identify the PCI bus ID of the adapter.
===========================================================================
Run “lspci | grep Mellanox” to determine the PCI bus ID
Example: [root@localhost ~]# lspci | grep Mellanox
a1:00.0 Infiniband controller: Mellanox Technologies MT28908 Family [ConnectX-6]
Here “a1:00.0” is our PCI bus ID.
Step 2: Download and unzip the Firmware Zip file.
=============================================================
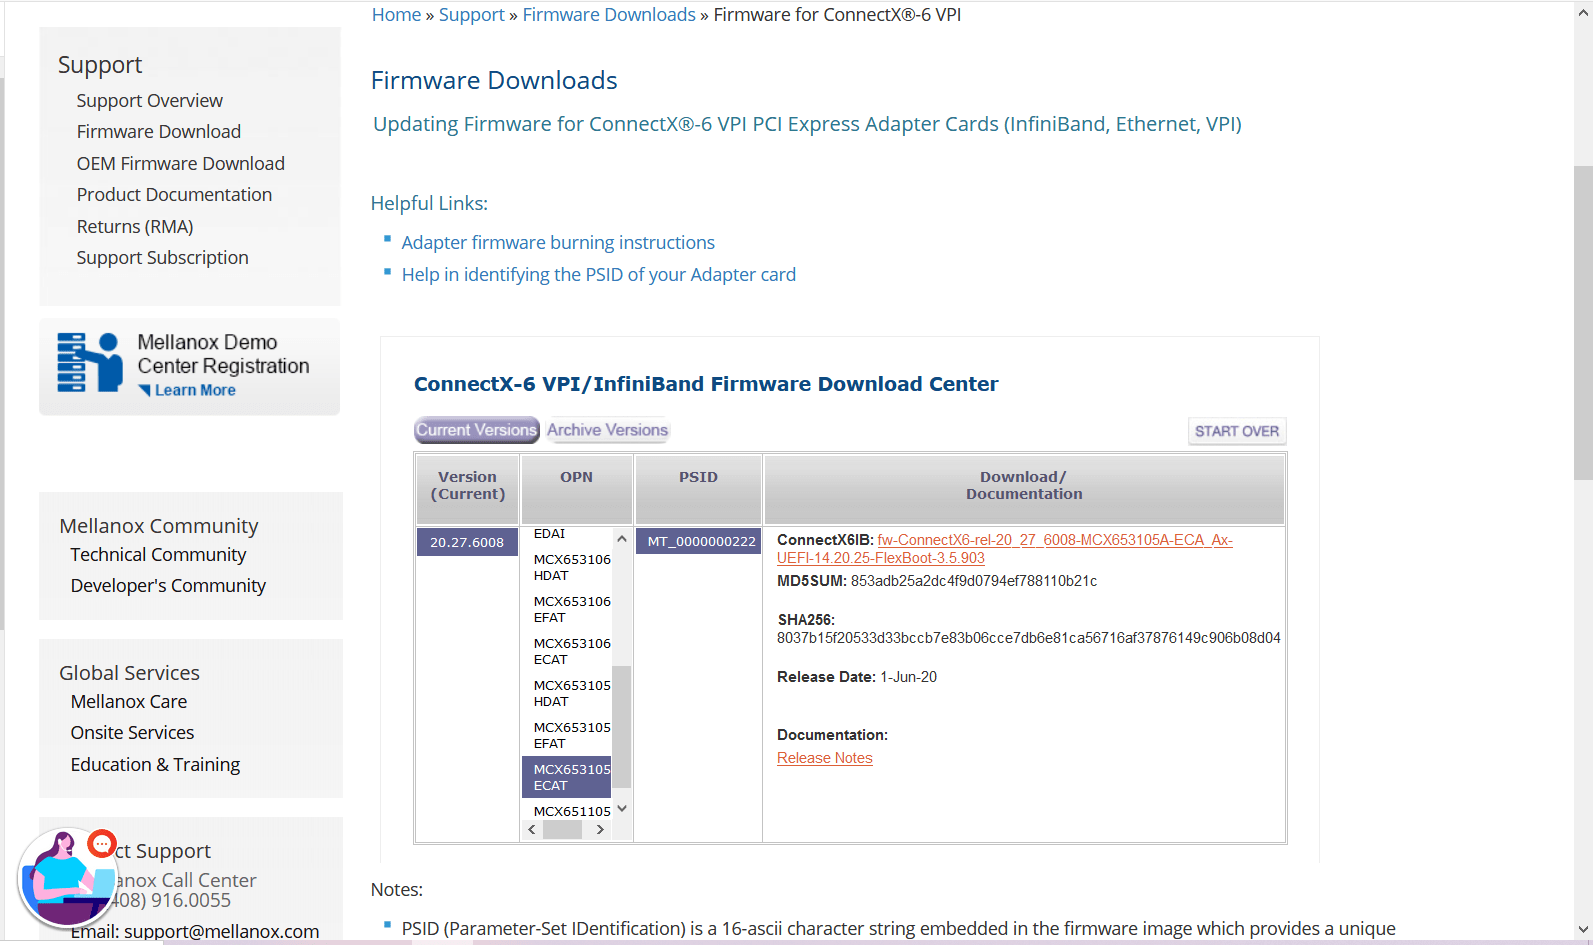
You can download the firmware from the official Mellanox website.
Link: https://www.mellanox.com/support/firmware/connectx6ib
https://www.mellanox.com/support/firmware/connectx6ib
Please download the firmware using “wget”
Example: wget http://www.mellanox.com/downloads/firmware/fw-ConnectX6-rel-20_27_6008-MCX653105A-ECA_Ax-UEFI-14.20.25-FlexBoot-3.5.903.bin.zip
http://www.mellanox.com/downloads/firmware/fw-ConnectX6-rel-20_27_6008-MCX653105A-ECA_Ax-UEFI-14.20.25-FlexBoot-3.5.903.bin.zip
Once it is downloaded unzip it by using the command “unzip”
Example: unzip fw-ConnectX6-rel-20_27_6008-MCX653105A-ECA_Ax-UEFI-14.20.25-FlexBoot-3.5.903.bin.zip
Once you unzip the file you can view a .bin file which is our firmware.
Example: fw-ConnectX6-rel-20_27_6008-MCX653105A-ECA_Ax-UEFI-14.20.25-FlexBoot-3.5.903.bin
Step3: Burn the firmware to the NIC.
============================================
You need the mstflint utility to update the firmware. You can download mstflint from the OpenFabrics site at mstflint_SW for Linux.
NOTE: If OFED is installed on your machine, then mstflint is already installed.
For burning the new firmware run
the command in the same directory as the firmware file, run “mstflint –d <PCI bus ID, i.e. 05:00.0> -i <.bin file> b”
Example: mstflint -d a1:00.0 -i fw-ConnectX6-rel-20_27_6008-MCX653105A-ECA_Ax-UEFI-14.20.25-FlexBoot-3.5.903.bin b
To load new FW run mstfwreset or reboot machine and check.
Example: [root@localhost ~]# ethtool -i ib0
driver: mlx5_core[ib_ipoib]
version: 5.0-2.1.8
firmware-version: 20.27.6008 (MT_0000000222)
expansion-rom-version:
bus-info: 0000:a1:00.0
supports-statistics: yes
supports-test: yes
supports-eeprom-access: no
supports-register-dump: no
supports-priv-flags: yes
Here “ib0” is our interface name, yours maybe different.
Please refer Mellanox documentation if you need any further details.
https://www.mellanox.com/products/adapter-software/firmware-tools https://www.mellanox.com/support/firmware/update-instructions
by Teffin Varghese | Jul 7, 2020 | Howtos, Linux, Networking, OS, Python, Security, Servers, Storages, Troubleshooting, Uncategorized, VMware Esxi, Workstation
How to upgrade 10G Intel NIC driver in Linux.
Step 1: Identify the NIC adapter on the server/machine.
For upgrading the NIC driver, First you need to identify the NIC model for that you can use “lspci” command.
Use the command “lspci | grep -i net” to list the PCIe devices. (Usually 10G NIC’s are plugged into the PCIe slots on the Motherboard)
Command: lspci | grep -i net
Sample Output:
04:00.0 Ethernet controller: Intel Corporation 82599ES 10-Gigabit SFI/SFP+ Network Connection (rev 01)
04:00.1 Ethernet controller: Intel Corporation 82599ES 10-Gigabit SFI/SFP+ Network Connection (rev 01)
06:00.0 Ethernet controller: Intel Corporation 82576 Gigabit Network Connection (rev 01)
06:00.1 Ethernet controller: Intel Corporation 82576 Gigabit Network Connection (rev 01)
Here our 10G adapter is Ethernet controller: Intel Corporation 82599ES 10-Gigabit SFI/SFP+ Network Connection (rev 01)
Step 2: Identify the active interface in the OS.
For identify the active interface just type “ip a” on the terminal, this will display the interfaces on the OS and from the list identify the active interface name.
Command: ip a
Sample Output:
1: lo: <LOOPBACK,UP,LOWER_UP> mtu 65536 qdisc noqueue state UNKNOWN
link/loopback 00:00:00:00:00:00 brd 00:00:00:00:00:00
inet 127.0.0.1/8 scope host lo
inet6 ::1/128 scope host
valid_lft forever preferred_lft forever
2: eth0: <BROADCAST,MULTICAST,UP,LOWER_UP> mtu 1500 qdisc pfifo_fast state UP qlen 1000
link/ether 32:36:65:64:66:34 brd ff:ff:ff:ff:ff:ff
inet x.x.x.x/x brd 50.7.126.127 scope global eth0
inet6 x:x:x::x/64 scope global
valid_lft forever preferred_lft forever
inet6 x::x:x:x:x/64 scope link
valid_lft forever preferred_lft forever
Step 3: Check the current driver version of the NIC.
For identifying the driver version use the command “ethtool -i <interface name>” Eg: ethool -i eth0
From the results you can view the current driver version. The output will be something like this.
Command: ethtool -i <interface name>
Sample Output:
driver: ixgbe
version: 4.2.1-k
firmware-version: 0x80000208
bus-info: 0000:04:00.0
supports-statistics: yes
supports-test: yes
supports-eeprom-access: yes
supports-register-dump: yes
supports-priv-flags: no
Here the “version: 4.2.1-k” indicates the current driver version of the NIC.
Step 4: Download the latest available driver from Intel.
Go to https://downloadcenter.intel.com/product/32609/Intel-82599-10-Gigabit-Ethernet-Controller
to download the required driver.
https://downloadcenter.intel.com/product/32609/Intel-82599-10-Gigabit-Ethernet-Controller
For Linux: https://downloadcenter.intel.com/download/14687/Ethernet-Intel-Network-Adapter-Driver-for-PCIe-Intel-10-Gigabit-Ethernet-Network-Connections-Under-Linux-?product=32609
https://downloadcenter.intel.com/download/14687/Ethernet-Intel-Network-Adapter-Driver-for-PCIe-Intel-10-Gigabit-Ethernet-Network-Connections-Under-Linux-?product=32609
Download the latest available driver from the above link.
Step 5: Install/upgrade the Driver.
To manually build the driver
—————————-
1. Move the base driver tar file to the directory of your choice.
For example, use ‘/home/username/ixgbe’ or ‘/usr/local/src/ixgbe’.
2. Untar/unzip the archive, where <x.x.x> is the version number for the
driver tar file:
# tar zxf ixgbe-<x.x.x>.tar.gz
3. Change to the driver src directory, where <x.x.x> is the version number
for the driver tar:
# cd ixgbe-<x.x.x>/src/
4. Compile the driver module:
# make install
The binary will be installed as:
/lib/modules/<KERNEL VER>/updates/drivers/net/ethernet/intel/ixgbe/ixgbe.ko
The install location listed above is the default location. This may differ
for various Linux distributions.
5. Load the module using the modprobe command.
To check the version of the driver and then load it:
# modinfo ixgbe
# modprobe ixgbe [parameter=port1_value,port2_value]
Alternately, make sure that any older ixgbe drivers are removed from the
kernel before loading the new module:
# rmmod ixgbe; modprobe ixgbe
Note: For certain distributions like (but not limited to) Red Hat Enterprise
Linux 7 and Ubuntu, once the driver is installed, you may need to update the
initrd/initramfs file to prevent the OS loading old versions of the ixgbe
driver.
Use the dracut utility on Red Hat distributions:
# dracut –force
For Ubuntu:
# update-initramfs -u
Step 6: Check and verify the new driver version.
Use the same command we used before “ethtool -i <interface name>” to view the driver version
Command: ethtool -i <interface name>
Sample Output:
driver: ixgbe
version: 5.7.1-k
firmware-version: 0x80000208
bus-info: 0000:04:00.0
supports-statistics: yes
supports-test: yes
supports-eeprom-access: yes
supports-register-dump: yes
supports-priv-flags: no
Note: Please read the read me file available from Intel before proceeding.
That’s all for now. CHEERS!!!