by George Sruthin | Aug 11, 2026 | Security
Passwords are still one of the easiest ways for attackers to gain access to online accounts. Unfortunately, many people still reuse the same password across multiple websites or store passwords in places that are not designed for secure password management.
As the number of online accounts continues to grow, remembering a different strong password for every service becomes difficult. This is where password managers can help.
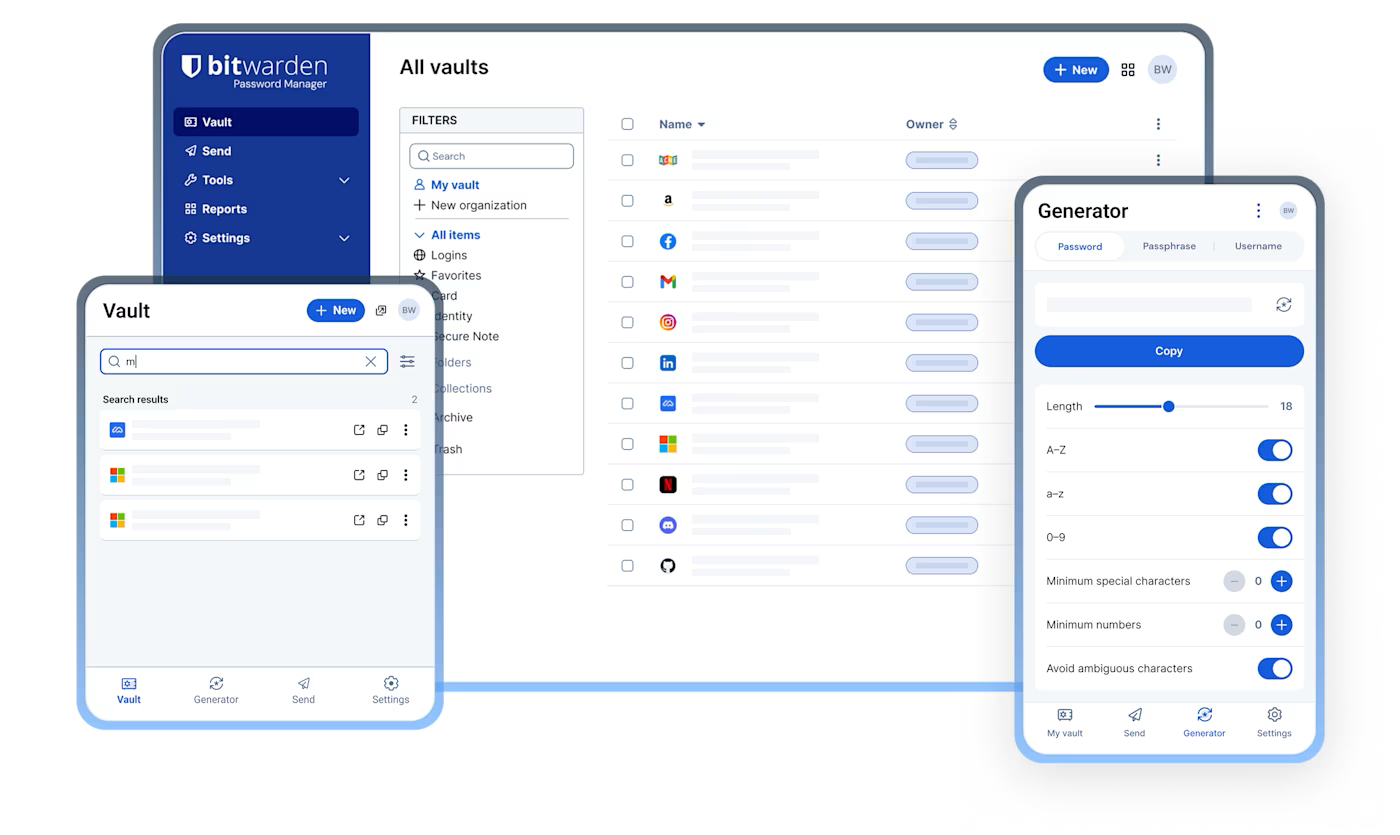
I personally use Bitwarden to manage my passwords. However, regardless of which password manager you choose, there are some important security best practices you should follow.
Generally, yes. Reputable password managers use encryption and security controls to protect your stored credentials.
However, a password manager is not a replacement for good security practices. Your master password, devices, and account recovery methods still need to be protected.
In other words, a password manager can improve your security significantly, but only when it is used correctly.
1. Use a Strong and Unique Master Password
Your master password protects your password vault, so it is one of the most important passwords you will ever create.
Therefore, make it:
- Long and difficult to guess
- Unique
- Easy for you to remember
- Never reused on another website
A long passphrase made from several unrelated words can be easier to remember while still providing strong security.
Never use your password manager's master password anywhere else.
2. Never Reuse Passwords
One of the biggest advantages of a password manager is the ability to create a unique password for every account.
For example, your email, banking, social media, and work accounts should all have different passwords.
Why is this important?
If one website suffers a data breach and your password is exposed, attackers may try the same password on other services.
Therefore, one account should have one unique password.
3. Don't Save Passwords in Your Browser
Modern browsers offer to save passwords, which is convenient. However, storing all your credentials directly in your browser may not provide the same level of password-management features and control as a dedicated password manager.
Instead, use a reputable password manager to centralize your credentials and manage them securely.
For example, rather than saving passwords in Chrome, Edge, or Firefox, you can store them in your dedicated password manager.
This also makes it easier to manage passwords across different browsers and devices.
4. Enable Multi-Factor Authentication
A strong password is important, but Multi-Factor Authentication (MFA) provides another layer of protection.
Whenever possible, enable MFA for:
- Your password manager
- Email accounts
- Banking accounts
- Social media
- Cloud services
- Business applications
As a result, even if someone obtains your password, they may still be unable to access your account.
For your password manager itself, consider using a strong second factor such as an authenticator application or security key when supported.
5. Never Share Your Passwords
Your passwords should remain private.
Avoid sending passwords through:
- WhatsApp
- Email
- SMS
- Chat applications
- Screenshots
- Notes or documents
Even if you trust the recipient, sharing passwords increases the risk of accidental exposure.
If credentials must be shared for legitimate business reasons, use the secure sharing features provided by your password management solution rather than sending the password as plain text.
6. Don't Store Passwords in Plain Text
Avoid keeping passwords in:
- Notepad files
- Excel spreadsheets
- Word documents
- Text files
- Sticky notes
- Email drafts
Although these methods may seem convenient, they provide little protection if your device or account is compromised.
Instead, use a dedicated password manager designed to protect sensitive credentials.
7. Generate Strong Passwords
Don't create passwords manually whenever possible.
Instead, use your password manager's built-in password generator to create random and unique credentials.
For example:
K8!vQ2#pL9@xT7
You don't need to remember this password because your password manager does that for you.
Consequently, you can use stronger and more complex passwords without making your daily login process difficult.
8. Secure Your Password Manager Account
Your password manager itself must be protected carefully.
Therefore:
- Use a strong master password
- Enable MFA
- Keep recovery information secure
- Don't share your master password
- Keep your devices updated
- Lock your password manager when appropriate
Remember that your password manager is protecting many other accounts, so it deserves extra attention.
9. Regularly Review Your Passwords
Finally, don't simply save passwords and forget about them.
Periodically review your password vault and:
- Remove unused accounts
- Replace weak passwords
- Change reused passwords
- Check for compromised credentials
- Review important account security settings
In addition, prioritize critical accounts such as email, banking, cloud storage, and business systems.
Password managers are not completely risk-free. However, they are generally much safer than reusing passwords, storing them in plain-text files, or using simple passwords that are easy to guess.
The most important thing is to use them correctly.
Use a strong and unique master password, generate a different password for every account, avoid saving credentials directly in your browser, enable MFA, and never share your passwords.
I use Bitwarden as part of my own password security strategy. Nevertheless, the same principles apply regardless of which reputable password manager you choose.
Ultimately, good password security is not about remembering more passwords. It's about making every password unique, difficult to guess, and properly protected.
by Teffin Varghese | Oct 31, 2021 | Hosting, Howtos, Linux, Networking, OS, Review, Security, Servers, Troubleshooting, Unix, VPN, VPS, Vulnerability, Workstation
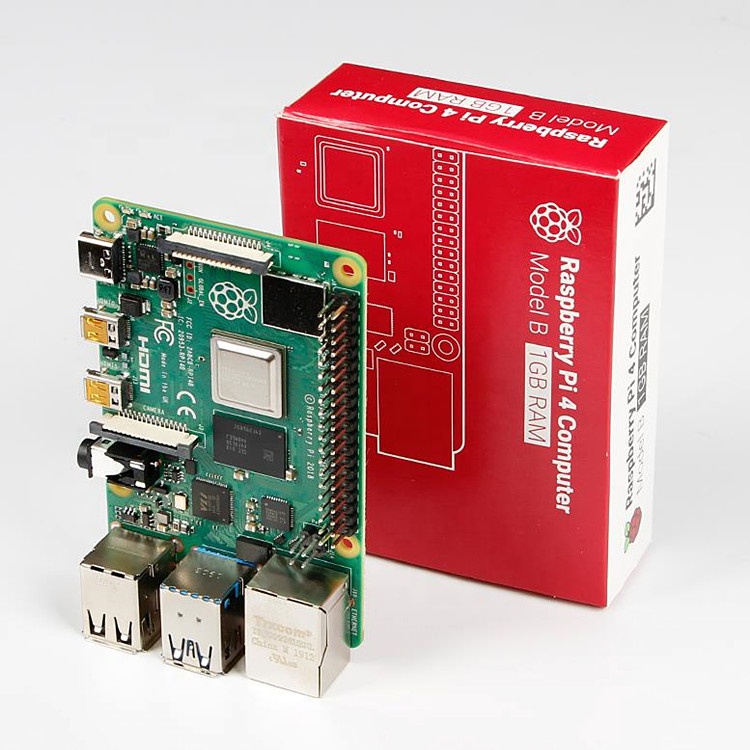
For the 64-Bit OS support we need to use Raspberry Pi 4
I’m using Raspberry Pi 4 Model-B With * Gigs of RAM, A 4GB RAM model would work just fine.
But First what is Raspberry Pi and what is it used for ?
he Raspberry Pi is a low cost, credit-card sized computer that plugs into a computer monitor or TV, and uses a standard keyboard and mouse.
It is a capable little device that enables people of all ages to explore computing, and to learn how to program in languages like Scratch and Python.
It’s capable of doing everything you’d expect a desktop computer to do, from browsing the internet and playing high-definition video, to making spreadsheets, word-processing, and playing games.
What’s more, the Raspberry Pi has the ability to interact with the outside world, and has been used in a wide array of digital maker projects, from music machines and parent detectors to weather stations and tweeting birdhouses with infra-red cameras.
We want to see the Raspberry Pi being used by kids all over the world to learn to program and understand how computers work.
Assemble and enclose the Raspberry Pi, We recommend a case with passive cooling or with a small fan and heat-sinks.
Yes of course you can the Pi without any case or cooling setup, But we recommend to use a cooling case for protection and better performance.
Download Kali-Linux Image from the official website.
You can get the download link from the below URL.
You need to select ARM image category, then choose the Raspberry Pi 64-bit Image.
Now you need to write this image to a Micro SD card, Which you are going to use it on your Raspberry Pi.
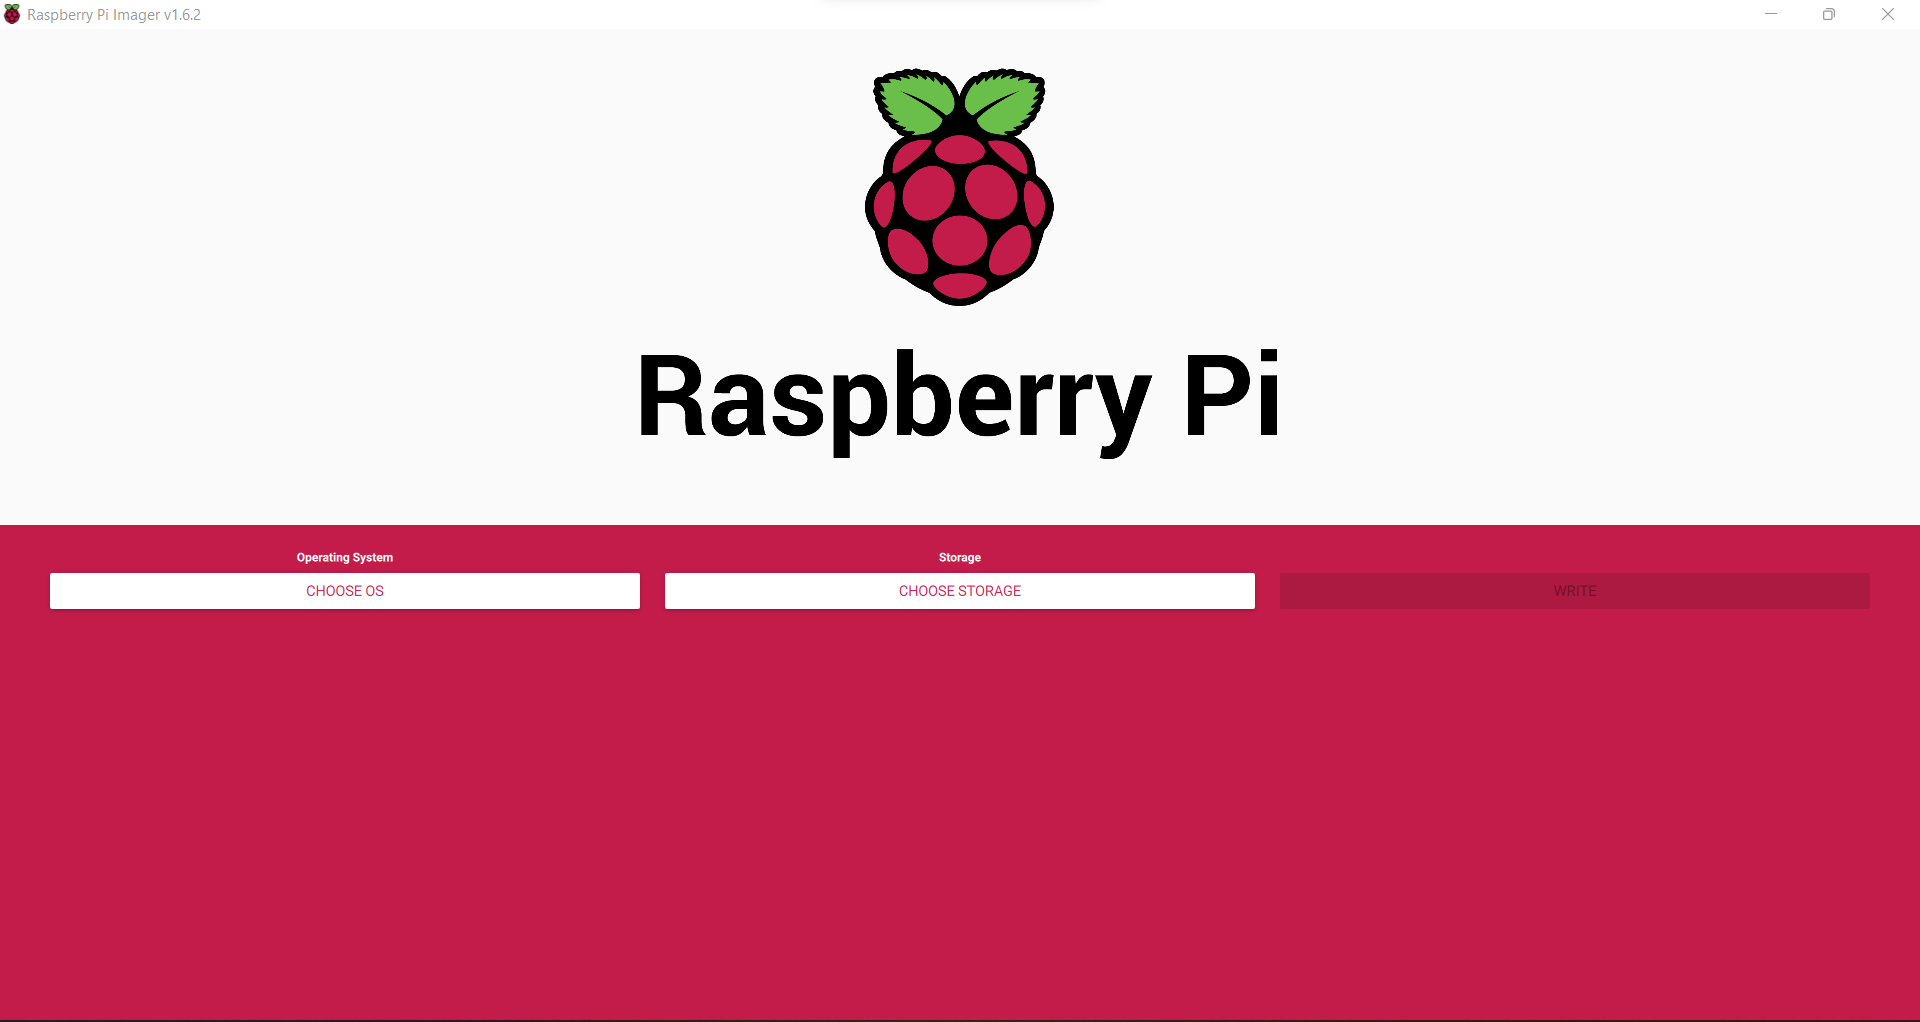
You can use either Balena Etcher or the official Raspberry Pi imager for this task.
Here we are using the official Raspberry Pi imager. You can download the imager from the following URL.
https://www.raspberrypi.com/software/
Here is the download link for Windows machines
https://downloads.raspberrypi.org/imager/imager_1.6.2.exe
Write Kali-Linux image to the Micro SD-Card. Please follow the following images.
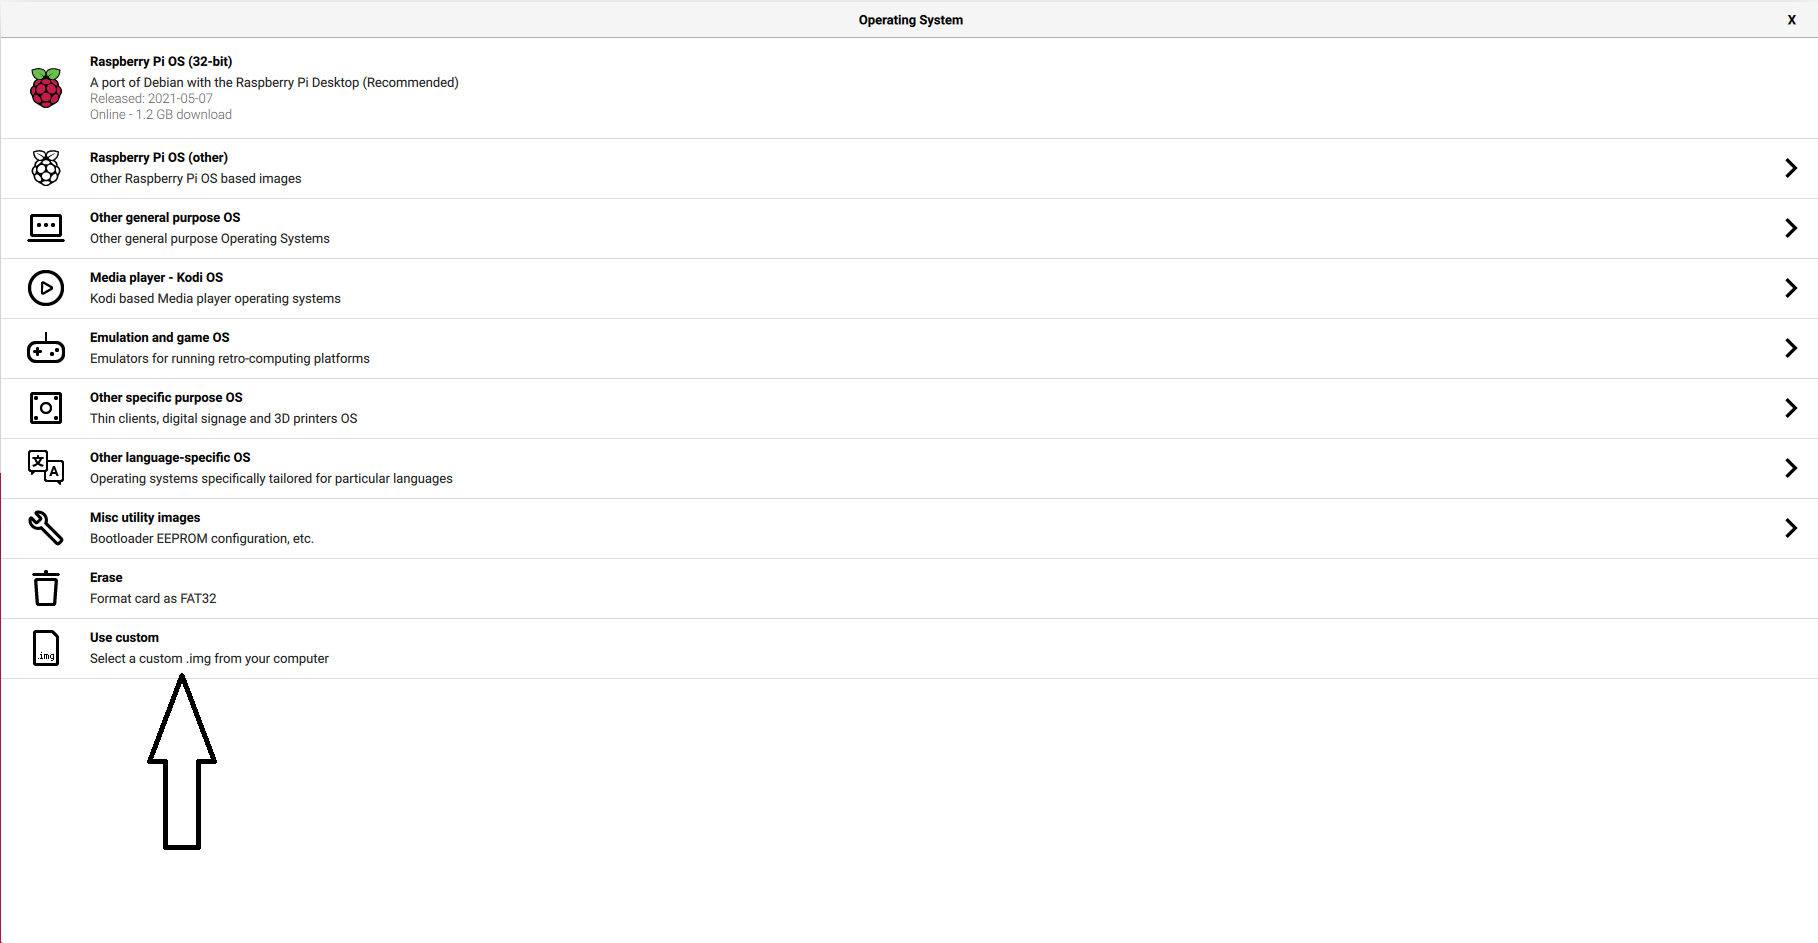
1, Launch the Pi Imager and select Choose OS.
2, Select the option “Use Custome” for our Kali-Linux Image
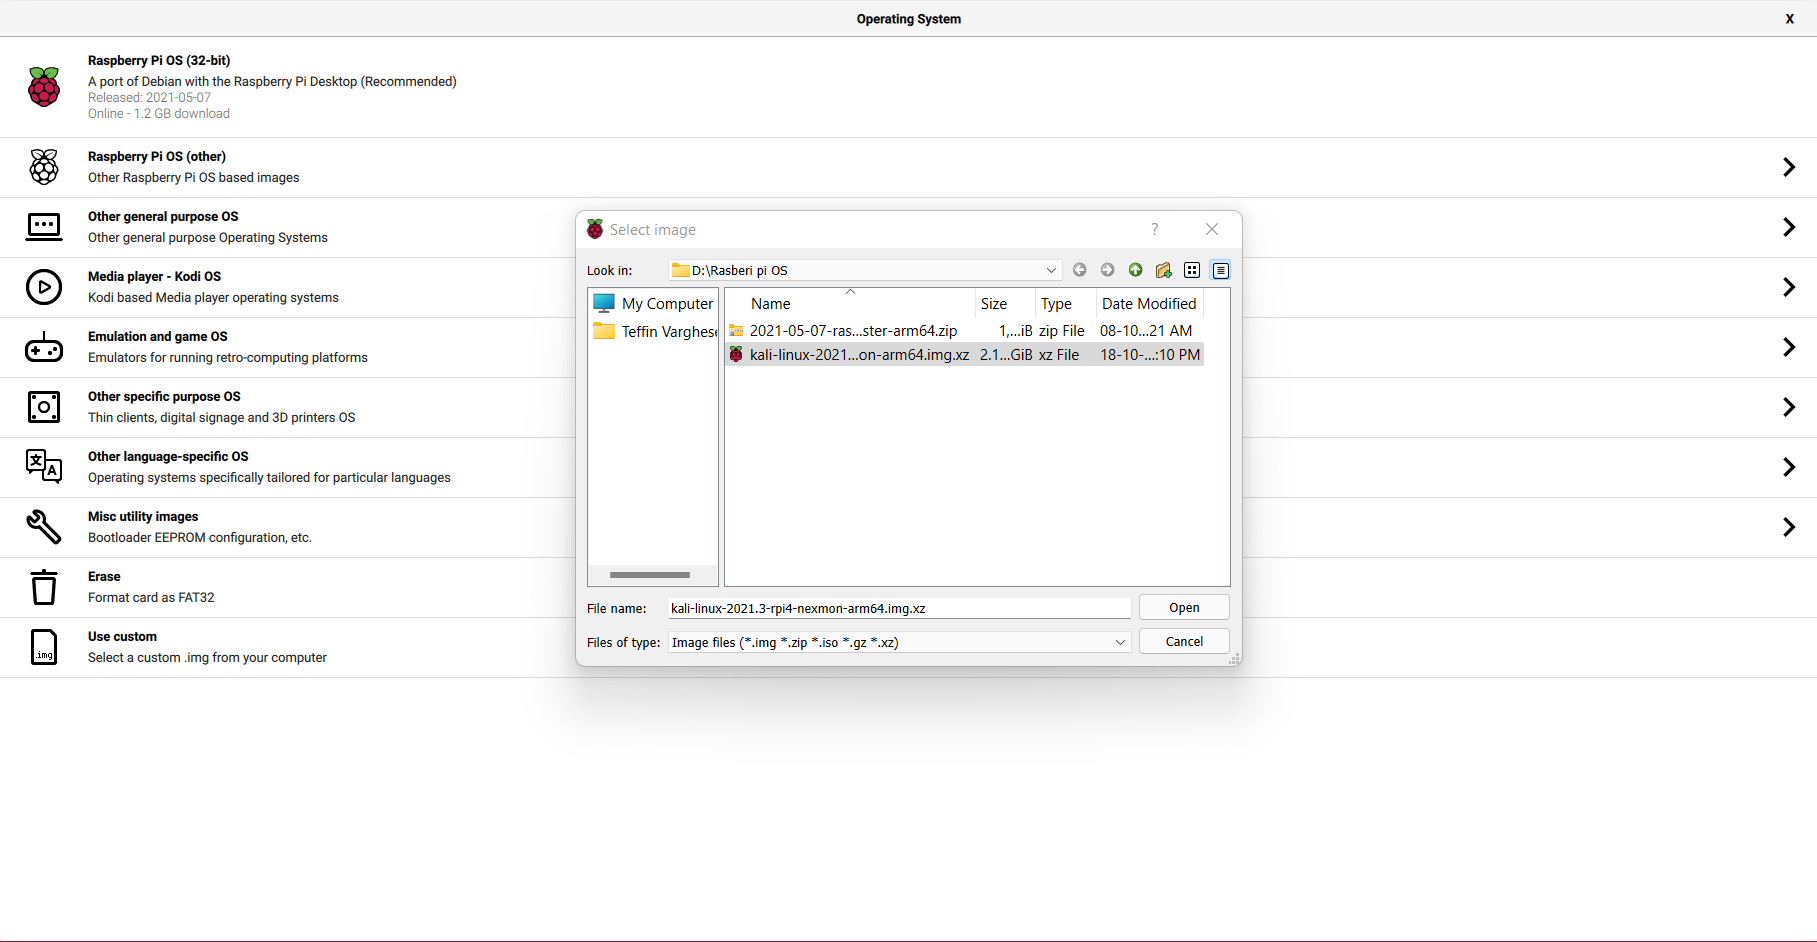
3, Browse and choose the Kali-Linux Image we have downloaded from our PC.
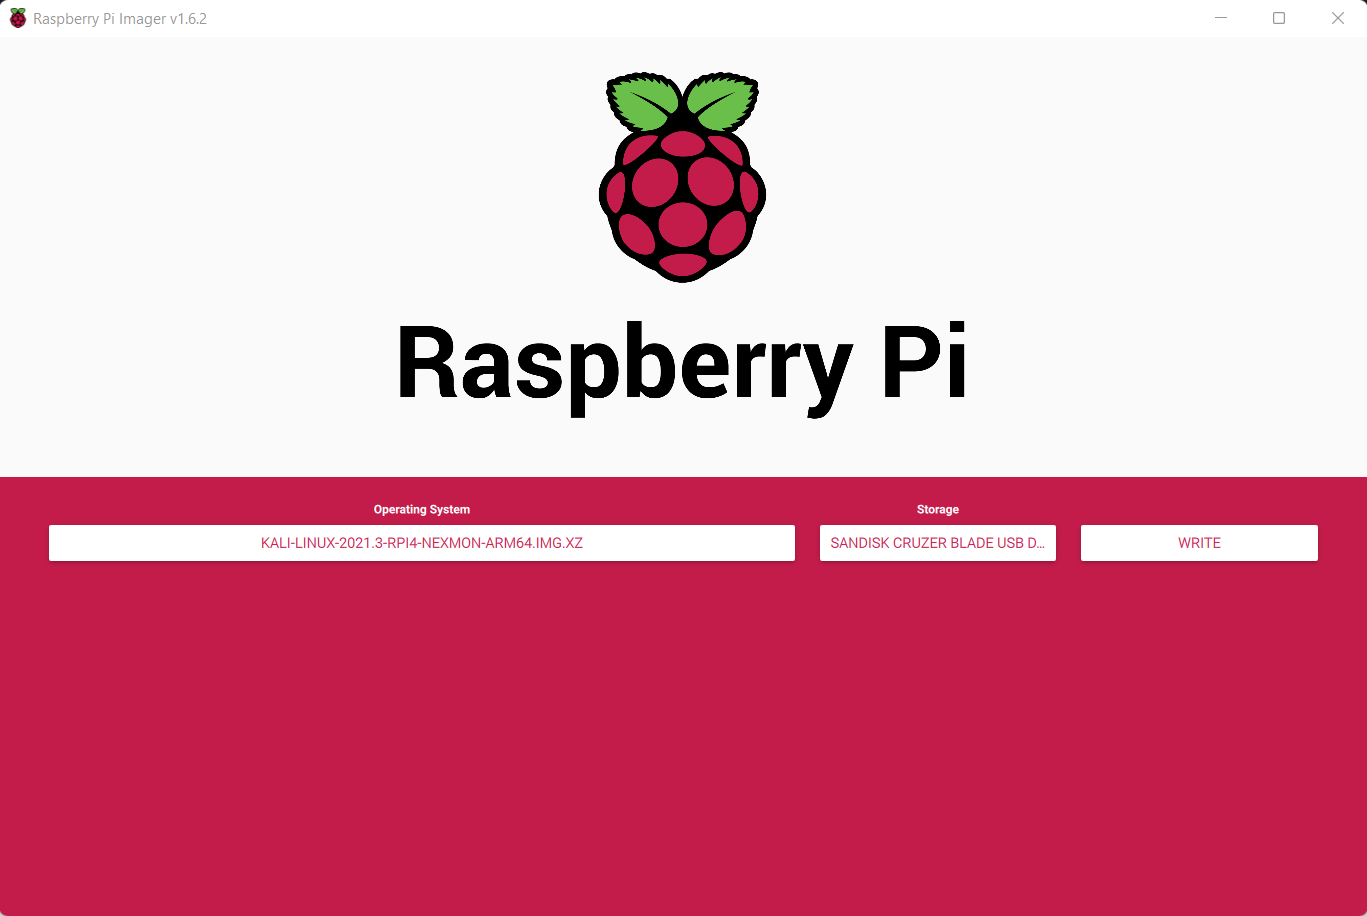
4, Now select storage and choose our micro SD-Card and click write to write the Image.
Note: Please make sure you have selected the correct storage, In our case the SD-Card. If you choose the wrong location the imager will wipe the selected storage location.
- step 5
Insert the Micro SD-card to your Raspberry Pi. Plug in your Raspberry Pi Power-Brick to the device and
connect your Pi to a monitor, also plugin your Mouse and Keyboard as well, Then power-on the power brick.
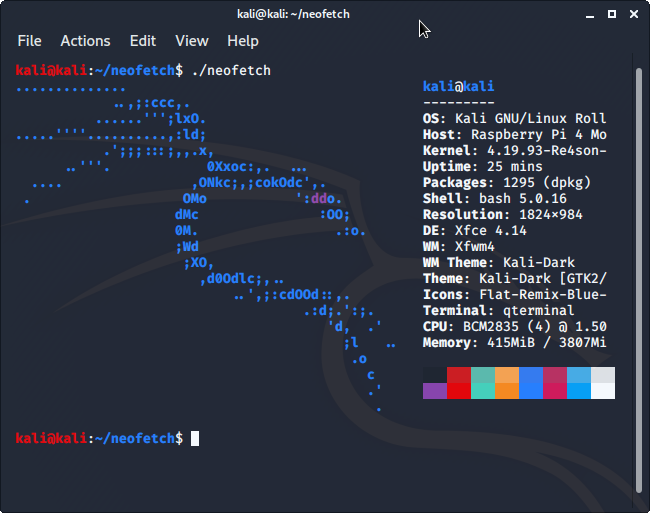
It will take some time for the initial bootup, Wait for it. If everything is perfect your Raspberry Pi will boot into Kali-Linux.
by George Sruthin | Aug 3, 2020 | Hosting, Howtos, Security, Servers, VPN, VPS
For creating a VPN you will need these things.
- A VPS(Virtual Private Server), I am using Ubuntu-based VPS
Here is the link for a free credit of 100$ with this you can create a VPS for free and test it if you like then you can continue.
Then you will need
- ssh client Since I am using Linux for this demo I will be using remmina, or you can use a terminal.
- Outline Manager and Outline Client ( I am using Outline as a VPN server, it's opensource and free.) here is the link to outline website https://getoutline.org/
Your content goes here. Edit or remove this text inline or in the module Content settings. You can also style every aspect of this content in the module Design settings and even apply custom CSS to this text in the module Advanced settings.
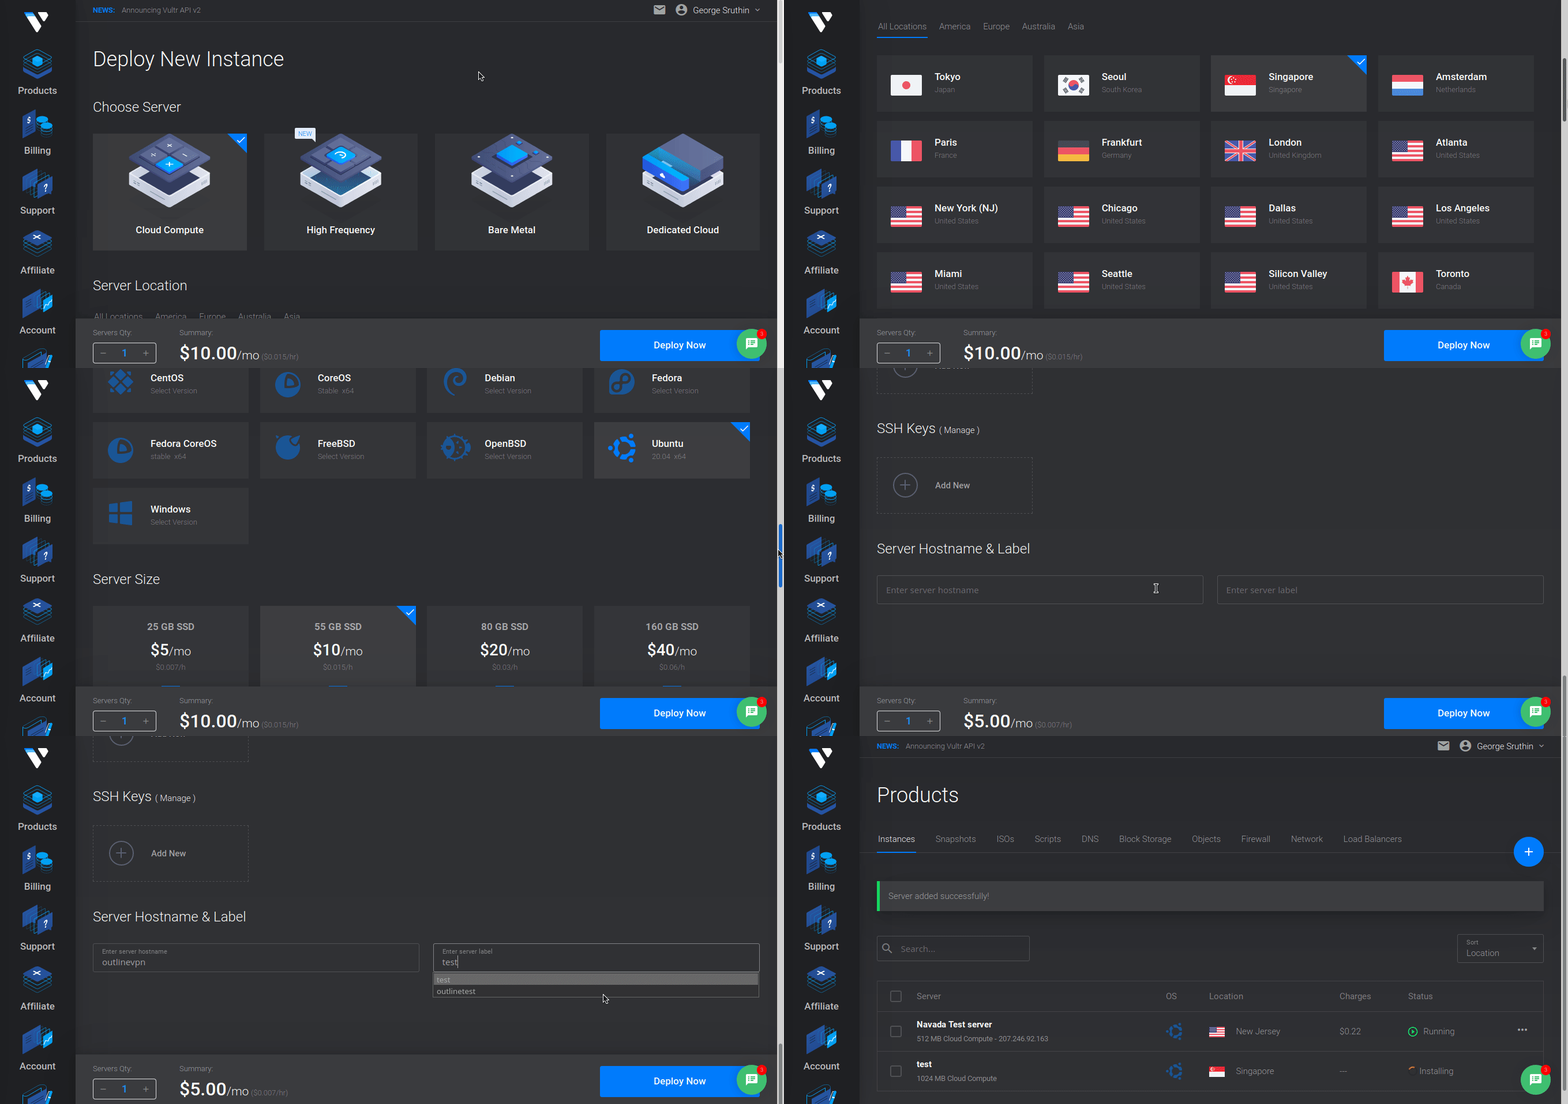
Ok, Let's get started, first create a VPS server, register your account and deploy your VPS server, i am using Vultr as VPS hosting provider, they have multiple datacenters in multiple continent.
after creating account on Vultr, you need to go to products, Click plus icon and click on create new server, this will redirect your page and follow below steps. wait for some time till your new vps server is up and running.
after that you will get your new VPS server listed in your product section, then open it now you can see, server detail including your server IP, user name, password. etc.
you need to note down 3 things,
- Server IP
- username
- password
now you have open your ssh client and connect to your VPS server.
i will put a link here how you can do that.
after connecting to your VPS, first thing you need to do is update & upgrade your server if available. please follow this command to update and upgrade.
for update use this command
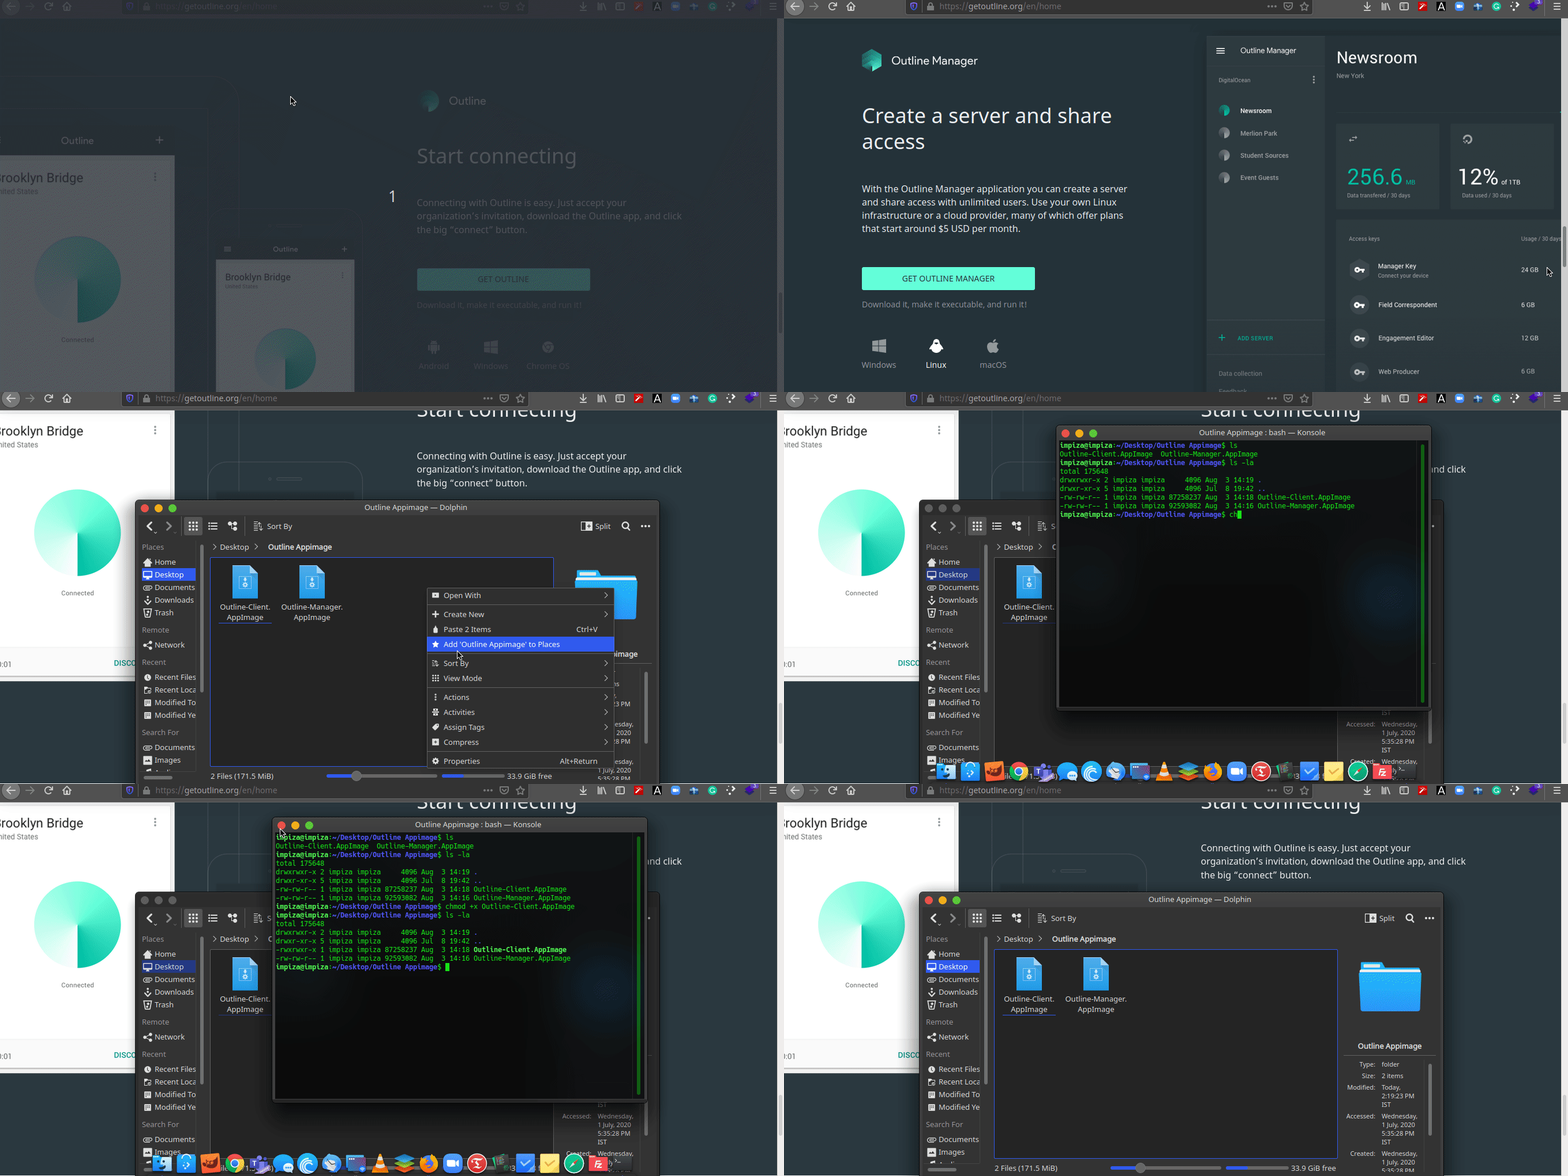
then restart reconnect to your server, then go to outline VPN website and download outline manager and outline client. and move both files to a directory so that you can find that files easily. then make those files executable. i will give you detailed tutorial below. there is gui method also available its depends on the distro you are using.
https://techridez.com/blog/make-file-executable-using-terminal/
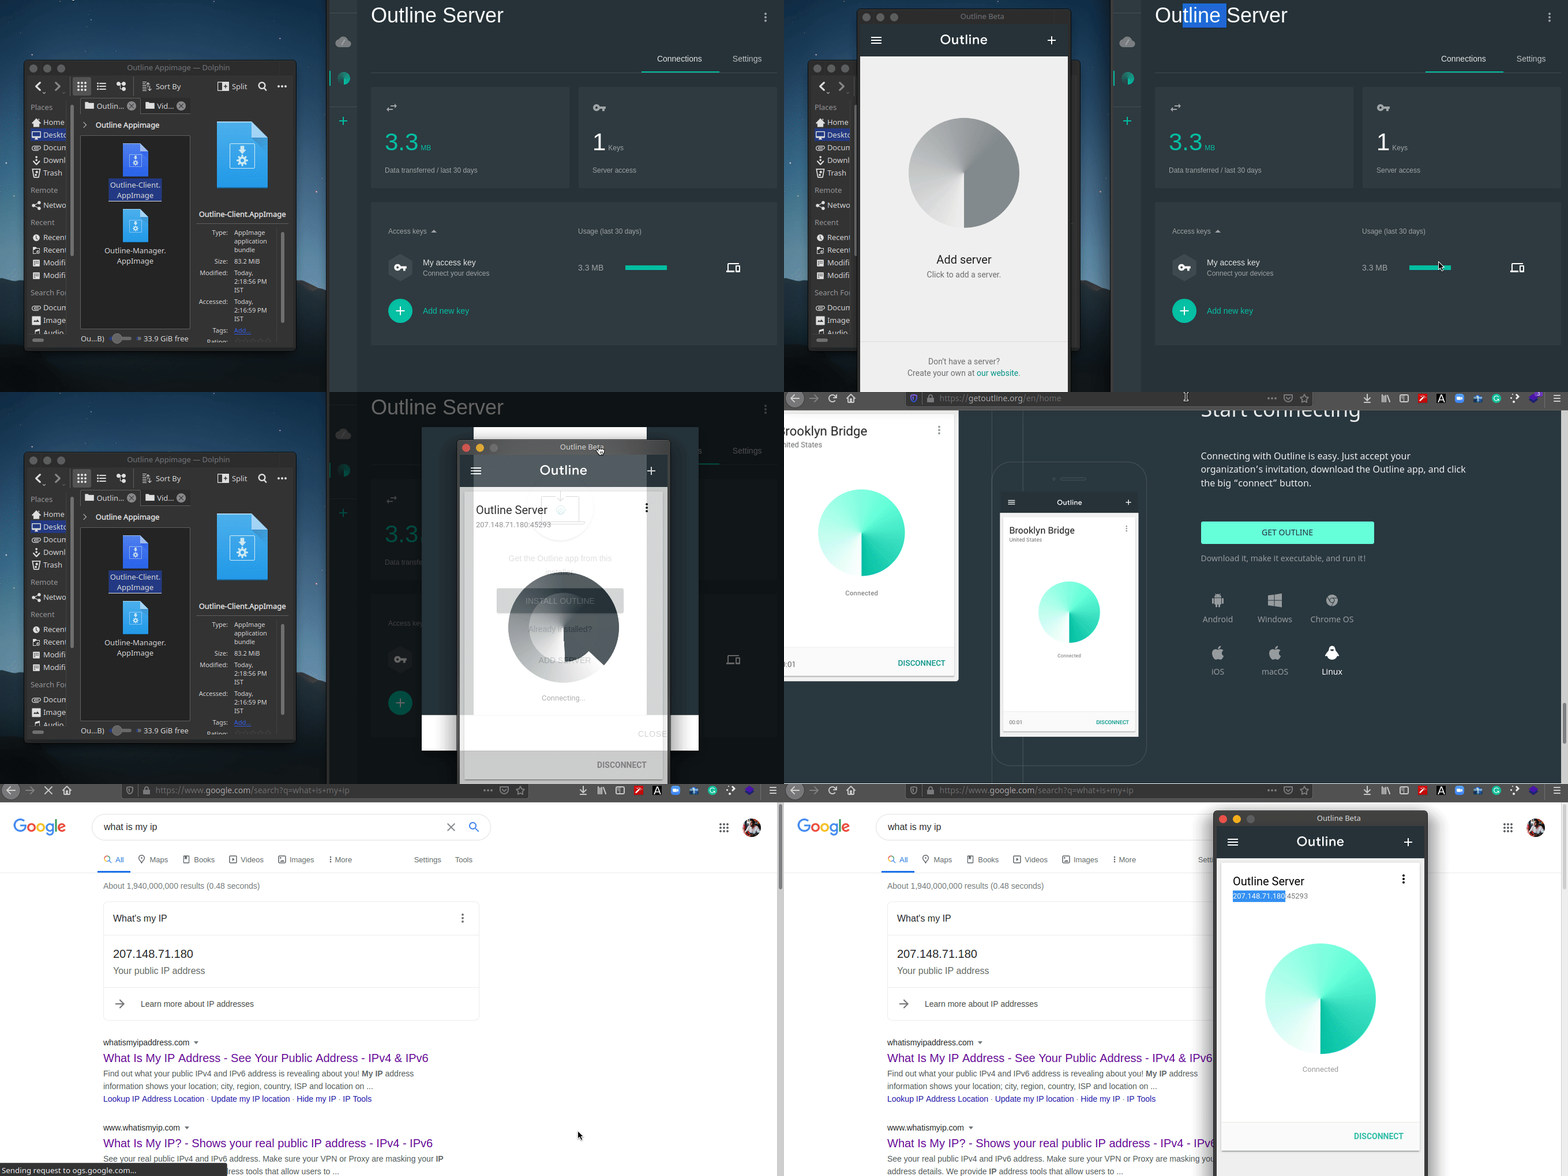
Ok now open Outline-Manager.Appimage
since its already executable you just need to double click.
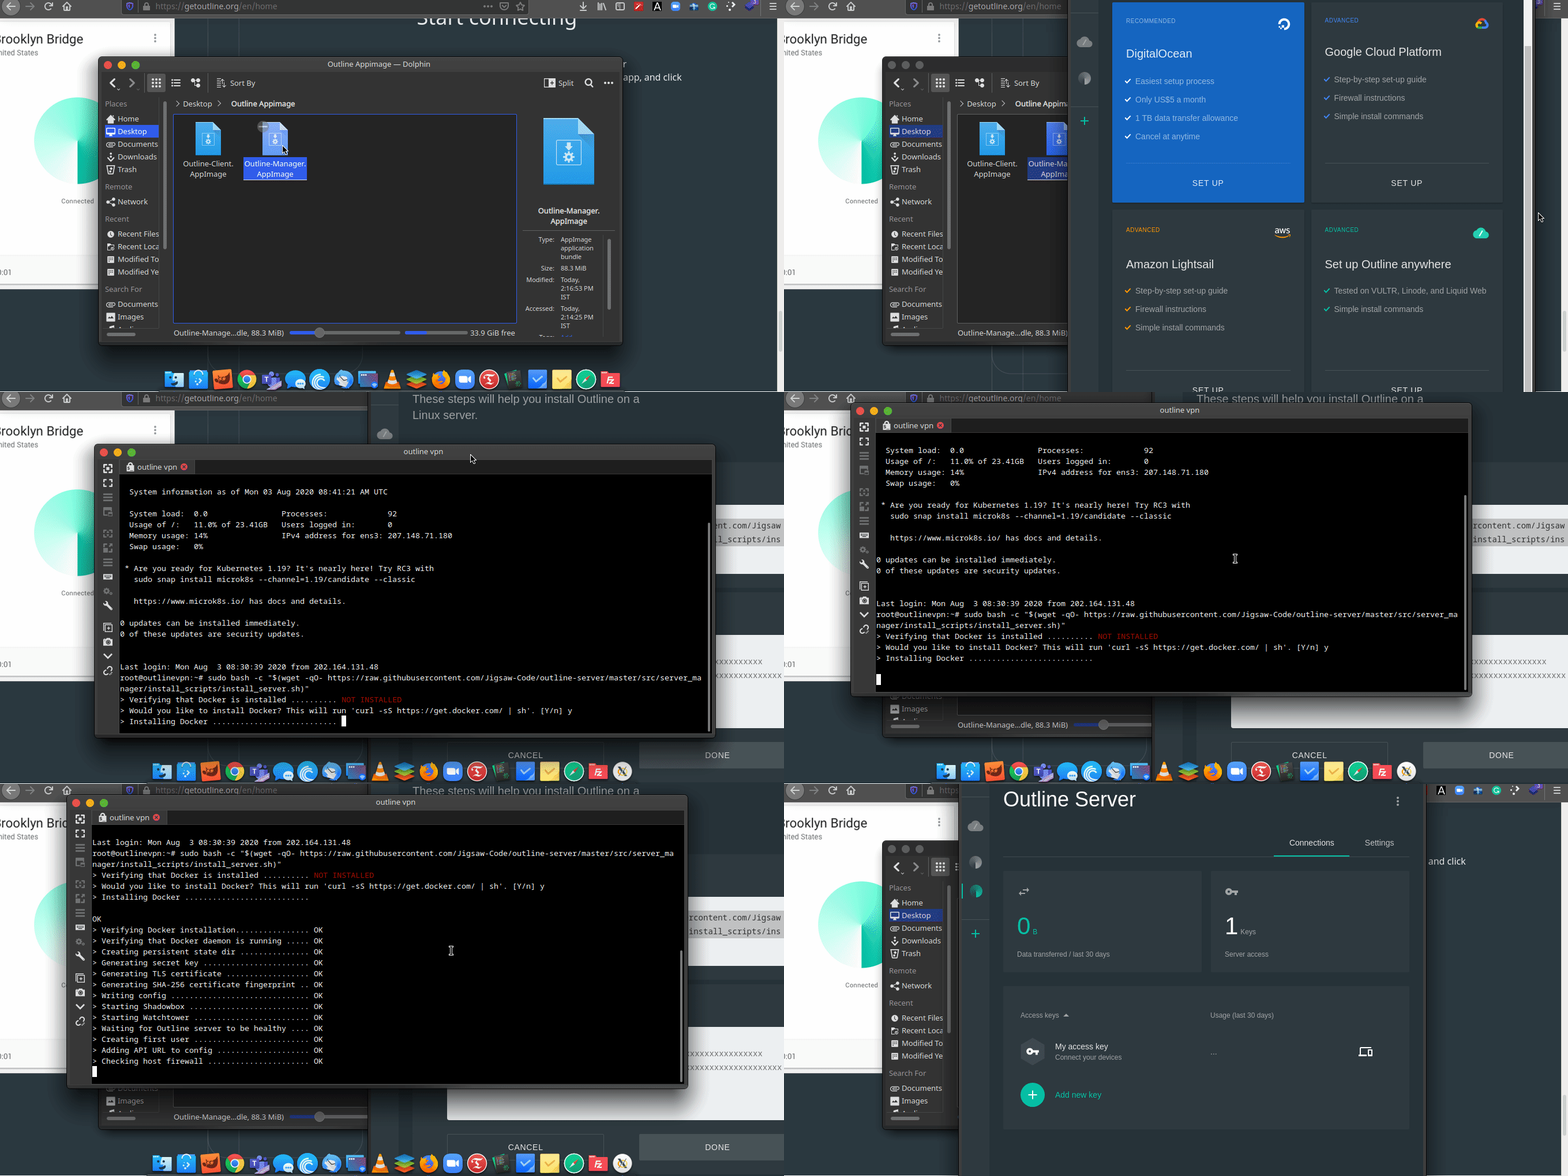
it will open Outline Manager, and you can find 4 options.
- Digital Ocean
- Google Cloud
- Aws Cloud
- Advanced option.
we will use Advanced option. this will give you a command line, you need to copy that and paste in the ssh client which is connected VPS server.
as you can see from above, after pasting those command to VPS Server it will install docker, it will takes some time, after that you will get API key as output which is highlighted in green, copy that and paste it in field in the Outline Manager.
then open outline client, go to outline manager copy key, and add server to the client.
Now your VPN Client is ready. as you can see about my public ip is also changed to the vps serve we are using.
Enjoy.
If you want a details video please watch my youtube channel. also i have put the youtube video below
by Teffin Varghese | Jul 16, 2020 | Howtos, Networking, News, OS, Security, Servers, Storages, Troubleshooting

Step 1: Identify the Adapter model
===========================
You can use the lspci command to view the details of the Adapter.
[root@localhost ~]# lspci | grep Mellanox
a1:00.0 Infiniband controller: Mellanox Technologies MT28908 Family [ConnectX-6]
Here our Adapter is Mellanox Technologies MT28908 Family [ConnectX-6]
Step 2: Download the OFED driver for the Adapter.
===================================================================================
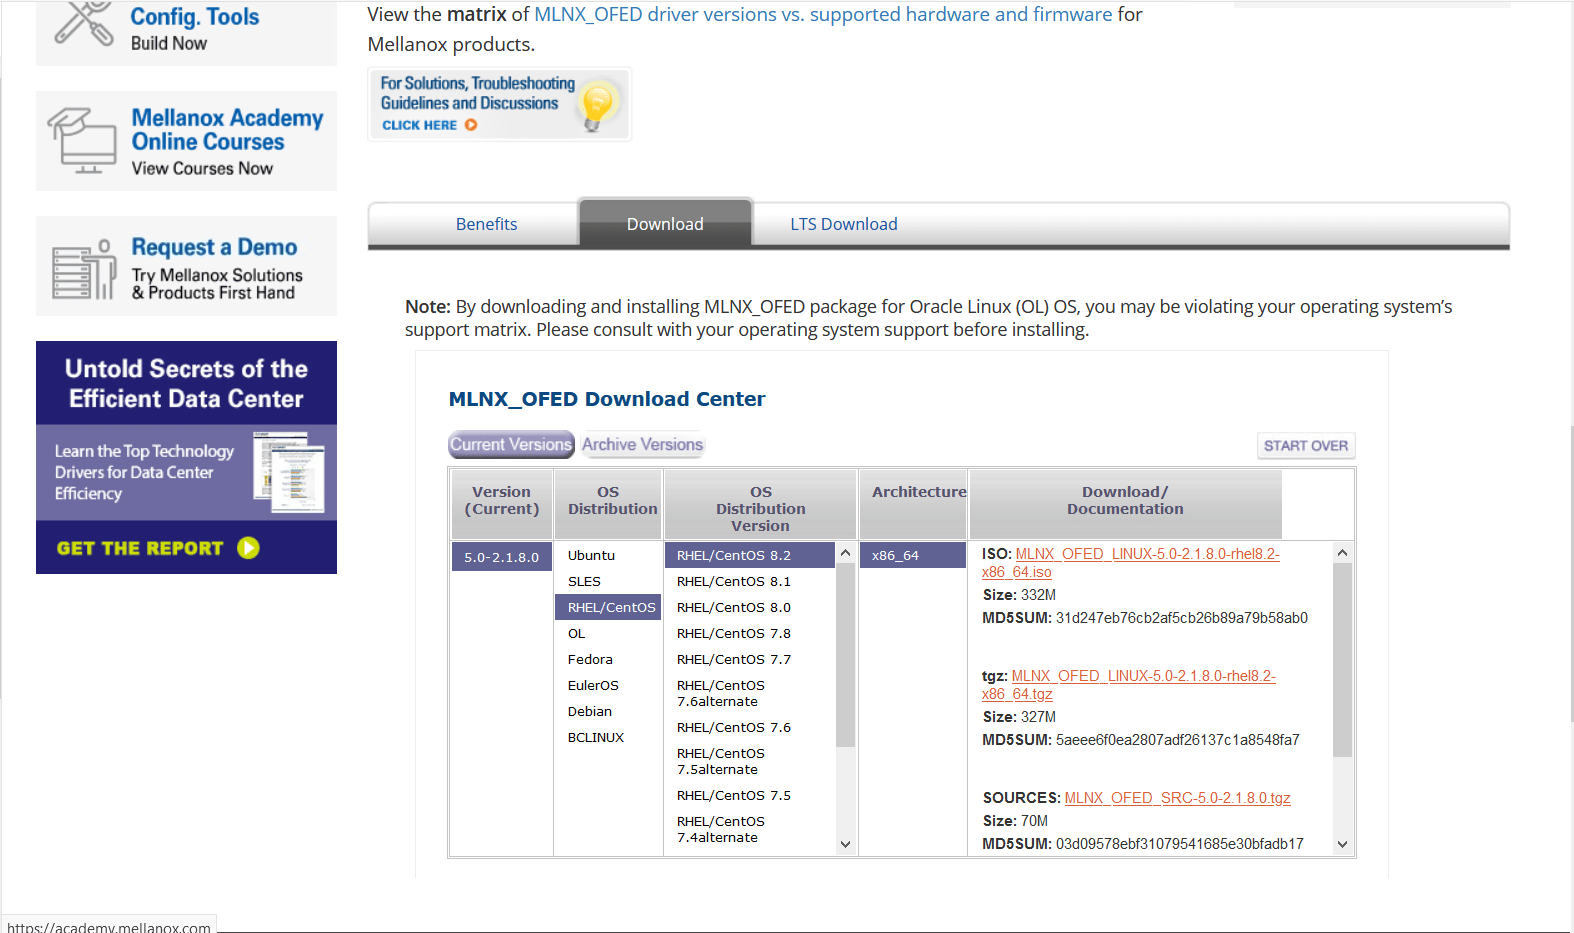
You can download the OFED driver from the below link and choose the OS and select the tar file for download.
https://www.mellanox.com/products/infiniband-drivers/linux/mlnx_ofed
https://www.mellanox.com/products/infiniband-drivers/linux/mlnx_ofed
You can use wget command to download the driver.
Example: wget http://content.mellanox.com/ofed/MLNX_OFED-5.0-2.1.8.0/MLNX_OFED_LINUX-5.0-2.1.8.0-rhel8.2-x86_64.tgz
http://content.mellanox.com/ofed/MLNX_OFED-5.0-2.1.8.0/MLNX_OFED_LINUX-5.0-2.1.8.0-rhel8.2-x86_64.tgz
Step 3: Extract the zip file.
============================================
Untar the zip file you have just downloaded
Example: tar -xvf MLNX_OFED_LINUX-5.0-2.1.8.0-rhel8.2-x86_64.tgz
Step 4: Navigate to the extracted directory.
======================================================================
Once you have extracted the tar file you can view a directory with the same name, navigate to the directory
by cd command
Example: cd MLNX_OFED_LINUX-5.0-2.1.8.0-rhel8.2-x86_64
Once you are in the directory please list the contents on the directory using a ls command.
and from the output you can view a script file name “mlnxofedinstall”
Step 5: Run the script file.
==========================================
You can run the script file using “./mlnxofedinstall”
Once you run the script the driver will be installed and once it is completed reload the driver or reboot the machine.
Note: The server must have Perl, python and GCC compilers for completing the driver installation.
If the installation run failed due to any unmet dependencies, please install the packages and libraries mentioned on the failed message.
Firmware upgrade.
————————–
Once the OFED driver is successfully installed then you can go with the firmware upgrade.
We are using the tool MSTFLINT for performing the firmware upgrade.
Step 1: First we need to identify the PCI bus ID of the adapter.
===========================================================================
Run “lspci | grep Mellanox” to determine the PCI bus ID
Example: [root@localhost ~]# lspci | grep Mellanox
a1:00.0 Infiniband controller: Mellanox Technologies MT28908 Family [ConnectX-6]
Here “a1:00.0” is our PCI bus ID.
Step 2: Download and unzip the Firmware Zip file.
=============================================================
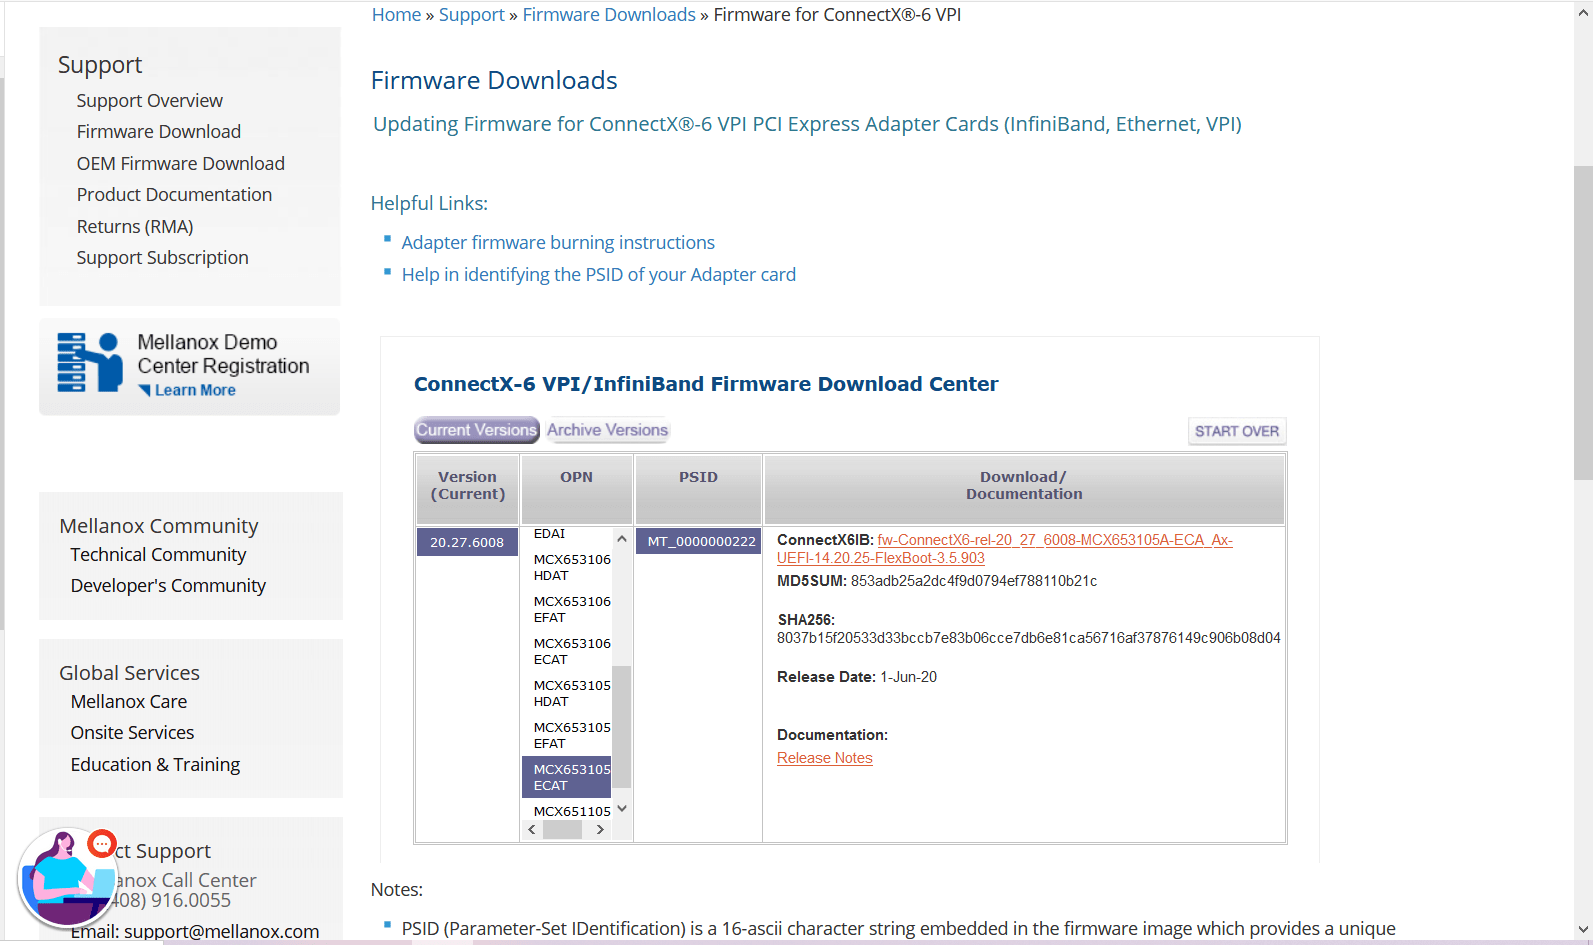
You can download the firmware from the official Mellanox website.
Link: https://www.mellanox.com/support/firmware/connectx6ib
https://www.mellanox.com/support/firmware/connectx6ib
Please download the firmware using “wget”
Example: wget http://www.mellanox.com/downloads/firmware/fw-ConnectX6-rel-20_27_6008-MCX653105A-ECA_Ax-UEFI-14.20.25-FlexBoot-3.5.903.bin.zip
http://www.mellanox.com/downloads/firmware/fw-ConnectX6-rel-20_27_6008-MCX653105A-ECA_Ax-UEFI-14.20.25-FlexBoot-3.5.903.bin.zip
Once it is downloaded unzip it by using the command “unzip”
Example: unzip fw-ConnectX6-rel-20_27_6008-MCX653105A-ECA_Ax-UEFI-14.20.25-FlexBoot-3.5.903.bin.zip
Once you unzip the file you can view a .bin file which is our firmware.
Example: fw-ConnectX6-rel-20_27_6008-MCX653105A-ECA_Ax-UEFI-14.20.25-FlexBoot-3.5.903.bin
Step3: Burn the firmware to the NIC.
============================================
You need the mstflint utility to update the firmware. You can download mstflint from the OpenFabrics site at mstflint_SW for Linux.
NOTE: If OFED is installed on your machine, then mstflint is already installed.
For burning the new firmware run
the command in the same directory as the firmware file, run “mstflint –d <PCI bus ID, i.e. 05:00.0> -i <.bin file> b”
Example: mstflint -d a1:00.0 -i fw-ConnectX6-rel-20_27_6008-MCX653105A-ECA_Ax-UEFI-14.20.25-FlexBoot-3.5.903.bin b
To load new FW run mstfwreset or reboot machine and check.
Example: [root@localhost ~]# ethtool -i ib0
driver: mlx5_core[ib_ipoib]
version: 5.0-2.1.8
firmware-version: 20.27.6008 (MT_0000000222)
expansion-rom-version:
bus-info: 0000:a1:00.0
supports-statistics: yes
supports-test: yes
supports-eeprom-access: no
supports-register-dump: no
supports-priv-flags: yes
Here “ib0” is our interface name, yours maybe different.
Please refer Mellanox documentation if you need any further details.
https://www.mellanox.com/products/adapter-software/firmware-tools https://www.mellanox.com/support/firmware/update-instructions
by Teffin Varghese | Jul 7, 2020 | Howtos, Linux, Networking, OS, Python, Security, Servers, Storages, Troubleshooting, Uncategorized, VMware Esxi, Workstation
How to upgrade 10G Intel NIC driver in Linux.
Step 1: Identify the NIC adapter on the server/machine.
For upgrading the NIC driver, First you need to identify the NIC model for that you can use “lspci” command.
Use the command “lspci | grep -i net” to list the PCIe devices. (Usually 10G NIC’s are plugged into the PCIe slots on the Motherboard)
Command: lspci | grep -i net
Sample Output:
04:00.0 Ethernet controller: Intel Corporation 82599ES 10-Gigabit SFI/SFP+ Network Connection (rev 01)
04:00.1 Ethernet controller: Intel Corporation 82599ES 10-Gigabit SFI/SFP+ Network Connection (rev 01)
06:00.0 Ethernet controller: Intel Corporation 82576 Gigabit Network Connection (rev 01)
06:00.1 Ethernet controller: Intel Corporation 82576 Gigabit Network Connection (rev 01)
Here our 10G adapter is Ethernet controller: Intel Corporation 82599ES 10-Gigabit SFI/SFP+ Network Connection (rev 01)
Step 2: Identify the active interface in the OS.
For identify the active interface just type “ip a” on the terminal, this will display the interfaces on the OS and from the list identify the active interface name.
Command: ip a
Sample Output:
1: lo: <LOOPBACK,UP,LOWER_UP> mtu 65536 qdisc noqueue state UNKNOWN
link/loopback 00:00:00:00:00:00 brd 00:00:00:00:00:00
inet 127.0.0.1/8 scope host lo
inet6 ::1/128 scope host
valid_lft forever preferred_lft forever
2: eth0: <BROADCAST,MULTICAST,UP,LOWER_UP> mtu 1500 qdisc pfifo_fast state UP qlen 1000
link/ether 32:36:65:64:66:34 brd ff:ff:ff:ff:ff:ff
inet x.x.x.x/x brd 50.7.126.127 scope global eth0
inet6 x:x:x::x/64 scope global
valid_lft forever preferred_lft forever
inet6 x::x:x:x:x/64 scope link
valid_lft forever preferred_lft forever
Step 3: Check the current driver version of the NIC.
For identifying the driver version use the command “ethtool -i <interface name>” Eg: ethool -i eth0
From the results you can view the current driver version. The output will be something like this.
Command: ethtool -i <interface name>
Sample Output:
driver: ixgbe
version: 4.2.1-k
firmware-version: 0x80000208
bus-info: 0000:04:00.0
supports-statistics: yes
supports-test: yes
supports-eeprom-access: yes
supports-register-dump: yes
supports-priv-flags: no
Here the “version: 4.2.1-k” indicates the current driver version of the NIC.
Step 4: Download the latest available driver from Intel.
Go to https://downloadcenter.intel.com/product/32609/Intel-82599-10-Gigabit-Ethernet-Controller
to download the required driver.
https://downloadcenter.intel.com/product/32609/Intel-82599-10-Gigabit-Ethernet-Controller
For Linux: https://downloadcenter.intel.com/download/14687/Ethernet-Intel-Network-Adapter-Driver-for-PCIe-Intel-10-Gigabit-Ethernet-Network-Connections-Under-Linux-?product=32609
https://downloadcenter.intel.com/download/14687/Ethernet-Intel-Network-Adapter-Driver-for-PCIe-Intel-10-Gigabit-Ethernet-Network-Connections-Under-Linux-?product=32609
Download the latest available driver from the above link.
Step 5: Install/upgrade the Driver.
To manually build the driver
—————————-
1. Move the base driver tar file to the directory of your choice.
For example, use ‘/home/username/ixgbe’ or ‘/usr/local/src/ixgbe’.
2. Untar/unzip the archive, where <x.x.x> is the version number for the
driver tar file:
# tar zxf ixgbe-<x.x.x>.tar.gz
3. Change to the driver src directory, where <x.x.x> is the version number
for the driver tar:
# cd ixgbe-<x.x.x>/src/
4. Compile the driver module:
# make install
The binary will be installed as:
/lib/modules/<KERNEL VER>/updates/drivers/net/ethernet/intel/ixgbe/ixgbe.ko
The install location listed above is the default location. This may differ
for various Linux distributions.
5. Load the module using the modprobe command.
To check the version of the driver and then load it:
# modinfo ixgbe
# modprobe ixgbe [parameter=port1_value,port2_value]
Alternately, make sure that any older ixgbe drivers are removed from the
kernel before loading the new module:
# rmmod ixgbe; modprobe ixgbe
Note: For certain distributions like (but not limited to) Red Hat Enterprise
Linux 7 and Ubuntu, once the driver is installed, you may need to update the
initrd/initramfs file to prevent the OS loading old versions of the ixgbe
driver.
Use the dracut utility on Red Hat distributions:
# dracut –force
For Ubuntu:
# update-initramfs -u
Step 6: Check and verify the new driver version.
Use the same command we used before “ethtool -i <interface name>” to view the driver version
Command: ethtool -i <interface name>
Sample Output:
driver: ixgbe
version: 5.7.1-k
firmware-version: 0x80000208
bus-info: 0000:04:00.0
supports-statistics: yes
supports-test: yes
supports-eeprom-access: yes
supports-register-dump: yes
supports-priv-flags: no
Note: Please read the read me file available from Intel before proceeding.
That’s all for now. CHEERS!!!