Select Page

How to Reset forgotten Root Password in Suse Enterprise Linux
How to Reset forgotten Root Password in Suse Enterprise Linux

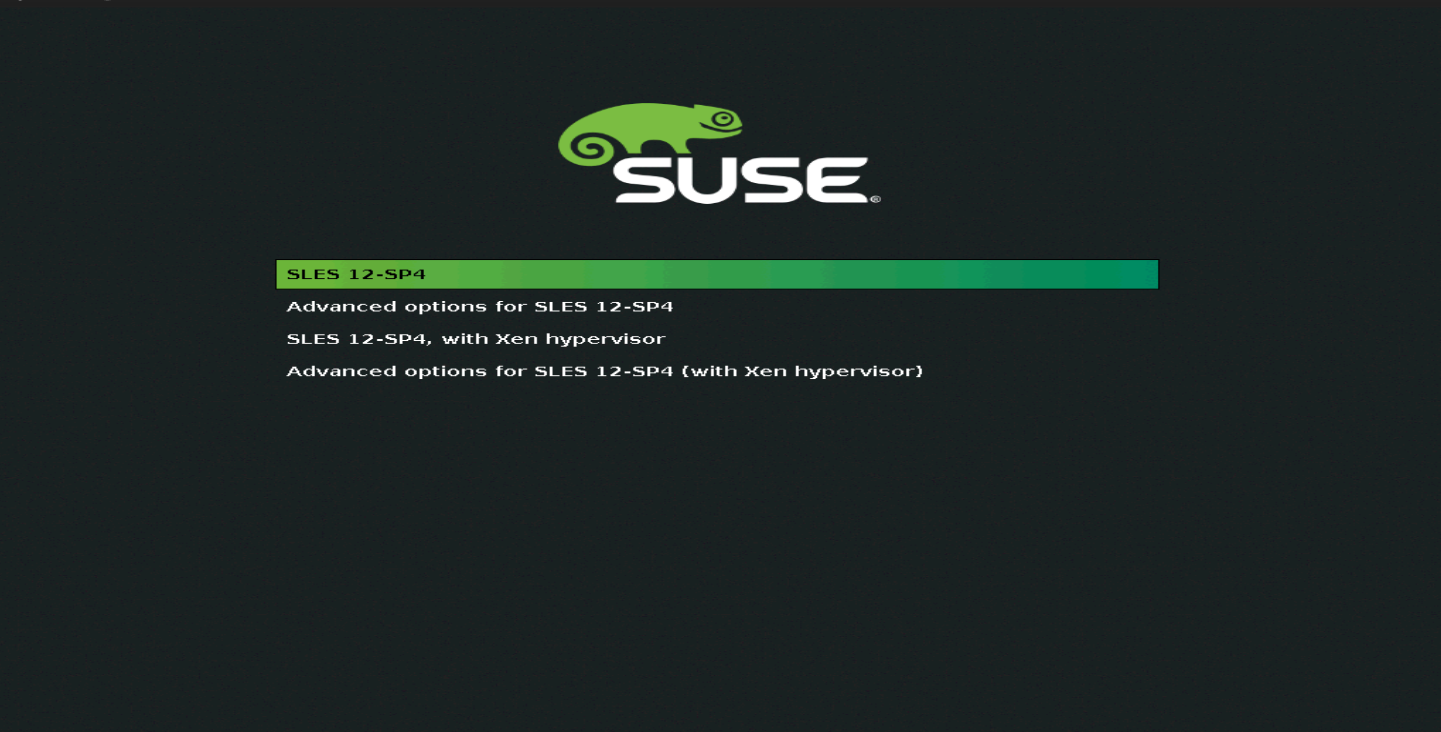
To reset forgotten password hard reboot your affected VM or bare metal server, press arrow key to skip boot timeout from grub, then press “e”
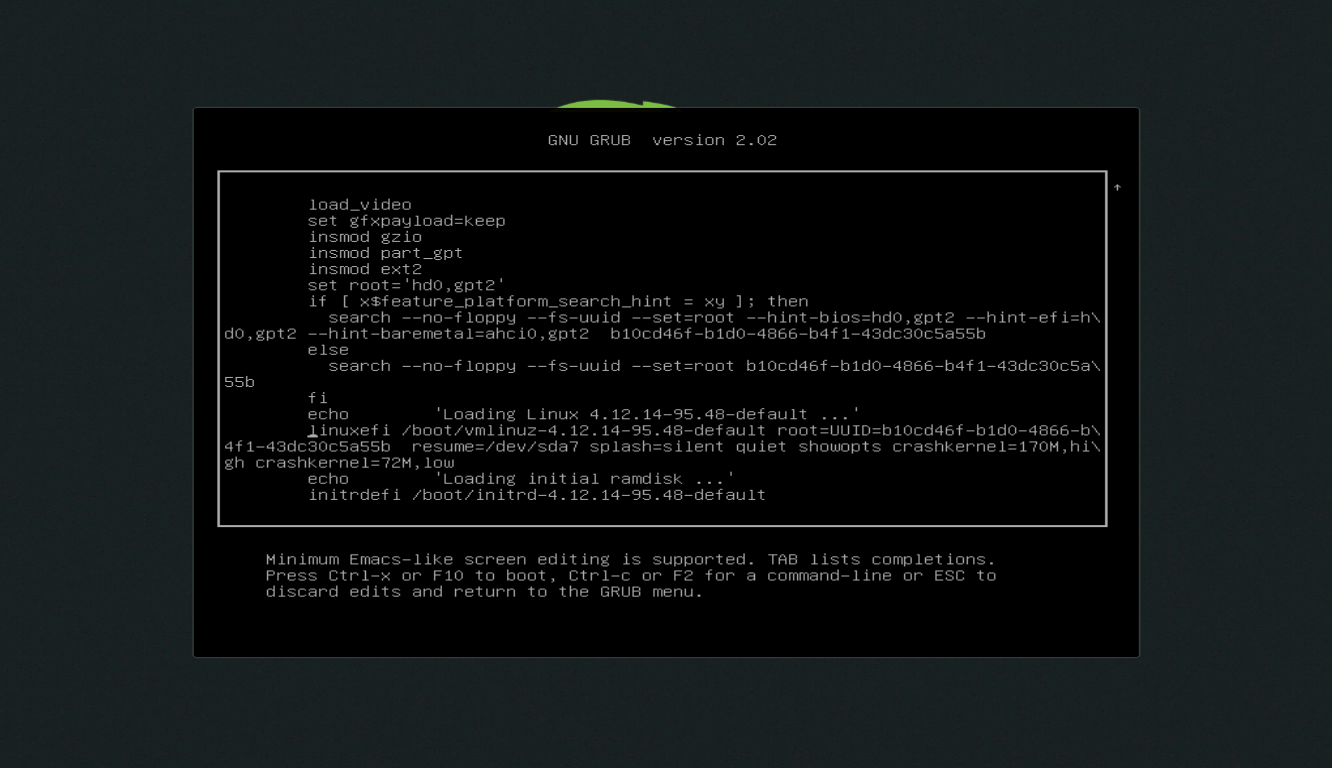
edit suse grub

search for line start with “linuxefi” (some time instead of “linuxefi” you can find “linux” or “linux16”) and press “end” button
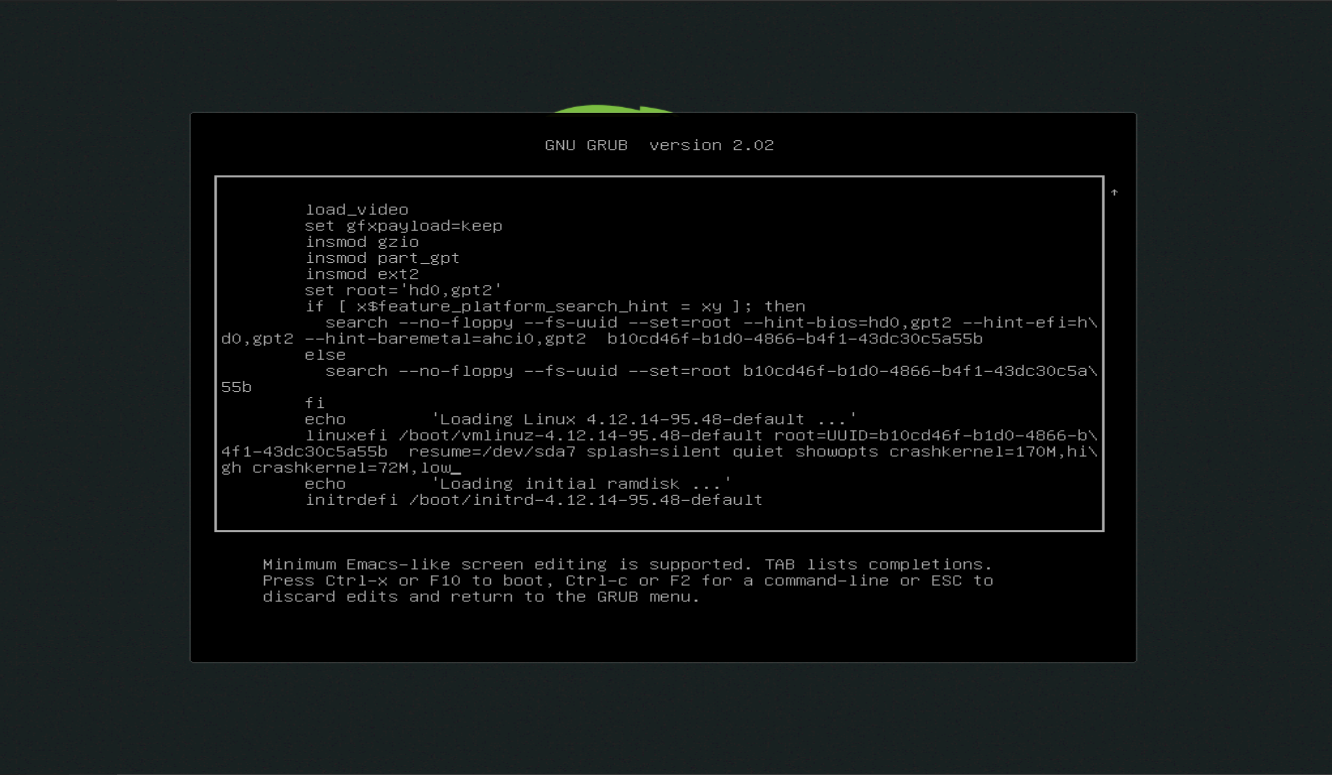
edit suse grub

at the end of the line type init=/bin/bash then press F10 or ctrl+x to boot
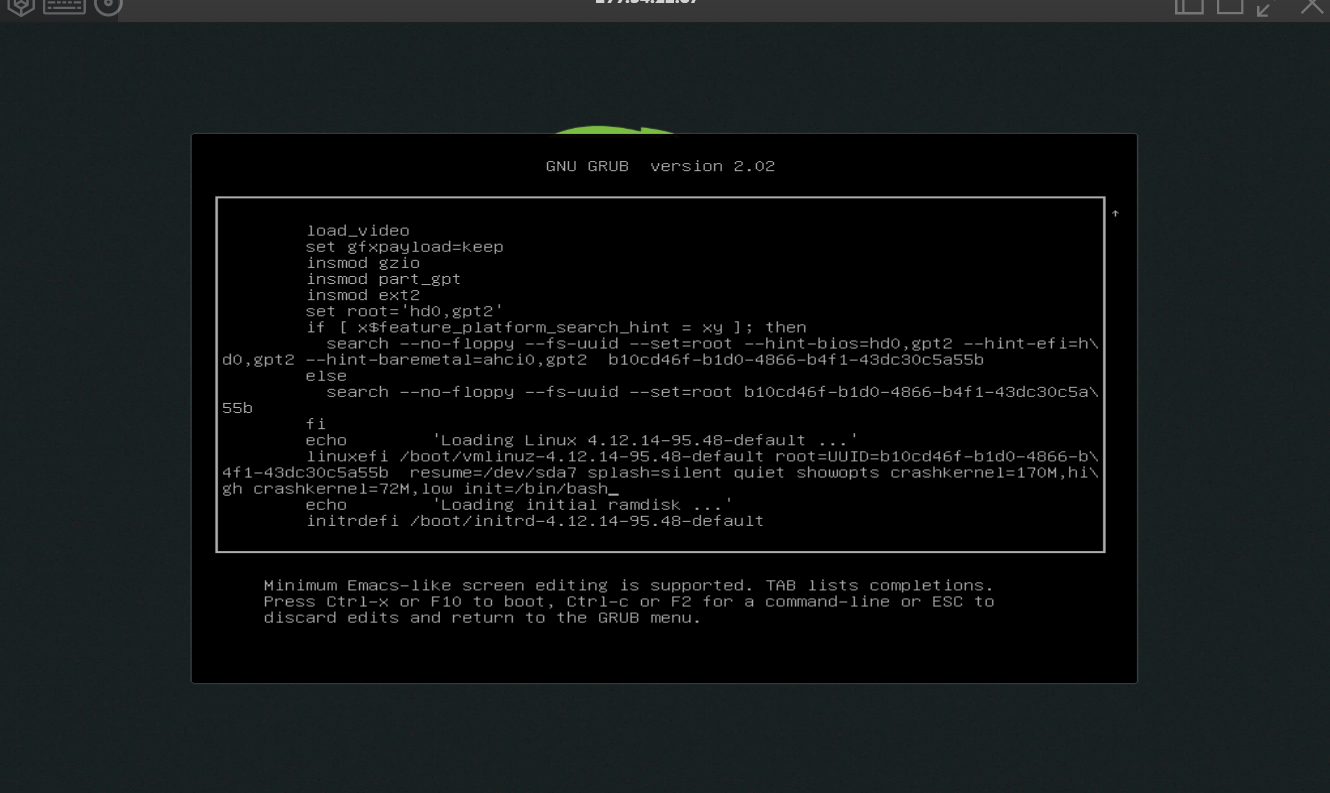
edit suse grub

now you can will be booted into shell, but it will in readonly mode, to change to read, write mode type following commands

mount -o rw, remount /

after that type

chroot /

reset suse linux password

to reset password type following command followed by user name.

passwd root

then type exit and
type reboot

Enjoy
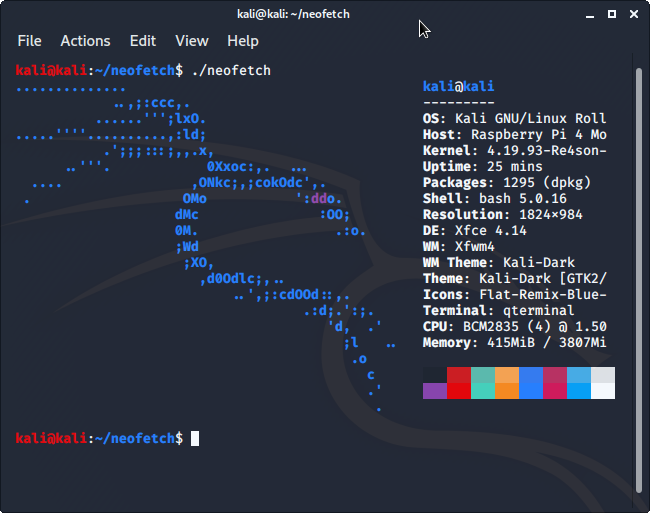
Installing Kali-Linux 64-Bit on Raspberry Pi-4

Installing Kali-Linux (64-bit) in Raspberry Pi-4

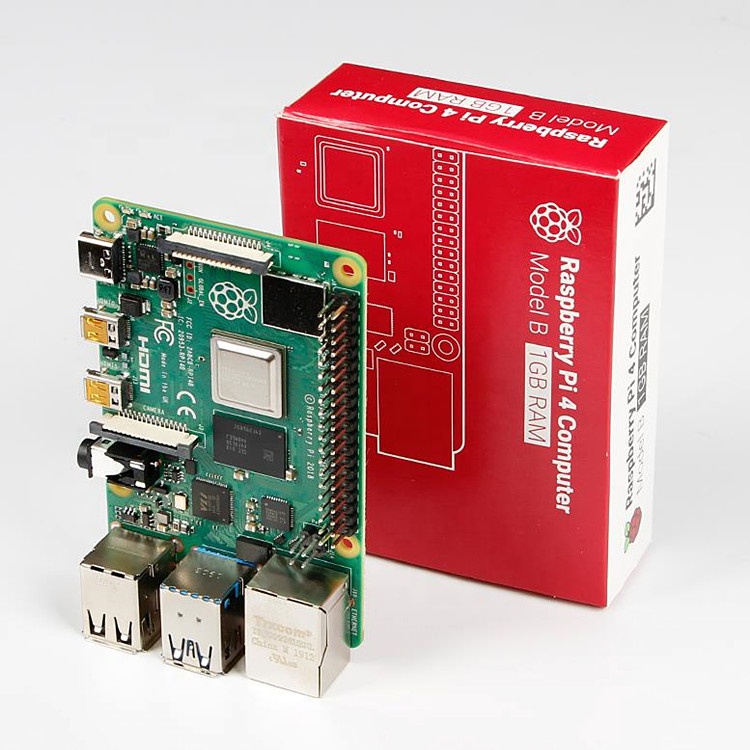
For the 64-Bit OS support we need to use Raspberry Pi 4
I’m using Raspberry Pi 4 Model-B With * Gigs of RAM, A 4GB RAM model would work just fine.

But First what is Raspberry Pi and what is it used for ?

he Raspberry Pi is a low cost, credit-card sized computer that plugs into a computer monitor or TV, and uses a standard keyboard and mouse.
It is a capable little device that enables people of all ages to explore computing, and to learn how to program in languages like Scratch and Python.
It’s capable of doing everything you’d expect a desktop computer to do, from browsing the internet and playing high-definition video, to making spreadsheets, word-processing, and playing games.

What’s more, the Raspberry Pi has the ability to interact with the outside world, and has been used in a wide array of digital maker projects, from music machines and parent detectors to weather stations and tweeting birdhouses with infra-red cameras.
We want to see the Raspberry Pi being used by kids all over the world to learn to program and understand how computers work.

Now please follow the following steps to install Kali-Linux on a Raspberry Pi 4

  • Step 1

Assemble and enclose the Raspberry Pi, We recommend a case with passive cooling or with a small fan and heat-sinks.
Yes of course you can the Pi without any case or cooling setup, But we recommend to use a cooling case for protection and better performance.

  • Step 2

Download Kali-Linux Image from the official website.
You can get the download link from the below URL.
You need to select ARM image category, then choose the Raspberry Pi 64-bit Image.

  • Step 3

Now you need to write this image to a Micro SD card, Which you are going to use it on your Raspberry Pi.
You can use either Balena Etcher or the official Raspberry Pi imager for this task.

Here we are using the official Raspberry Pi imager. You can download the imager from the following URL.
https://www.raspberrypi.com/software/
Here is the download link for Windows machines
https://downloads.raspberrypi.org/imager/imager_1.6.2.exe

  • Step 4

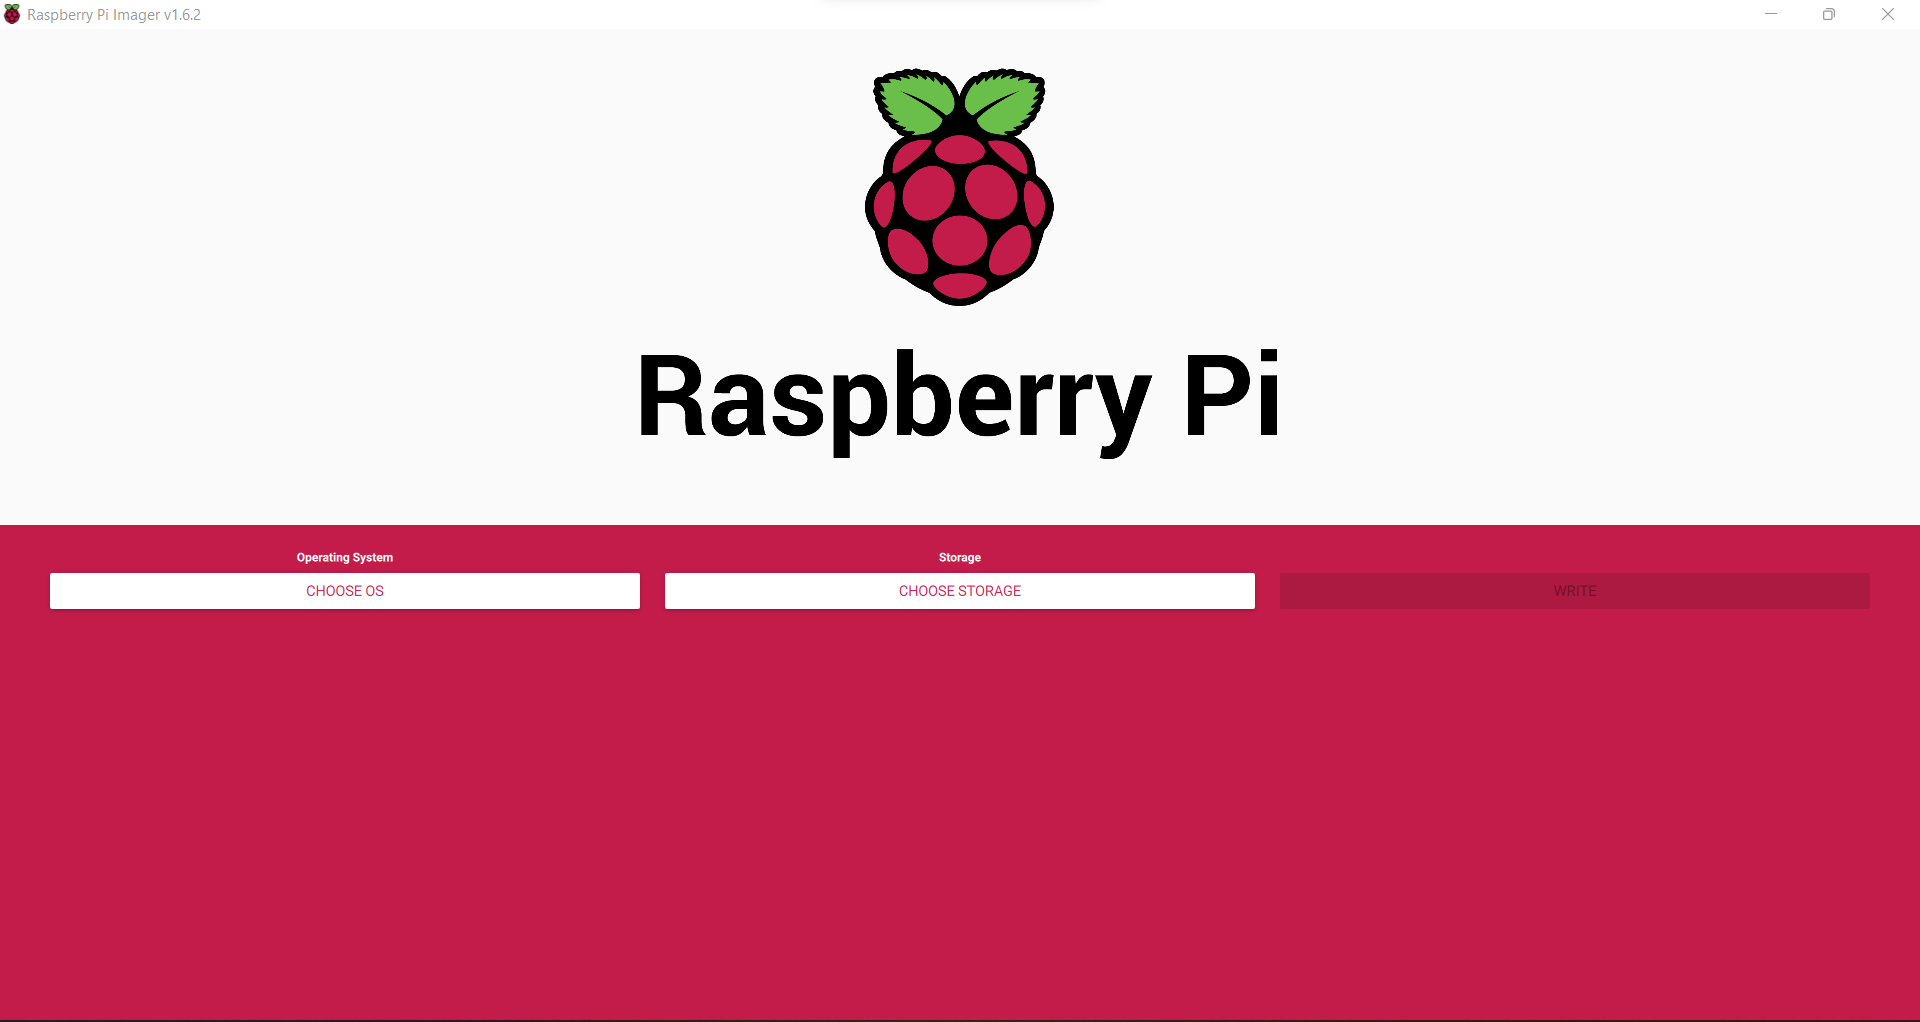
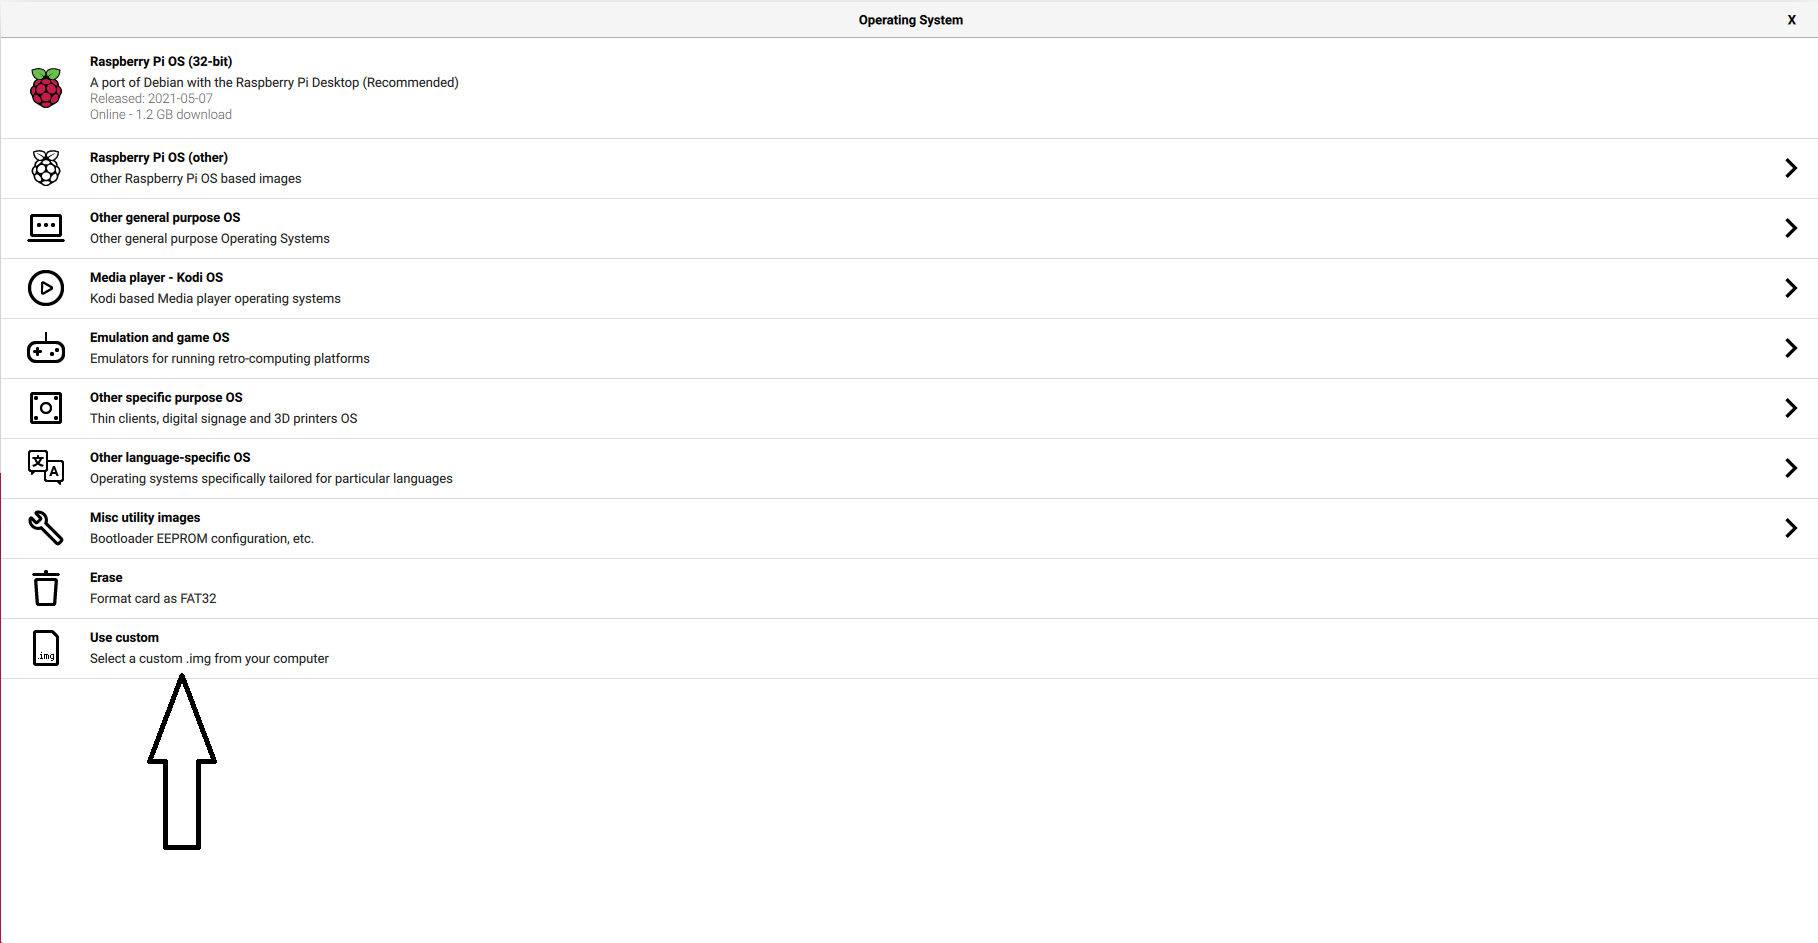
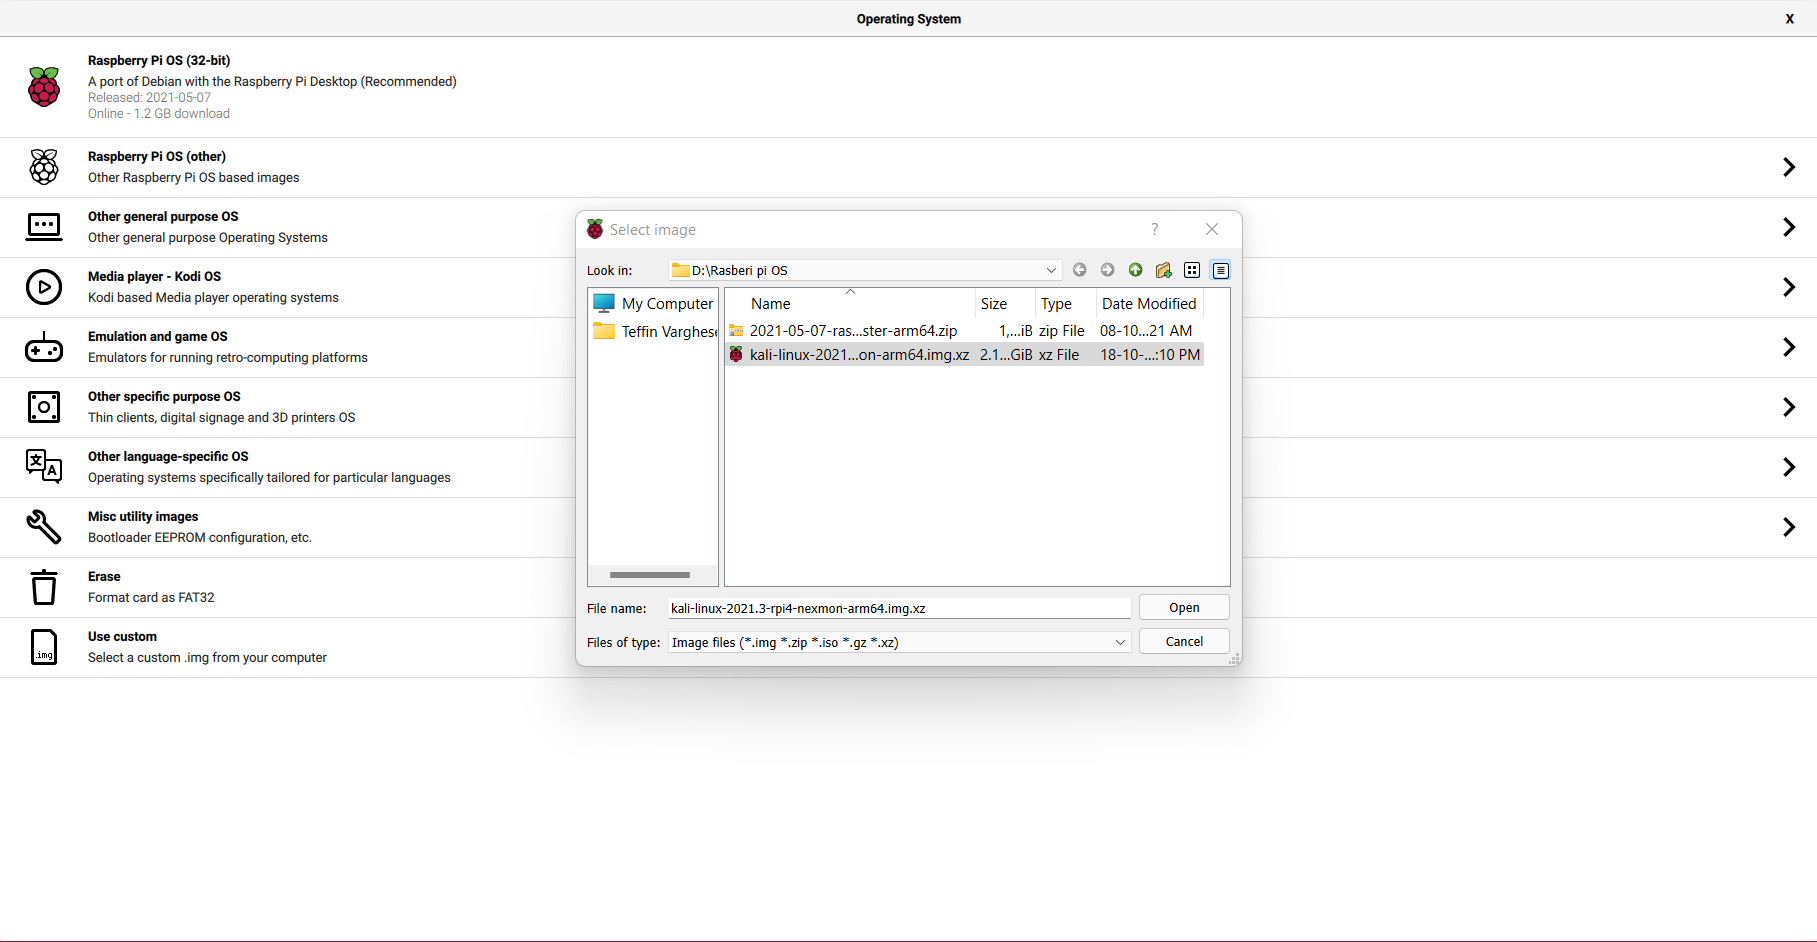
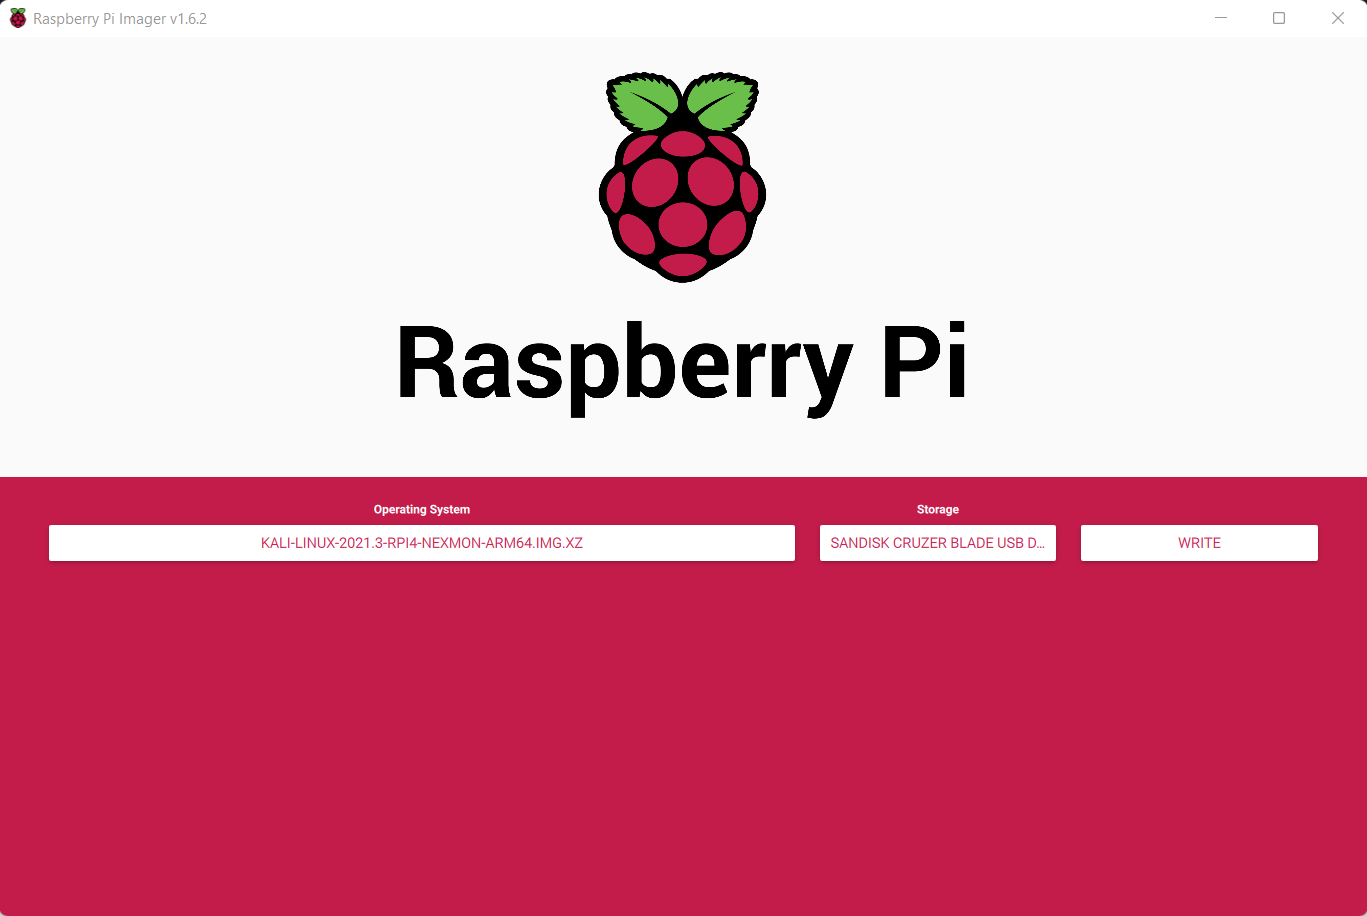
Write Kali-Linux image to the Micro SD-Card. Please follow the following images.

1, Launch the Pi Imager and select Choose OS.

2, Select the option “Use Custome” for our Kali-Linux Image

3, Browse and choose the Kali-Linux Image we have downloaded from our PC.

4, Now select storage and choose our micro SD-Card and click write to write the Image.

Note: Please make sure you have selected the correct storage, In our case the SD-Card. If you choose the wrong location the imager will wipe the selected storage location.

  • step 5
    Insert the Micro SD-card to your Raspberry Pi. Plug in your Raspberry Pi Power-Brick to the device and
    connect your Pi to a monitor, also plugin your Mouse and Keyboard as well, Then power-on the power brick.

It will take some time for the initial bootup, Wait for it. If everything is perfect your Raspberry Pi will boot into Kali-Linux.

That’s it, Have fun.

How to reset forgotten root password in FreeBSD.

Introduction.

FreeBSD is an operating system used to power modern servers, desktops, and embedded platforms. A large community has continually developed it for more than thirty years. Its advanced networking, security, and storage features have made FreeBSD the platform of choice for many of the busiest web sites and most pervasive embedded networking and storage devices.

FreeBSD is a free and open-source Unix-like operating system descended from the Berkeley Software Distribution, which was based on Research Unix. The first version of FreeBSD was released in 1993.

Now lets check how can we reset forgotten root password in FreeBSD.

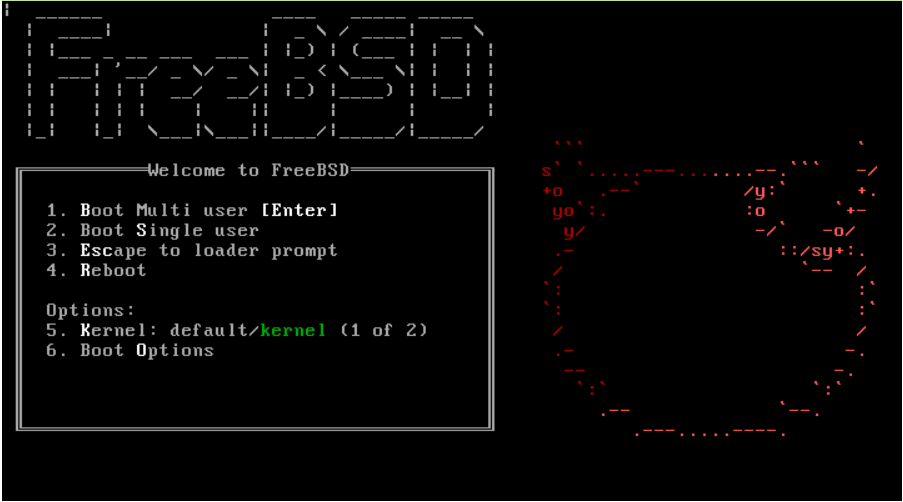
Step #1 : Reboot / Restart the server and boot into Single user mode.

You can press "S" at the boot prompt for entering the Single user mode.

Step #2: Mount the filesystem on the server.

root filesystem will be mounted read-only by default, you will need to remount it using the mount -ruw / command to give yourself read/write access. Run mount -a to remount all filesystems specified in the /etc/fstab file.

Step #3: Reset the root password.

You can reset the root password using the command passwd and set a new password on the server.

Step #4: Reboot the server.

That's it, when the server boots back to the OS you can login with the new password.

Cheers!!!

Please check our recent post about how to reset ubuntu server forgotten password.

How to Reset forgotten the Root Password in ubuntu server

Introduction

If you forget your root password of your ubuntu server you can use this method.

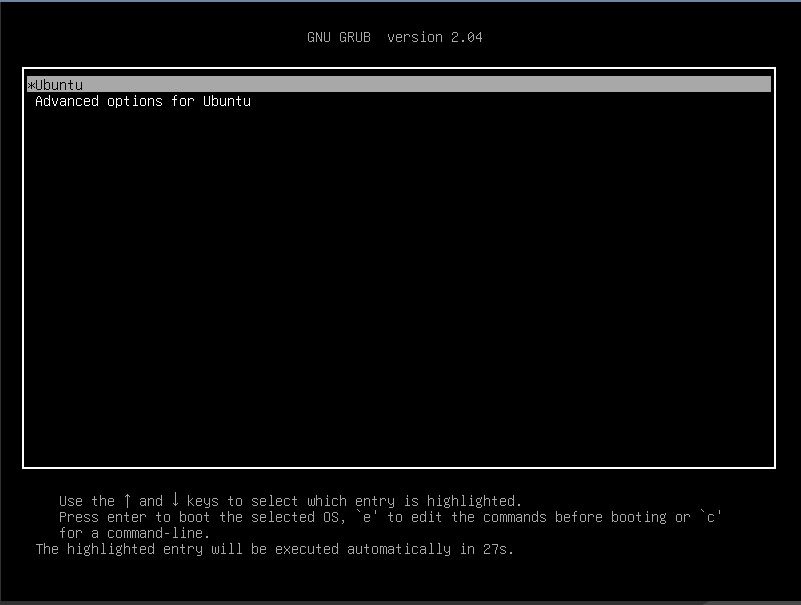
If you are using a bare metal server or a vps all you have to do is restart your server and press escape "ESC" key.

this will prevent Server OS to boot and bring up the GRUB boot promt. if you skip this step and boot in to OS then you need to restart your server again.

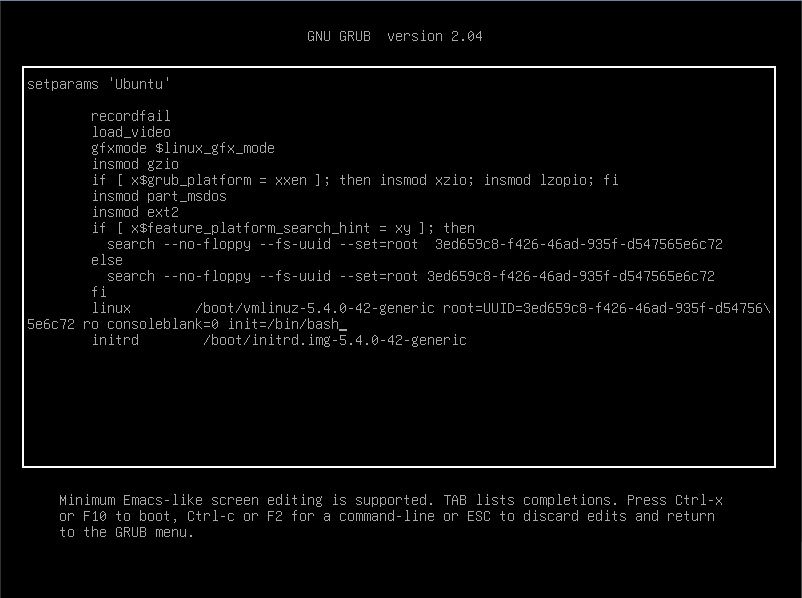
At the GRUB boot promt, press " E " to edit the first boot option which will be " Ubuntu "

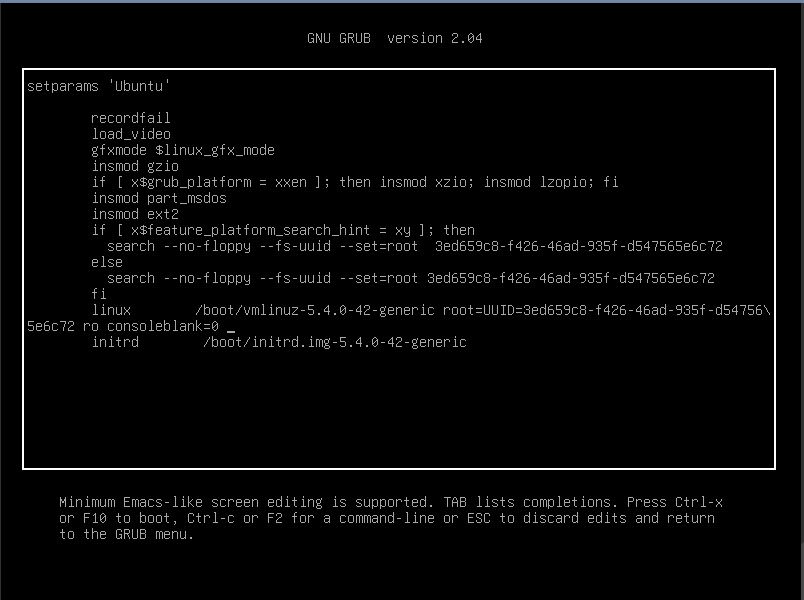
Find kernal line starting with

 linux /boot/

add space in the end of that line and add this command

init=/bin/bash

Press CTRL + X or F10  to boot into single-user mode.

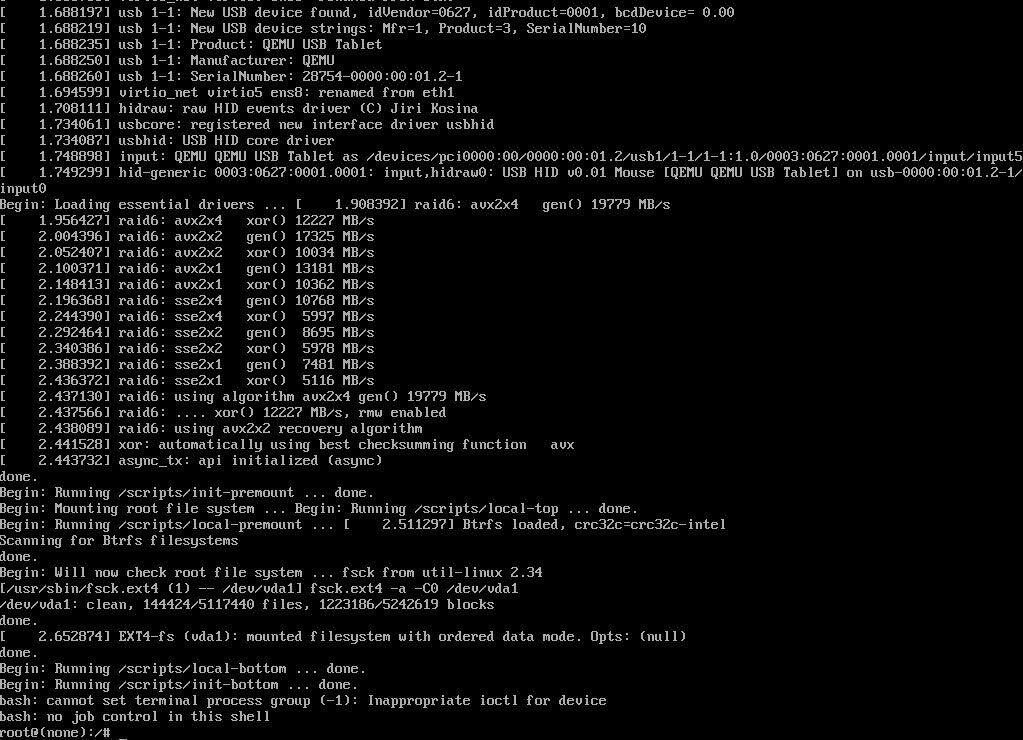
the system will boot and you will see the root prompt.

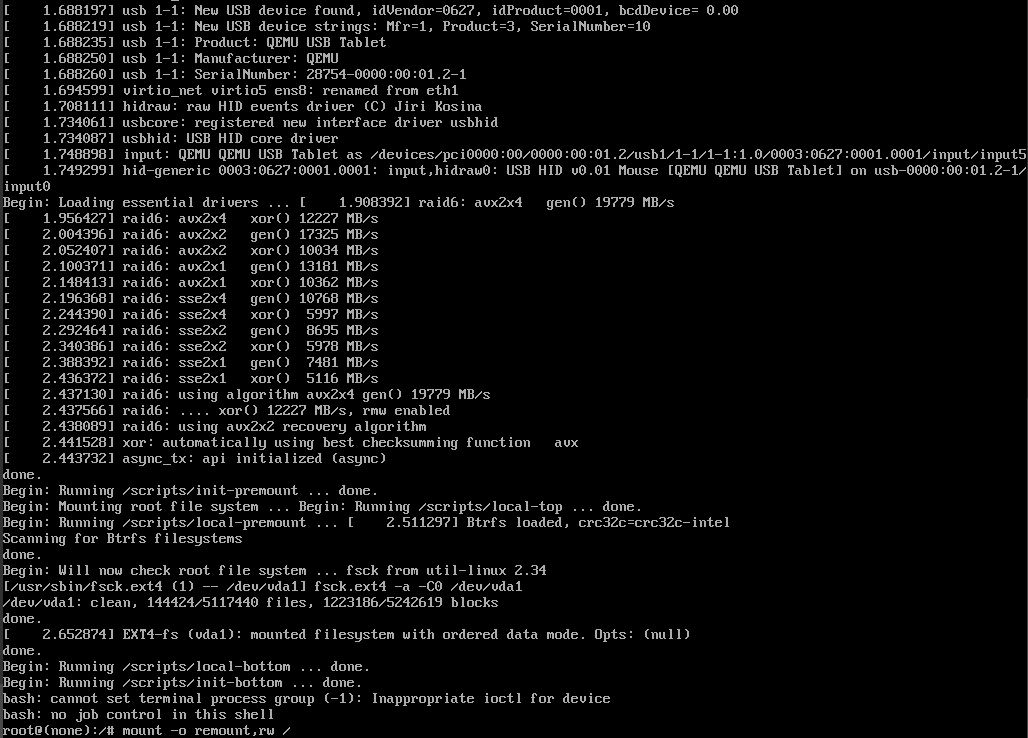
 mount -o remount,rw /

type above command to mount the system volume, for me it gives me an error but works.

now type command to reset your password.

passwd

This will ask you to type your password twice to confirm then reboot the server.


Hope this will help you, if you have any question please let me know.

MySQL Bin Files Eating Lots of Disk Space (fix)

Some time you may find MySQL stopped working and failed to start, and if you check status of MySQL using "systemctl status mysql" or "journalctl -xe" you can find that your "filesystem is out of space"

Trouble Shooting

OK first of all, we have to determine which disk partition is full, MySQL can be configured to store data on different disk or partition. by default it will be stored in /var/lib/mysql , i am going to use df command and find out how much space it uses, btw my vps has 20Gb of file system.


root@testserver:~# du -sh /var/lib/mysql
13G    /var/lib/mysql
root@coversunkochi:~#
root@coversunkochi:~# lsblk
NAME    MAJ:MIN RM  SIZE RO TYPE MOUNTPOINT
sda       8:0    0 19.1G  0 disk
├─sda1    8:1    0   19G  0 part /
├─sda14   8:14   0    1M  0 part
└─sda15   8:15   0   61M  0 part /boot/efi
root@coversunkochi:~#
root@coversunkochi:~# df -h /
Filesystem      Size  Used Avail Use% Mounted on
/dev/sda1        19G  18.6G   403M  99% /

As you can see my vps has a root directory of 19 Gb and /var/lib/msql uses 13Gb. and total of 18.6 Gb is used by filesystem. 

To Fix this i have 3 Methods.

  1. Manually delete Log files.
  2. Using MySQL (Only works if mysql is starts)
  3. Set Persist binlog settings(this will automatically delete logs after number of days you set)

Ok Lets get started.

Method #1 Manually Delete Log files.

you need to change directory to /var/lib/mysql, if you type type "du-bsh *" you can find your logs some thing like this, for tutorial i have only listed binlog files you can see the file name binlog.000141 to binlog.000148 these are the files which consumes most of you filesystem.


root@coversunkochi:/var/lib/mysql# du -bsh *
48M     /var/lib/mysql/binlog.000141
102M    /var/lib/mysql/binlog.000142
67M     /var/lib/mysql/binlog.000143
104M    /var/lib/mysql/binlog.000144
102M    /var/lib/mysql/binlog.000145
101M    /var/lib/mysql/binlog.000146
103M    /var/lib/mysql/binlog.000147
44M     /var/lib/mysql/binlog.000148

you can also find bindlog.index file this contains log files name, you be careful to do some thing stupid, you need take a backup first, then edit this file and remove indexing "remove names of logs" then save this.
after that you can delete files which is not in the index
now you can restart msyql it will start.

Method #2 Using MySQL

If you MySQL is still working you need to access MySQL then type following command, login to MySQL.


mysql> SHOW BINARY LOGS;
+---------------+-----------+-----------+
| Log_name      | File_size | Encrypted |
+---------------+-----------+-----------+
| binlog.000141 |  50260145 | No        |
| binlog.000142 | 106706425 | No        |
| binlog.000143 |  69240464 | No        |
| binlog.000144 | 108516594 | No        |
| binlog.000145 | 106324989 | No        |
| binlog.000146 | 105725450 | No        |
| binlog.000147 | 107466759 | No        |
| binlog.000148 |  98082094 | No        |
+---------------+-----------+-----------+

this will list your binary logs index, to delete logs to a certain number, i am going to delete binlog.000141 so i need to type command like this, the number mentioned below is the number of log which should apper in index file after removing, so in our case 141 will be deteted or all logs from 1 to 141 and rest of the logs will remain.


mysql> PURGE BINARY LOGS TO 'binlog.000142';

I have put MySQL logs for comparison before and after doing the purge.


mysql> SHOW BINARY LOGS;
+---------------+-----------+-----------+
| Log_name      | File_size | Encrypted |
+---------------+-----------+-----------+
| binlog.000141 |  50260145 | No        |
| binlog.000142 | 106706425 | No        |
| binlog.000143 |  69240464 | No        |
| binlog.000144 | 108516594 | No        |
| binlog.000145 | 106324989 | No        |
| binlog.000146 | 105725450 | No        |
| binlog.000147 | 107466759 | No        |
| binlog.000148 |  98082094 | No        |
+---------------+-----------+-----------+
8 rows in set (0.01 sec)

mysql> PURGE BINARY LOGS TO 'binlog.000142';
Query OK, 0 rows affected (0.01 sec)

mysql> SHOW BINARY LOGS;
+---------------+-----------+-----------+
| Log_name      | File_size | Encrypted |
+---------------+-----------+-----------+
| binlog.000142 | 106706425 | No        |
| binlog.000143 |  69240464 | No        |
| binlog.000144 | 108516594 | No        |
| binlog.000145 | 106324989 | No        |
| binlog.000146 | 105725450 | No        |
| binlog.000147 | 107466759 | No        |
| binlog.000148 |  98195420 | No        |
+---------------+-----------+-----------+
7 rows in set (0.00 sec)

Method #3 Set Persist binlog settings.

Now we can set automatically delete old log files!

In MySQL 8.0, use binlog_expire_logs_seconds instead, where the default value is 2592000 seconds (30 days). In this example, we reduce it to only 3 days (60 seconds x 60 minutes x 24 hours x 3 days):


mysql> SET GLOBAL binlog_expire_logs_seconds = (60*60*24*3);
Query OK, 0 rows affected (0.00 sec)

mysql> SET PERSIST binlog_expire_logs_seconds = (60*60*24*3);
Query OK, 0 rows affected (0.01 sec)

Enjoy.

SET PERSIST will make sure the configuration is loaded in the next restart. Configuration set by this command is stored inside /var/lib/mysql/mysqld-auto.cnf.

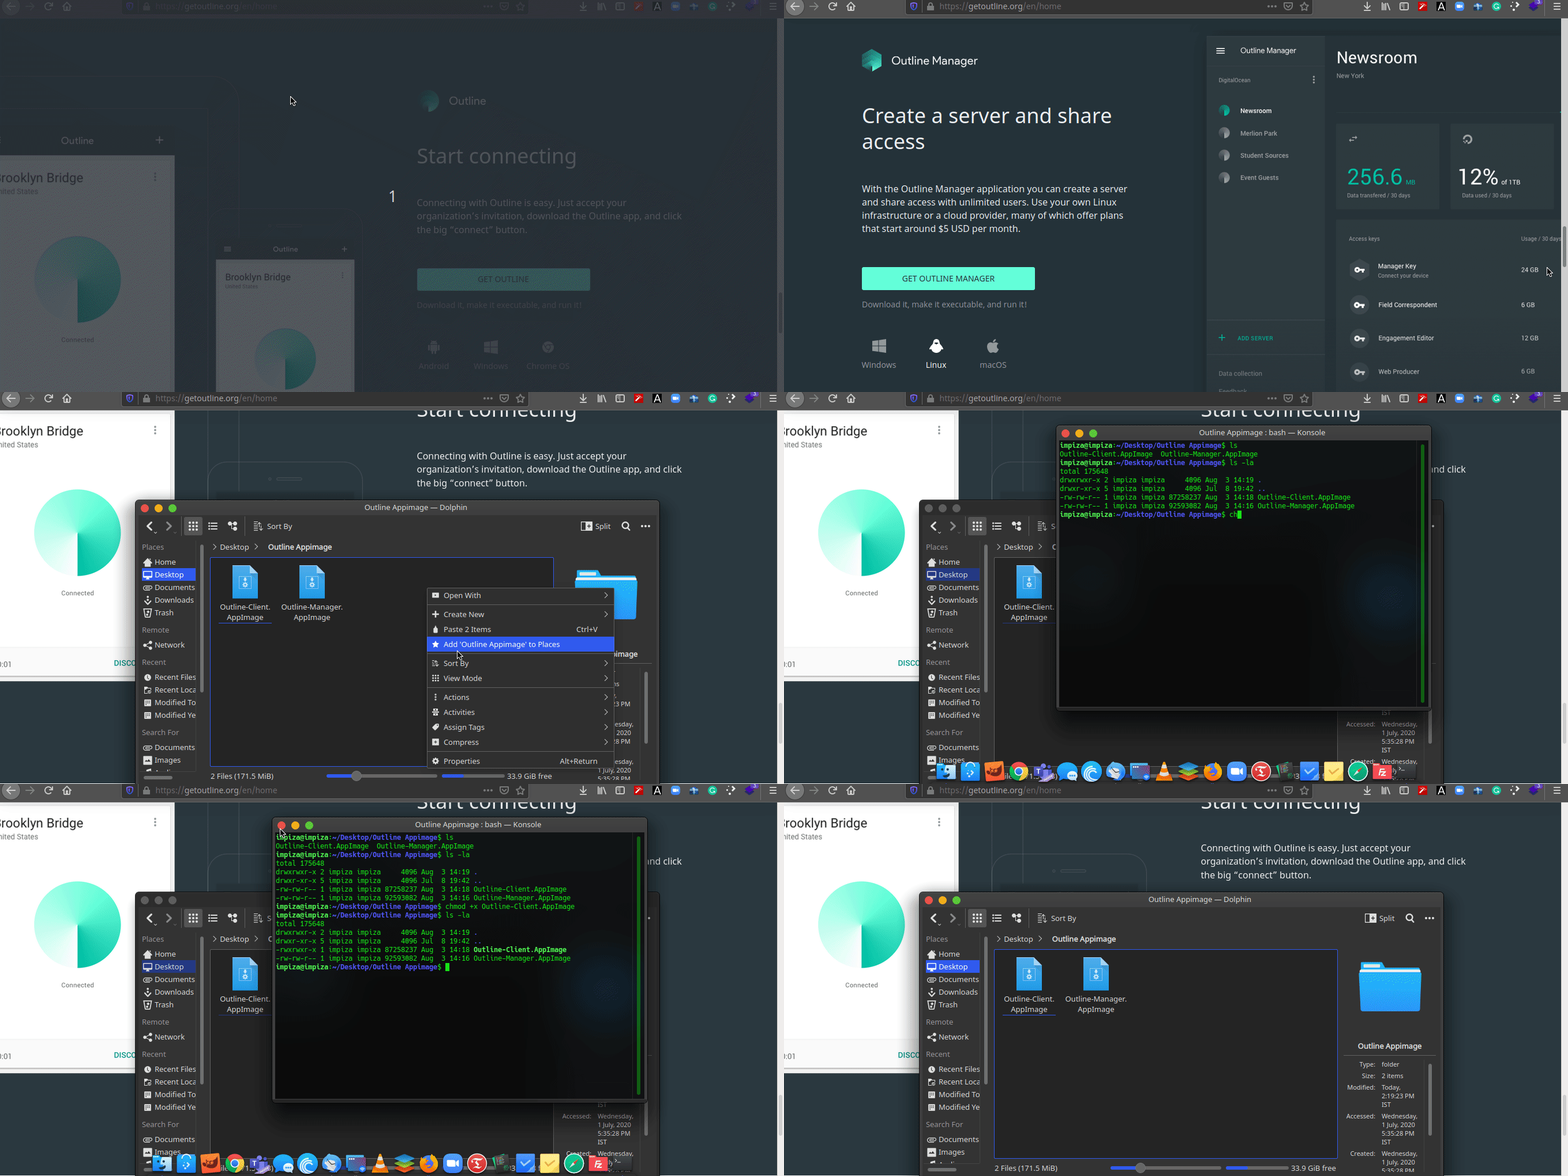
How to create your own vpn server

For creating a VPN you will need these things.

  • A VPS(Virtual Private Server), I am using Ubuntu-based VPS

Here is the link for a free credit of 100$ with this you can create a VPS for free and test it if you like then you can continue.


For Free $100 Credit for VPS use this link

Then you will need

  • ssh client Since I am using Linux for this demo I will be using remmina, or you can use a terminal.
  • Outline Manager and Outline Client ( I am using Outline as a VPN server, it's opensource and free.) here is the link to outline website  https://getoutline.org/

Your content goes here. Edit or remove this text inline or in the module Content settings. You can also style every aspect of this content in the module Design settings and even apply custom CSS to this text in the module Advanced settings.

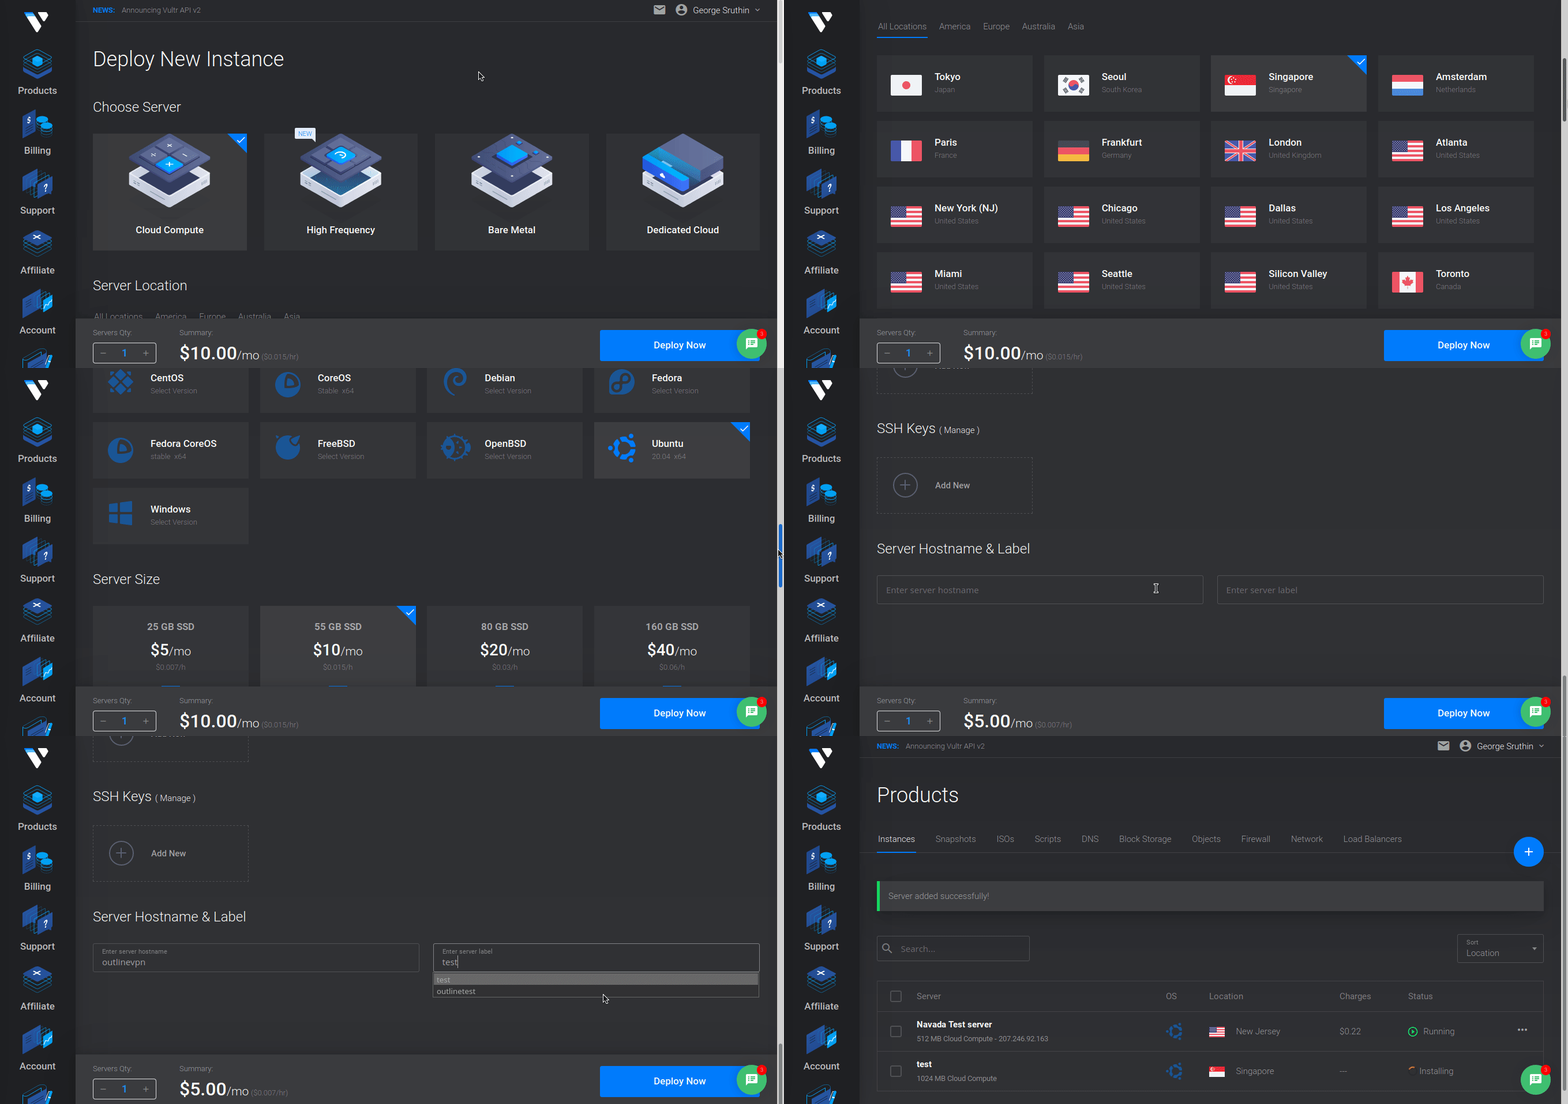
Ok, Let's get started, first create a VPS server, register your account and deploy your VPS server, i am using Vultr as VPS hosting provider, they have multiple datacenters in multiple continent.  

For Free $100 Credit for VPS use this link

after creating account on Vultr, you need to go to products, Click plus icon and click on create new server, this will redirect your page and follow below steps. wait for some time till your new vps server is up and running.


after that you will get your new VPS server listed in your product section, then open it now you can see, server detail including your server IP, user name, password. etc.

you need to note down 3 things,

  • Server IP
  • username
  • password

now you have open your ssh client and connect to your VPS server.

i will put  a link here how you can do that.

after connecting to your VPS, first thing you need to do is update & upgrade your server if available. please follow this command to update and upgrade.

for update use this command

sudo apt update

for upgrade use this.

sudo apt upgrade

for restart use this

sudo reboot now


then restart reconnect to your server, then go to outline VPN website and download outline manager and outline client. and move both files to a directory so that you can find that files easily. then make those files executable. i will give you detailed tutorial below. there is gui method also available its depends on the distro you are using.

https://techridez.com/blog/make-file-executable-using-terminal/

Ok now open Outline-Manager.Appimage

since its already executable you just need to double click.

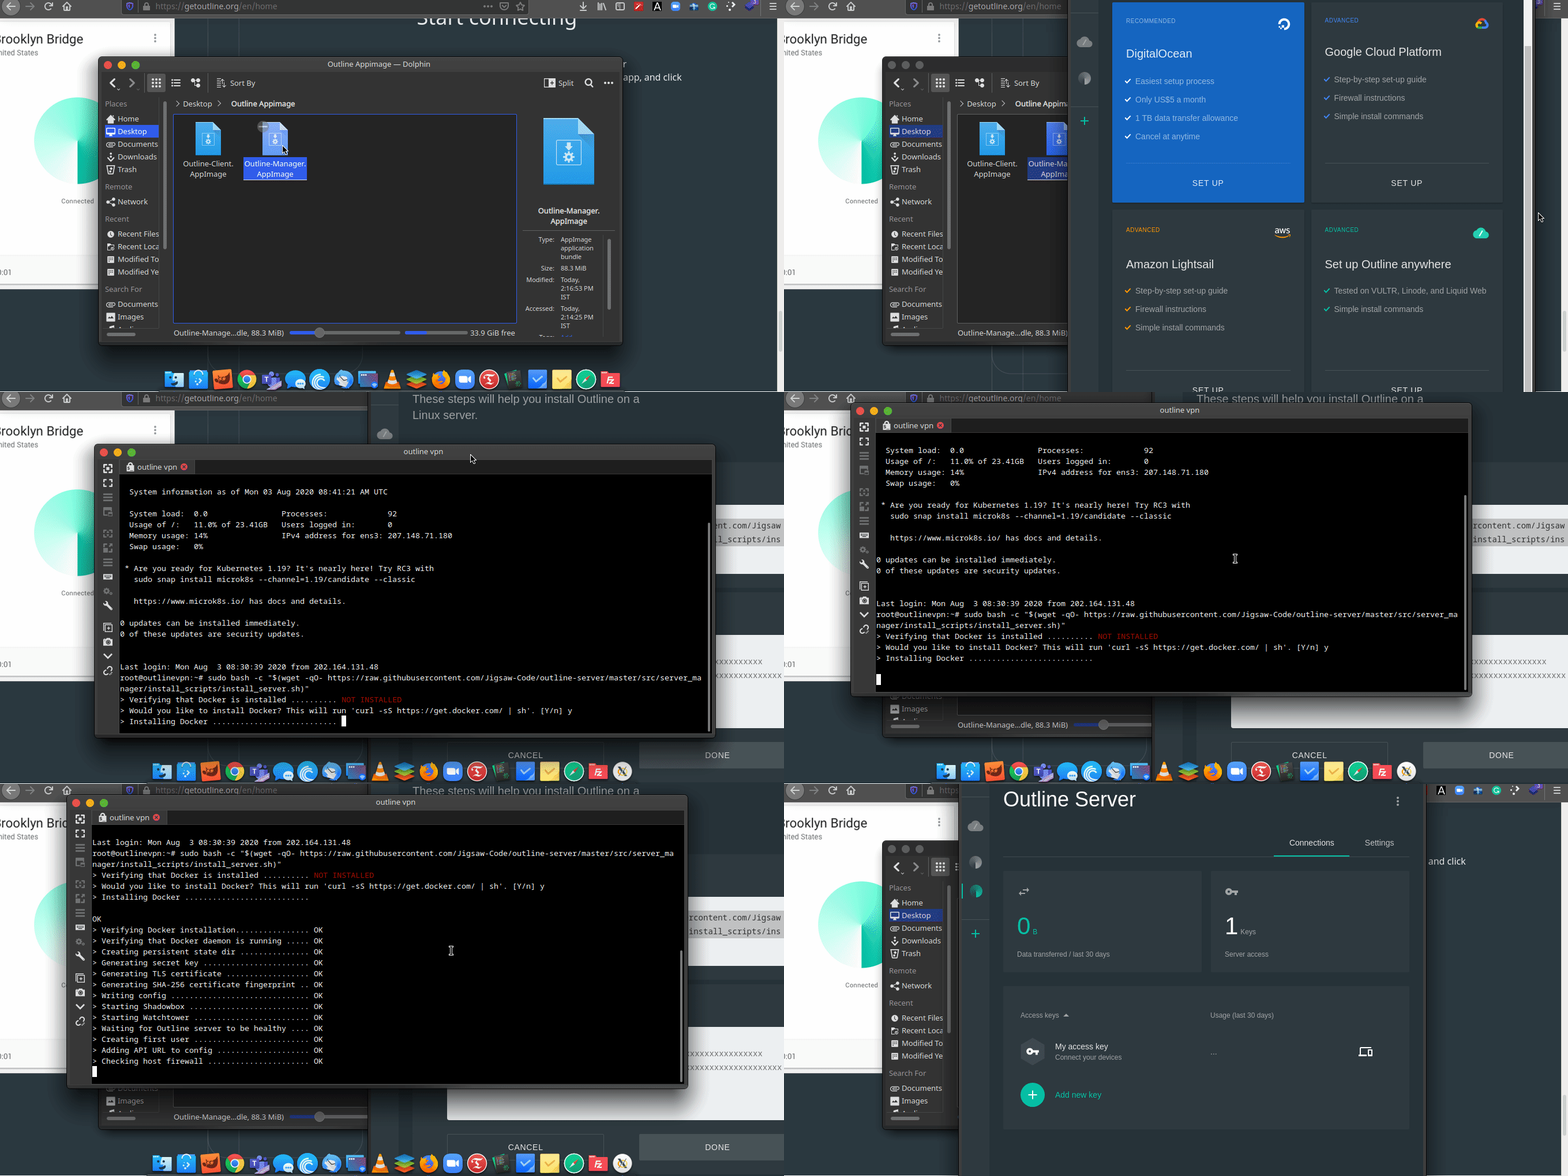
it will open Outline Manager, and you can find 4 options.

  • Digital Ocean
  • Google Cloud
  • Aws Cloud
  • Advanced option.

we will use Advanced option. this will give you a command line, you need to copy that and paste in the ssh client which is connected VPS server.

as you can see from above, after pasting those command to VPS Server it will install docker, it will takes some time, after that you will get API key as output which is highlighted in green, copy that and paste it in field in the Outline Manager.

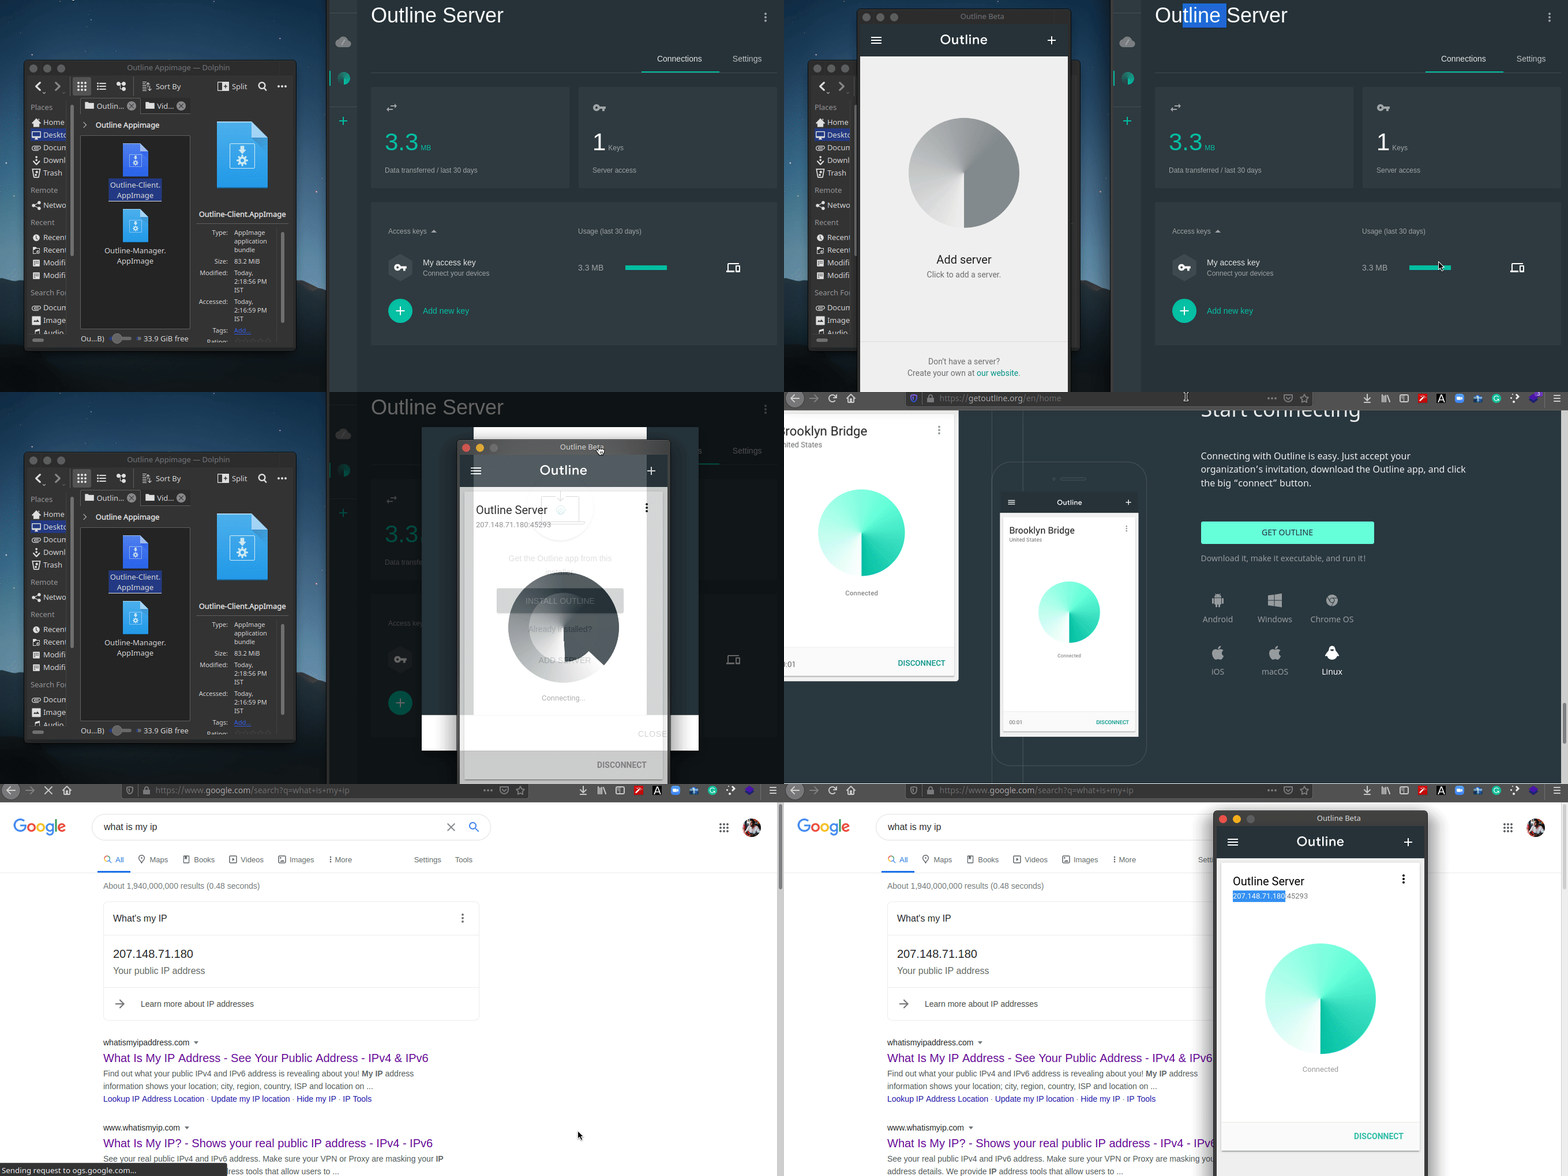
then open outline client, go to outline manager copy key, and add server to the client.

Now your VPN Client is ready. as you can see about my public ip is also changed to the vps serve we are using.


Enjoy.


If you want a details video please watch my youtube channel. also i have put the youtube video below

Pin It on Pinterest