Select Page

How to Convert batch file to Exe

Things you need

  • advancedbattoexeconverter.exe
  • a batch file


Now we have to add script to script file and verify it , if its works we can continue to further setup, then download advancedbattoexeconverter.exe and install in your system, Click to download app


I am using a simple script "which will show ipconfig result"for this tutorial , SORRY i have mistakenly named script file to ping.bat instead of ipconfig.bat 😀

Right click the batch file and click on "Open with Advanced BAT to EXE" option

Within the app you can read or edit script you have created, there are a lot of customization available, but i am skipping it and going to build exe, click on the "Build Exe" Button

This will popup a new windows, there you can add EXE icon, version file embed files and password, But for this tutorial i am going to just build the app, for that just click on Build EXE button , this will ask to save the exe file


save the file as exe, now you can run this file just like an application


Converting script to an exe will ensure more security, others will not get much confidential details whats running background and for the users this will be much more easier to click on a single app installed of executing a script file which is more complex and difficult for them, you can also create silent installation scripts to install application to systems using this kind of method

HPE completes Nimble Storage acquisition

HPE has completed the acquisition of Nimble Storage, now a Hewlett Packard Enterprise company. This acquisition builds on our strategy to make Hybrid IT simple, through software defined infrastructure with a modern flash-optimized storage foundation. A report by IDC called the acquisition a “bold, strategic move” that will benefit our customers—and HPE couldn’t agree more.
The Nimble Storage offerings for predictive all-flash for entry to midrange segments are complementary to our scalable midrange to high-end HPE 3PAR solutions and affordable HPE MSA products. In addition, HPE will incorporate the InfoSight Predictive Analytics platform by Nimble Storage across our existing storage portfolio, which will enable continuity of products and deliver a transformed customer support experience.
With this acquisition, HPE will offer a full range of best-in-class all-flash storage solutions that will enable customers to compose the right storage for their exact application needs. Our comprehensive, flash-optimized storage portfolio across all workloads and resource requirements will provide:
  • Enterprise class for the all-flash datacenter: HPE 3PAR supports customers experiencing rapid growth and needing a highly scalable, all-flash data center capable of supporting up to millions of IOPS, petabyte capacity, and a multi-tenant architecture—priced from midrange to high-end.
  • Straightforward predictive flash: Nimble Storage is ideal for midmarket customers needing advanced, flash-optimized data services, including all-flash, hybrid-flash, and multicloud support, underpinned by machine-learning based predictive analytics, all at entry to midrange price points and designed with ease-of-use at its core.
  • Simple flash acceleration: HPE MSA and HPE StoreVirtual have an installed base of over 500,000 deployments worldwide and are suited for price-sensitive small site customers that need simple, flash tiering support at an entry price point.
  • Built-for-enterprise hyperconverged infrastructure: Nimble Storage also complements our recent SimpliVity acquisition for the growing hyperconverged market for those deploying turnkey VM-farms. The combination of SimpliVity, Nimble Storage, and HPE 3PAR enables customers to deploy the right data services across all workloads, scale and deployment types.

Login with an SSH Private key in Linux or Mac Terminal

First you need following things :

  • generate private key from your hosting site ( i used godaddy cpanel )
  • username of cpanel
  • password of cpanel
  • finally passphrase which you have given when creating private key

Download your private key from your hosting site to your desktop , i have download my key from godaddy cpanel , you can find a file named " newssh " which is a private ssh key * name of private may vary

i have renamed the file " newssh " to " newssh.txt " , i have just changed the file extension , so that it can readable by terminal or you can read it using any text based editor like vim , nano or gedit

now you need to move this file from Desktop to your Home Directory , because when you open your directory it will mount home as the default directory

now you can see the " newssh.txt " file is listed in the terminal home directory

Run the following command to change the file permissions to 600 to secure the key. You can also set them to 400. *This step is required:


chmod 600 newssh.txt


To login you need to type the following details in the terminal , which loads the key in file newssh.txt and logs in as user ,to IP your server ip


ssh -i newssh.txt user@yourserverip


then press Enter key , now it will ask you for the passphrase which you have given at the time for private key creation , type the passphrase  , Press Enter


Congratulation you have successfully login to your server using ssh


How to create Vhd from Physical Disk

Its very easy to create vhd from physical disk,
First you need to download Disk2vhd utility from this url https://technet.microsoft.com/en-us/sysinternals/ee656415.aspx

Then run it as Administrator

Now you can see all drives which is associated with the hdd , select drive which you want to convert

to save it give vhd file name and location , then click create

after process complete you can find vhd file in the given exported path

now you can attach this vhd file to any hypervisor or windows diskmanager to access files in it , if it is bootable you can boot that inside virtualbox or vmware workstation

How to Enable God mode in Windows PC

To Create God Mode on your PC you need to login to your Windows Machine with Administrative privilege

Then Right Click on the desktop and create new folder in there

Then Rename it with following name

God Mode .{ED7BA470-8E54-465E-825C-99712043E01C}.

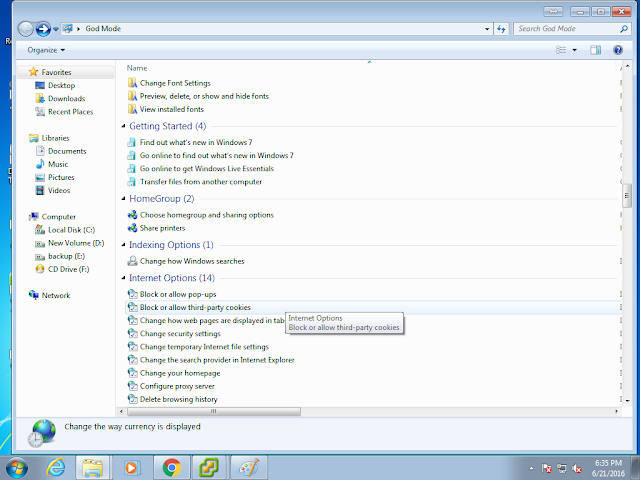
Double clicking this icon will give you access to many features like you see in this picture

Enjoy

Pin It on Pinterest